Wednesday, March 30, 2011

Phineas and Ferb...and the Imagine....and Colourlovers


My all-time favorite person to craft for is my little girl, Piper.  The walls of her room are filled with paper worlds of fairies, princesses, flowers, and animals with big eyes.  No one gives me bigger smiles and better hugs when she likes something... and no one is as honest when she does not. 

We watch Phineas and Ferb in the morning during breakfast so I was thinking this morning that I could make a little lunchbox card for her with those characters.  Although Cricut doesn't make a Phineas and Ferb cartridge, making a card with that theme is super easy with Google Images and the Colourlovers sites.  I have been curious to know if the two printers, my Imagine and my regular Canon office printer, would print matching quality colors.  This project would be a good test of that!

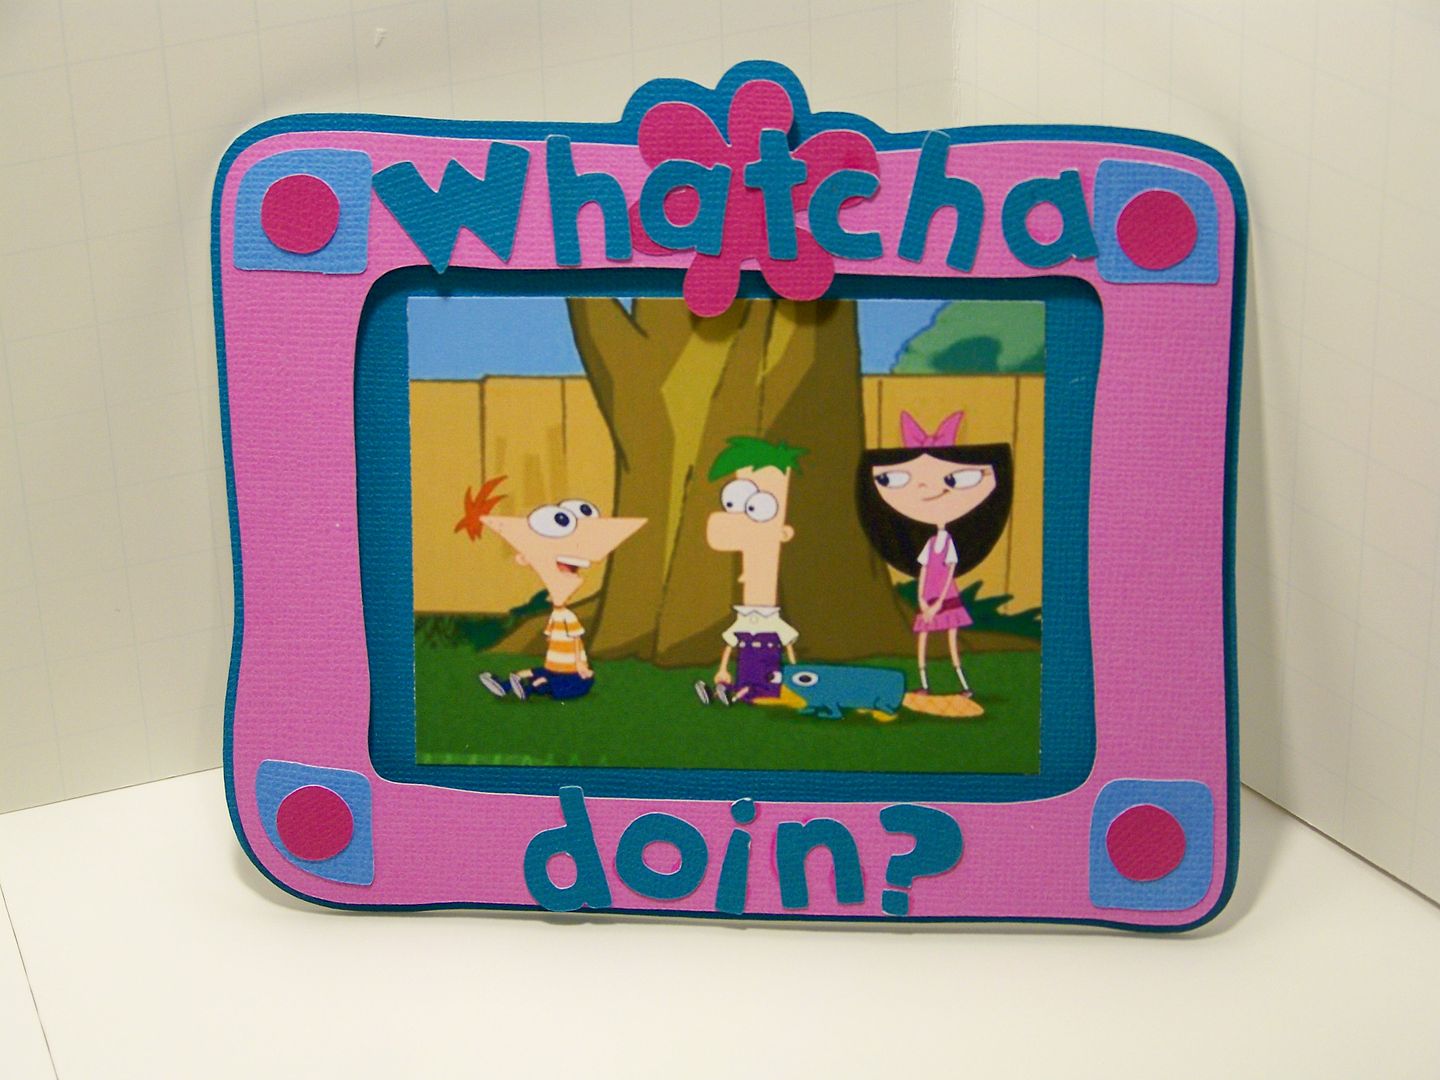
Using the Google Images search, I found a Phineas and Ferb picture that had Isabella, Piper's favorite character on the show (I guess because she is a girl and doesn't freak out like Candice, but who knows).  I saved the picture on my computer and uploaded it to photobucket.  I printed it as a single wallet size, 2.5x3.25 or so.

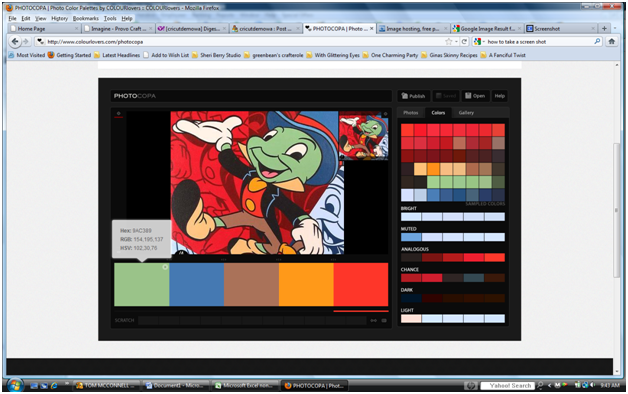
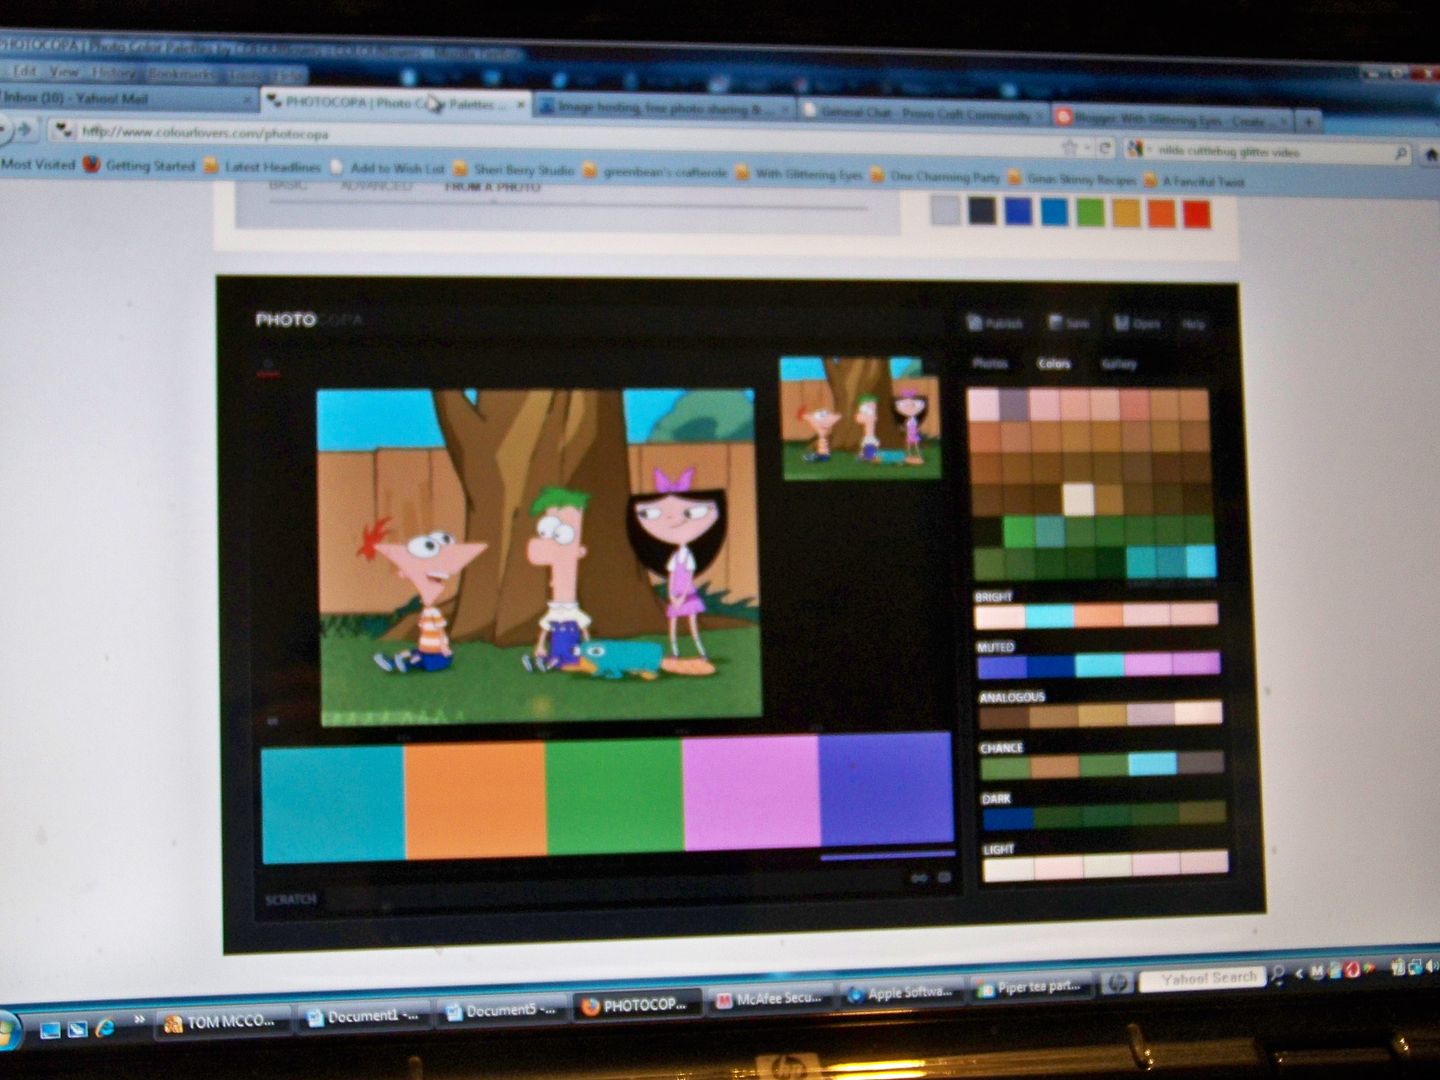
Then I went to the colourlovers site and uploaded my picture.  The site allows the user to pull any color out of an uploaded picture in order to obtain the RGB codes.  I wanted to duplicate the exact colors in the picture to make a little frame card.  You can find more info on how I did this by looking at an earlier post I made using this method by clicking here.  I love using this site!  If you would like to see the palettes I created for this picture, you can see those here.  The link will take you to my profile at Colourlovers.  There you will see "Phineas and Ferb" and "Phineas and Ferb2" palettes.

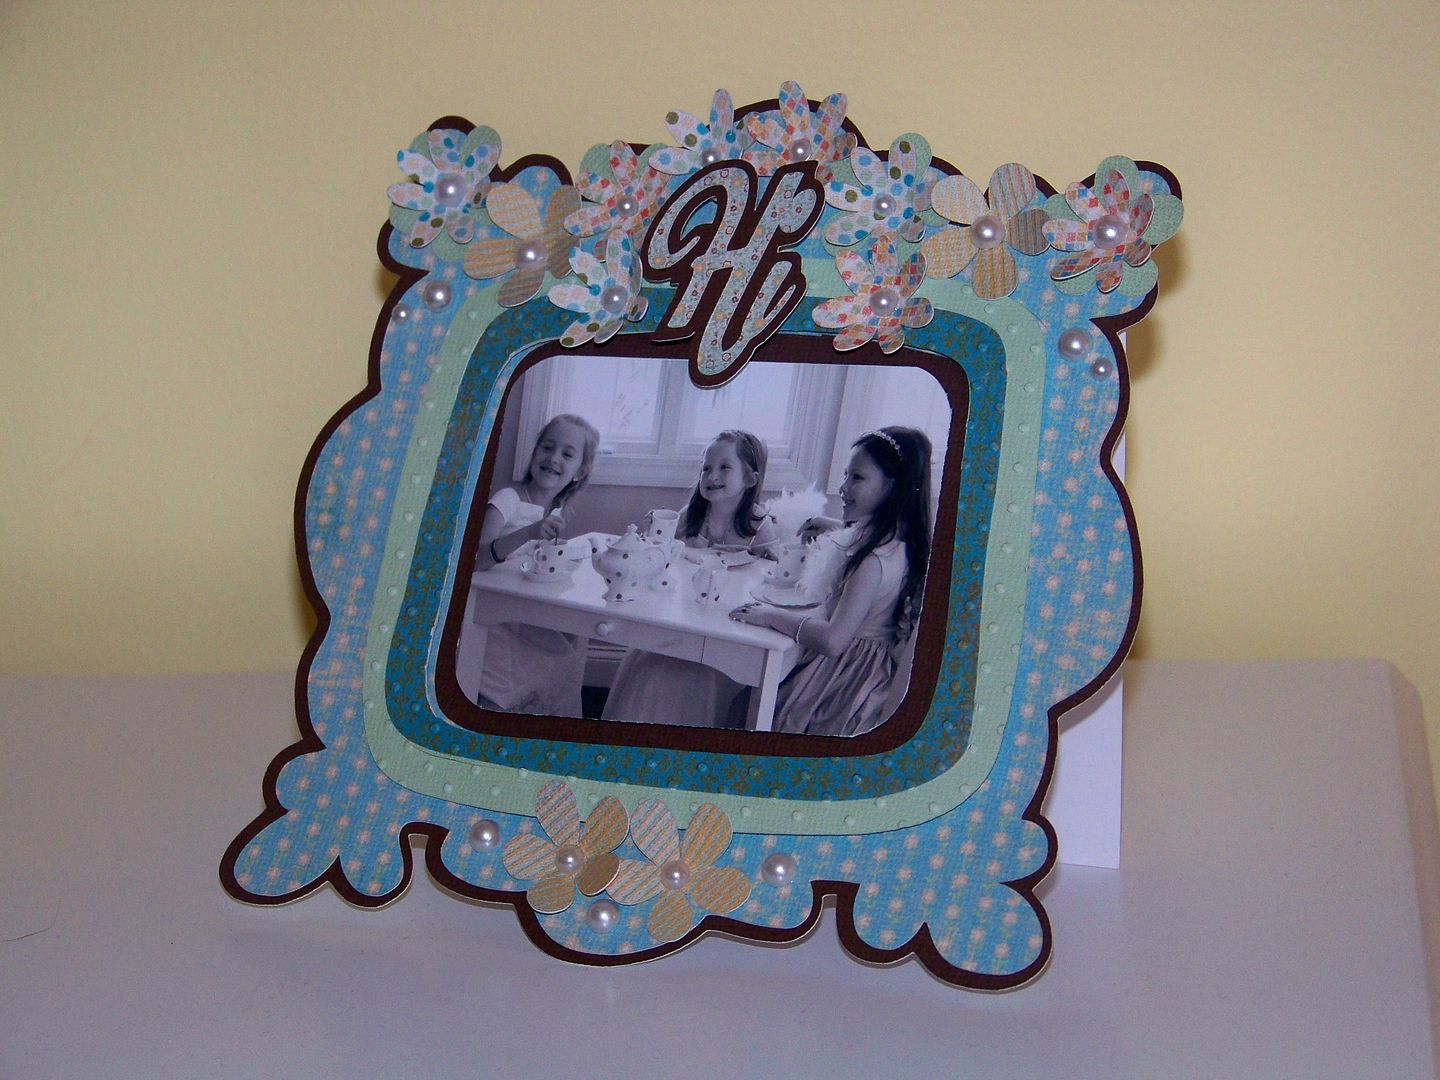
I used Live Simply to create a frame card on the Imagine at 4.6".  I used the following colors on the frame: Perry the Platypus (43,153,140), Isabella's dress (230,97,225), her belt (155,16,131), and the sky (107,190,232) to create the card.  The second layer is popped up with dots.  The letters were also printed in platypus color, using Mickey Font at .7".  For those of you who are not familiar with the show, Isabella's main line is "Whatcha doin?" in a little singsong tone (to explain the text I used).

I love how I was able to match the colors without worrying about having them in my stack!  It was super easy to find the RGB codes with Colourlovers and I even got to name a few new colors!  I was astounded that the printers do indeed have identical color quality -- so pleased!  This opens up so many creative doors! 

I hope my little critic approves of the card when she finds it in her lunchbox.  I am sure she will let me know!

Thank you for visiting my blog.  If you like frame cards, check out this one I did on the Imagine as well, using prints from Imagine More.  Frame cards are a super simple way to use those great frame features on some Cricut cartridges!  I am loving the Imagine and have been exploring what I can do with it.  I would love to hear from anyone using the Colourlovers site to obtain colors or to match colors.

Tuesday, March 29, 2011

By Jiminy (Cricket) I found RGB codes with COLOURlovers!


I just found a great new tool that I wanted to share!  After searching for RGB codes and seeing requests for licensed characters' RGB codes, I stumbled upon COLOURlovers.com and their great tool, PHOTOCOPA.

First, you need to upload your picture or find a picture.  I found the picture of Jiminy Cricket using Google Images by searching his name.  I hovered over pictures I liked in order to see the size.  You will need at least 256x256 to use the software, but you can always change the size if your picture is too small.

Next, I saved the picture to my computer by right-clicking and selecting 'save image as'.  Then I uploaded it to Photobucket. Once uploaded, copy the code for 'direct link'.

Next, go to the ColourLovers website and select PHOTOCOPA from the tools (or click here). Click on the 'photos' button, enter your URL, and click 'load photo'.  A sample of all the colors in your image will show up on the right.  Under your picture, you will see five blocks.  You can click on a block and then click on a color in your image and the color will also appear in the box!  Hover over the box to get  the RGB code for that color.

One thing to keep in mind is that colors can vary based on your image.  I found two images of Jiminy Cricket.  They both looked like the right colors, but the colors did not not match.
This should remind us that although they do not match, both images look authentic.  Either palette, I believe, would look great on the die cut image.

For those of you taking notes, the RGB codes for the first palette (JC2) are:
skin 156, 200, 141
hat 69,121,178
pants 170,114,89
ascot and button 255,153,25
vest 255,55,42
jacket 35,35,37

The RGB codes for the second palette (JC) are:
skin 215,228,159
hat 0,113,184
pants 173,123,2
ascot and button 236,217,53
vest 235,39,40
jacket 80,66,79

I loved this site and think the free tool will be a great help for future projects.  It works with photographs too, not just cartoons!  I was able to save my images and their palettes but unable to print until I published!  That is free too and you will get a URL.  For instance, the URL for JC2 is http://www.colourlovers.com/palette/1512990/JC_2.  One fun thing, if you publish a palette with colors that have not yet been named, you will have to name them.  This is why you will see Jimney Hat and Jimney Vest as two of my colors.  (Yes, I named them before I knew how Mr. Cricket spelled his name!)

Thank you for checking my blog.  I hope you found this helpful!


Saturday, March 26, 2011

Just Because Challenge

I am loving the coordinated patterns on Imagine More!  How easy it was to quickly make this card, saving the time I usually spend choosing papers!  This is my entry for Weekly Challenge #26:  Just Because Challenge. The requirements were so broad, simply to make a 'just because' card, that I thought it was a great time to try more ideas on my new Imagine.

I started with a black and white picture of my daughter and her little friends -- another mom posted this on Facebook and I grabbed it right up!  I love how natural they look, elegant and happy!


I used a frame from Live Simply, cut at 6.2".  I embossed a couple layers of the frame and popped them up.  I adhered my picture (after chomping the corners) with popdots.  The flowers are all from George, cut at 1" and embellished with adhesive pearls.  'Hi' is from Sentimentals, cut with a shadow, at 1.5".  It is popped up with stacked popdots to compete with the height of the dimensional flowers.

I used my ATG gun to adhere the frame to a white cardstock card.  I cut it smaller than the frame so as not to show from the front.
This was a super quick card that was made so easy by using the coordinated patterns and solids on Imagine More!  All the papers were printed from that cartridge!
Happy crafting!!

Strawberry Gift Box

The strawberries are not in season yet in Kentucky but with spring weather and blooms everywhere, strawberries cannot be far behind!  I have been having a little fun with 3D paper objects lately.  I found a terrific little tutorial on making strawberries and loved the results.  You can find it on the Whiff of Joy blog.

I used the berries I made to create a project for the Circle MB Weekend Challenge.  The box is cut from Tie the Knot (page 67), cut at 6-1/4" (which is the Fit-to-Page size when both box and lid are selected to cut).  The edges were inked to add a bit of color to the solid green box.
For the strawberry tops, I cut flowers from Pagoda at 1-1/2".  I used this RGB code for the green:  R95, G135, B85.  They were embossed and inked heavily on the backs and edges to cover all white and to add a little dimension.
I hand-cut the berries, using the tutorial.  They were embossed and the dots were inked in black.  I added a bit of silk embroidery ribbon to the tops for a little interest instead of the jute cord that was used on the tutorial.
The scrolling vine under the berries is from Storybook (page 51), cut at 3".  The blossoms are from Pagoda, cut at 3/4".  I used a bit of photocopied lase so they would look crocheted.  Mini poms are in the centers.
Thank you for looking at my project and for visiting my blog!

Thursday, March 24, 2011

An Old Dog Learning New Tricks ... me!

This is my entry for Weekly Challenge #25: Use Your Imagine-ation Challenge!
My new Cricut Imagine arrived a couple of days ago.  This is a machine that I was super-excited about when news of it first started circulating, but then lost interest when so many projects looked alike... I mean really looked alike.  It was obvious to me:  the machine made it too easy and the ease removed the need for creativity.  As paid designers, professional bloggers, and company-created projects surfaced, I really became sure that this was not for me.  Then, something changed.  The Circle Blog's designers started featuring some really interesting projects... and so did some of the folks on the message boards.  I started to believe that it must take time to learn the machine and then unlearn the ease to get back into one's own creative niche.

And then, the magical part that was required for my complete transformation into an Imagine owner:  they lowered the price and then discounted it further for Circle members.  Now it was less than half price and I took the bait! 

And I find that I am right -- it will take time to learn how to use the machine to be creative and not to simply print and cut someone else's ideas out.  I knew I wanted to get away from the clip art images that come on the Imagine carts - at least in part.  For one, they have been programmed to leave a border around some of the cut layers, instead of just cutting that layer's image.  It gives the feeling that a sticker has been used instead of a die cut. 

I have surprised myself at how much I love using RGB codes along with the traditional cartridges to get the perfect color!  I have sought out tons of charts for trendy colors, Disney colors, flesh and hair colors, and Imagine colors.  That is the best, most creative feature for me so far!  Click here a printable list of links.

I have pushed myself to learn to use the Imagine carts and traditional carts together.  I have played with the Cut-to-Size and Autofill features, since I use those so much with the Expression.  I miss the Centerpoint feature and happily got to use my Expression for that on a project I just finished for the Circle blog weekly challenge.  I forced myself to do a project because I really want to learn and use this machine!  I usually don't have to be 'forced' to do challenges, but I knew my project would be pretty simple!

For my challenge project, I cut flowers from Pagoda.  I used a patterned paper that I turned over and allowed the Imagine More cart to print the shape of the flowers on the white side of the paper.  I like my flowers to be dimensional so this allows for different colors/patterns on each side. 

I also used a pattern from Imagine More to print a pattern on a box from All Wrapped Up.  I used a beige paper so the inside of the box would be a solid color, while the outside is printed with the added bonus of a shifted color due to using paper other than white!  I inked the corners and edges of the box after assembling it.

I have been wanting to use old newpapers and books to put words within the design.  This is something that was popular in the fabric world a while back.  It is probably out-of-vogue in the paper world, but I love the look.  I made a color photocopy of the yellowed newpaper onto white cardstock to have a paper substantial enough to put in a die cutter.  I used my Expression for this.  I really loved using the two machines together for a project!
I also made a color copy of one of my grandma's lace gloves onto cardstock.  Using the Centerpoint feature on the Expression and Mini Monograms, I was able to create a lace scallop.
I used an image from Imagine More to make my tag.  I had it print and cut in layers, choosing not to use the flower layer since I am using the Pagoda flowers.  I cut a birdcage from Serenade, found a metal star charm, and used some silk embroidery ribbon to finish my little gift box.

I have been learning the features of the machine this week and do feel that this is a great crafting investment.  I think my comfort level with the Imagine will take time.  I don't find the cutting aspects of the machine to be as flexible as the Expression.  I am hoping that the release of Provocraft's new Cricut Craftroom will help with that a bit, although I really do prefer to cut and play rather than to design on a computer!

I am waiting for my other bargain to arrive:  Lori's Garden.  Having other patterns to play with will be fun!  I do think that the Imagine will make gift packaging and quick cards a breeze!  And with all my agonizing over using the clip art Imagine images, I am really looking forward to new Imagine carts, especially Buccaneer.  Thank you for looking at my project and for visiting my blog.

Monday, March 21, 2011

Mid-March Challenge Projects!


Happy Monday!  I have been crafting this weekend and wanted to share some projects!  AllisonF and Caroline over on the Circle have been hostessing a wonderful weekend of challenges!  Saturday was a tutorial challenge.  We were provided with directions for a great notecard and holder set.  This is my entry.  The little girl in the corner is from Car Decals (page 33), cut at 1-1/4".

Caroline's tutorial put me in the mood to learn new techniques!  I learned to make this peony over the weekend by watching a fantastic video tutorial by Julie Walters.  Check it out here! 


In the tutorial, she uses a Sizzix die for her 8-petal flower form.  I could not find a similar 8-petal flower on my Cricut cartridges, and since she mentioned that it would work with a 6-petal one as well, I found one on Accent Essentials (page 57, shift key).  I made a few changes from hers, using more layers and omitting the use of a stylus, for the practical reason that could not find mine anywhere!  That turned out to be a happy accent and using my fingers to curve the petals worked just fine!

Julie uses a heat gun to help dry the over-sprayed layers.  I loved that idea!  I use paper towels in my spray box to help soak up excess paint.

Using the 6-petal flower instead of an 8-petal one meant that the bud was a little different from her tutorial.  I glued and positioned the petals to close the top, instead of folding at the end as she does.

I added a few more layers and no stylus.  I simply used my fingers to curl more tightly the layers that would be around the bud.

Before adding glitter...

After glitter...
 For the 'wet' challenge (use sprays, inks, etc. on your project)  I used the peony to create a little gift holder.

This is from Wrap It Up (page 45), cut at 11" with only one layer.  I stamped the grass on (to go along with the challenge theme) and used a white pen for faux bois details on the fence.

This card was created for the sketch challenge on Thursday.   I wanted to do a card for my late grandmother's sister, who just turned 100!  She was always an advid quilter, so I was excited to find the print with scissors and thread!  I used Birthday Bash for the cake (cut at 2") and sentiment (cut at 3-3/4").  I hand-cut the pennants for the banner.  The scallop-edge circle is from Mini Monograms, cut at 2-1/2".  I inked the edged a bit.


The hardest challenge for me is always a color challenge.  I guess I have a problem being limited when I love color so much!  This card was an easy out because I used a picture of my daughter and tried to just have a little fun!  The text is from Groovy Times, cut at 1-1/4".  I used my trimmer, circle punch, and corner chomper for all other elements.


Thank you for checking out my blog and looking at my projects!  I hope you found a little creative time too!

Thursday, March 17, 2011

Happy Saint Patrick's Day!

 
My daughter's class is having a Saint Patrick's Day party so I made some treats.  I  have been wanting to try lollipop flowers from AllisonF's Goody Bag Diva blog  since the time she posted her daughter's party favors during Princess Week.  You just have to see 'em!  Allison's flowers are gorgeous with lots of layers, but I thought a little shamrock instead of the flower layers would be fun for this project.  I bought a couple of bags of Charms Blow Pops (mostly for the word 'charms').  I used the shamrock on Designer's Calendar (at 3" autofill will cut twelve on 12x12 paper or six on 8-1/2x11 paper).  The small hole punch on the CropADile Big Bite was the perfect size to allow the sticks to be pulled through the shamrock.
I wanted a cute way for Piper to take them to school for the party.  I created a little grassy box using my new, fabulous Martha Stewart Fringe Scissors (how does that woman know what I want when I don't even know?), a  3"x12" styrofoam block, and the Paper Doll Dress Up Cricut cartridge.
For the grass, I cut three 4"x12" strips and fringed on one side.  The picket fence was cut at 3".  I used sewing pins to hold everything on the block temporarily.  Mini metal brads and glue became the permanent solution!
The shamrock pops where crowded in together.

I also was given sugar cookie duty for the party.  I have a favorite recipe that I use for all kid holidays.  This is a basic iced sugar cookie that is pressed into colored sugars that have been placed in a pattern.

SUGAR COOKIES for ST. PATRICK'S DAY (click here for printable version)
3 cups all-purpose flour
1 teaspoon baking soda
1/8 teaspoon salt
1 cup sugar
1 stick Butter Flavor Crisco
2 tablespoons water
2 eggs
1 teaspoon vanilla
2 cans Whipped Butter Cream icing (yes, this is cheating but just be sure to get one that is both whipped and buttercream for best flavor!)
Wilton leaf green gel food coloring (in little pots)
assorted sprinkles and colored sugars
Combine flour, soda, and salt.  Set aside.
In a large bowl, beat sugar, Crisco, and water until light and fluffy.  Beat in eggs.  Add vanilla.  Gradually add flour mixture, forming a soft dough.  Add about 1/2 teaspoon food coloring, adjusting to get the green you desire.  Mix until the coloring is evenly distributed throughout.
Shape dough, wrap with plastic, and chill for two hours.
Preheat oven to 375°.  Spray baking sheets with Pam for Baking.

Roll out dough on floured surface to 1/8"  (I like mine more like 1/4" but the cookies will spread and their form may distort which will only matter for cookies other than circles, but they will be softer).  Cut out shapes (I used my grandma's 2-1/2" biscuit cutter for a round cookie) and place on baking sheet.  Bake 8-10 minutes.  Let stand a few minutes before transferring to cooling rack.  Cool completely.
Mix about 1/4 teaspoon of food coloring into each can of icing.  Adjust to get the color you like.  Mix completely!  Ice cooled cookies.  Sprinkle colored sugars and sprinkles onto a plate.  I like to make a striped pattern. 
Press iced side of cookie into sugars.  Repeat with all cookies.  My daughter loves these!  This recipe (minus the food coloring) works great at Easter too, using an oval cookie cutter and pastel sugars.

One last thing:  I wanted to share this sweet little cartoon about Saint Patrick that my husband found.  It is an Oscar-nominated short and it is adorable!  Click here to go watch it!

Happy Saint Patrick's Day!

Sunday, March 13, 2011

St. Patrick's Day is an enchanted time...


St. Patrick's Day is an enchanted time - a day to begin transforming winter's dreams into summer's magic.  ~Adrienne Cook
This little card for my daughter was created using the guidelines from the Weekly Circle Challenge, to create a project with a monochromatic color scheme...and a touch of gold.  Aside from the pink of my little March girl's skin, the rest of the project is every shade of green I had in my scrap drawer.  Even the bottom layer for her hair and eyes is cut from a dark midnight green instead of the black I would usually choose. 
Using my Cricut, I started with a character from Rock Princess, cut at 5".  I gathered a bit of lime green tulle and attached it under her skirt.
I hand-stitched the layers together to keep her skirt flat and added a bit of ribbon to begin adding layers for her clothing.
Cutting her arms apart and replacing them allows for a change in her gesture. 
A few extra ribbon details, brads, and hand-details complete the figure.  The shamrock in her hands is from A Child's Year, cut at 3/4". 

I found a sweet sentiment and printed it directly onto my cardstock.  Trimming and using the wonderful Martha Stewart tatting edge punch gave me a base for the figure.  Using green ribbons from my stash and more shamrocks cut at 1" (for the bow detail) and 1/2" for all others (covering a couple in gold glitter glue), I embellished this layer after the popped-up figure was placed. 
The gold glitter glue works well with the mint green background.
This layer was applied to bright green cardstock base with ATG tape.
I think my little Irish girl, Piper, will like it.

This weekend started the St. Patty's Day celebrations.  In our town, we have a HUGE parade referred to as Hooley in the Highlands.  Given my husband's love of all things "St. Patrick," we were there!  
Do you think Piper likes beads and candy or what!?!


Obviously, you don't have to be fit to be in a head-to-toe lycra suit on this float!

We have a great Irish restaurant right in the heart of it all, but most locals (well, the ones who haven't started drinking before the parade is over) head away ---past the closed-off streets and hightail-it to a nearby neighborhood with its own great Irish Restaurant, The Irish Rover.  Here it is Lent, a time of self-denial and I found myself with a huge serving of Smoked Salmon and Potato Gratin after the parade.  Well... it was fabulous, as always.  Our local newspaper has published the recipe and you can find it here

What a fun weekend!  I am hoping that you are enjoying this time as much as my family is!


But wait! There's more! Click 'older posts' above!

But wait!  There's more!  Click 'older posts' above!