Monday, April 22, 2013

Happy Birthday Barbara Stewart!

Yesterday was a milestone birthday for my friend, Barbara!  To celebrate, our friend, Donna, threw her a card shower!  I wanted to share the card I sent.  My favorite on-going theme is the Birthday Queen.  This is Gertie-Jean.


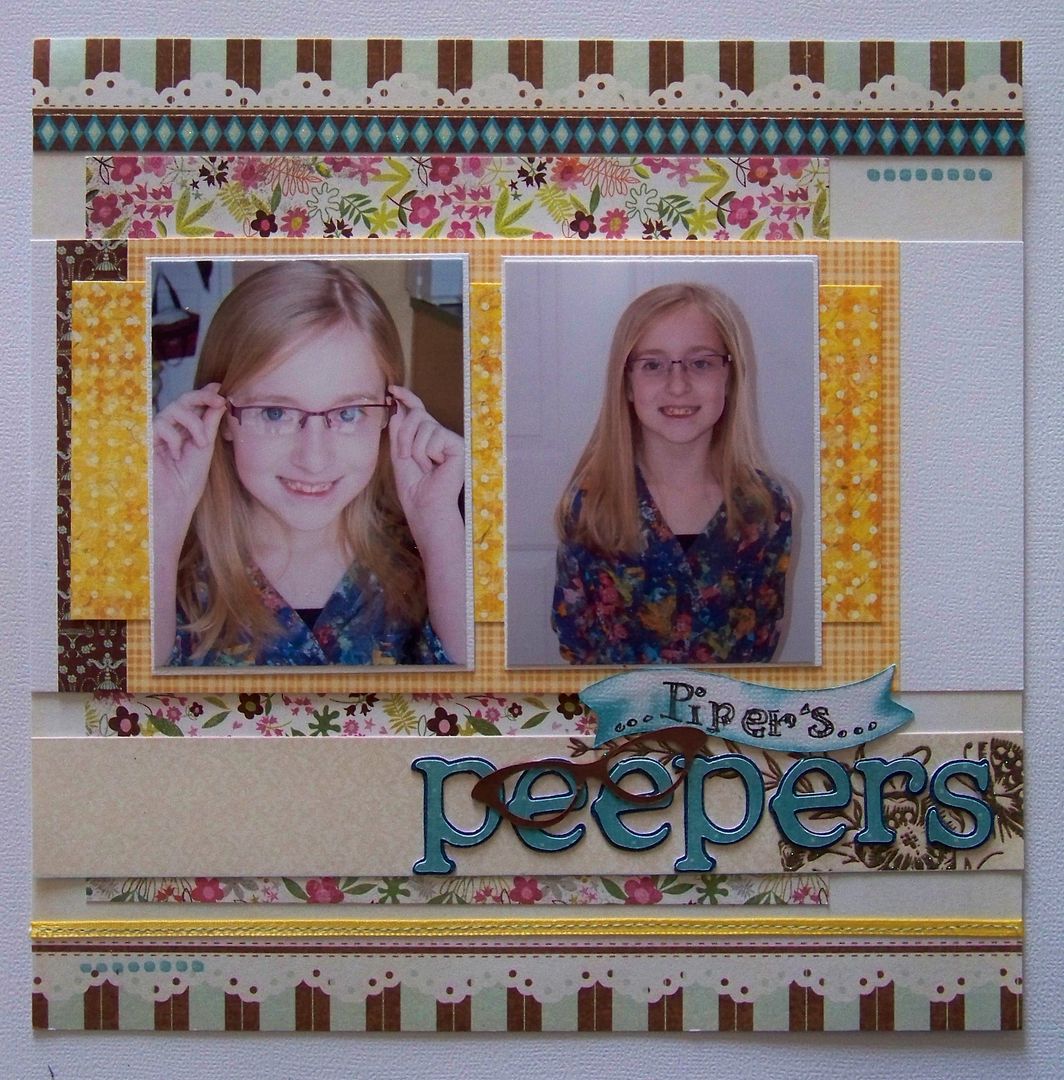
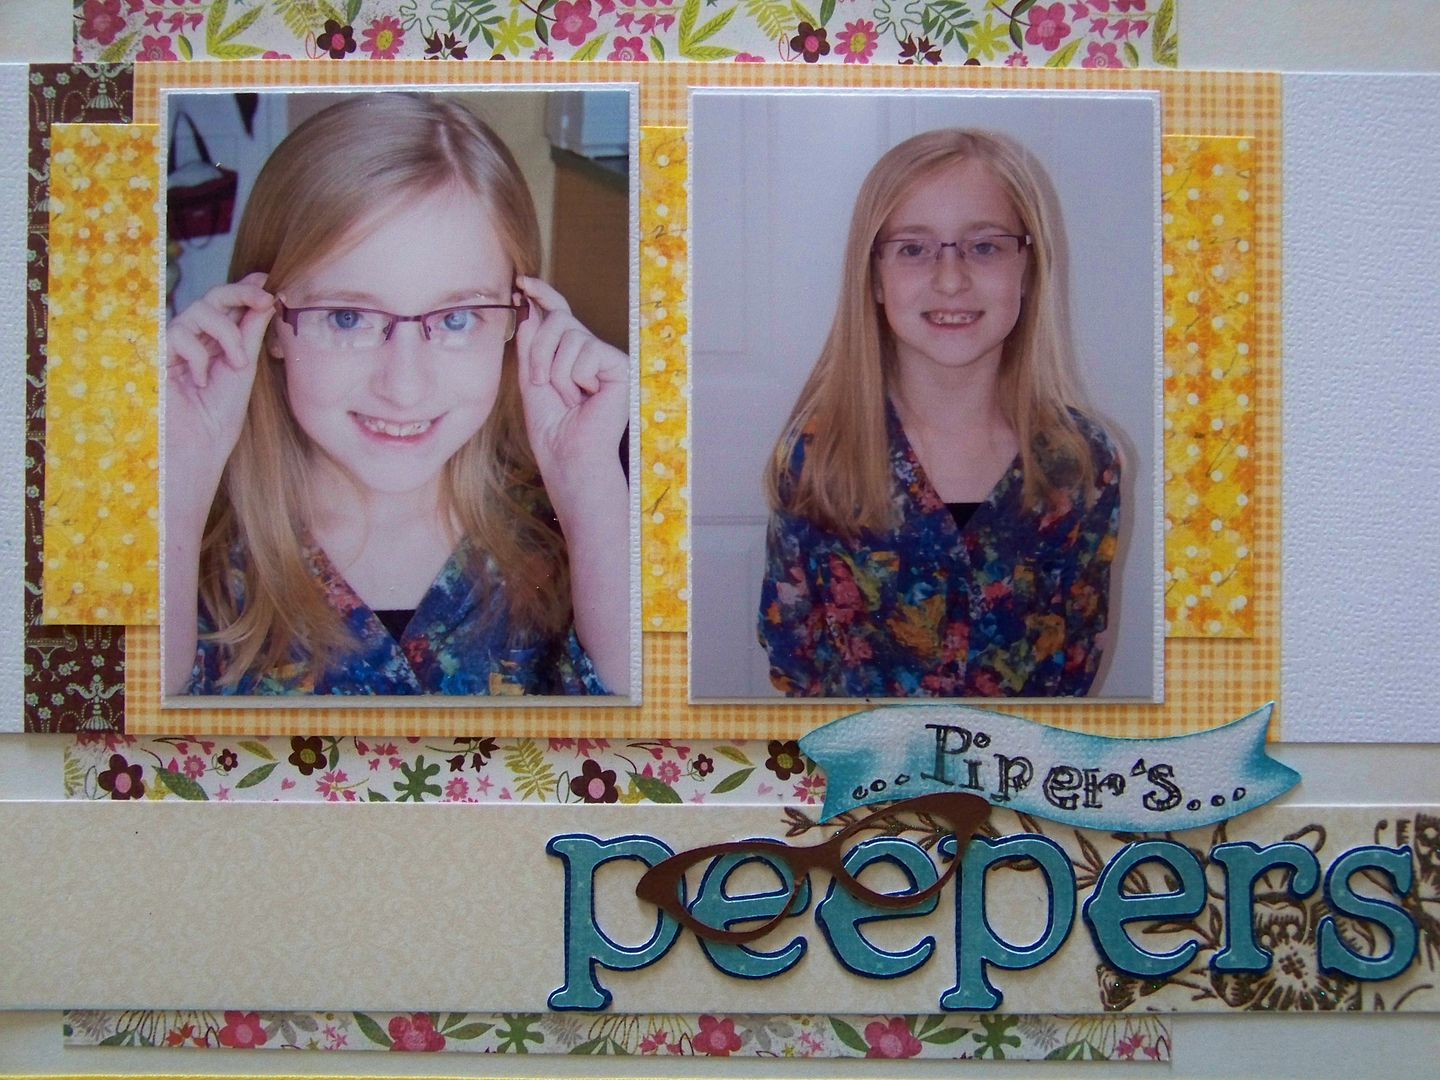
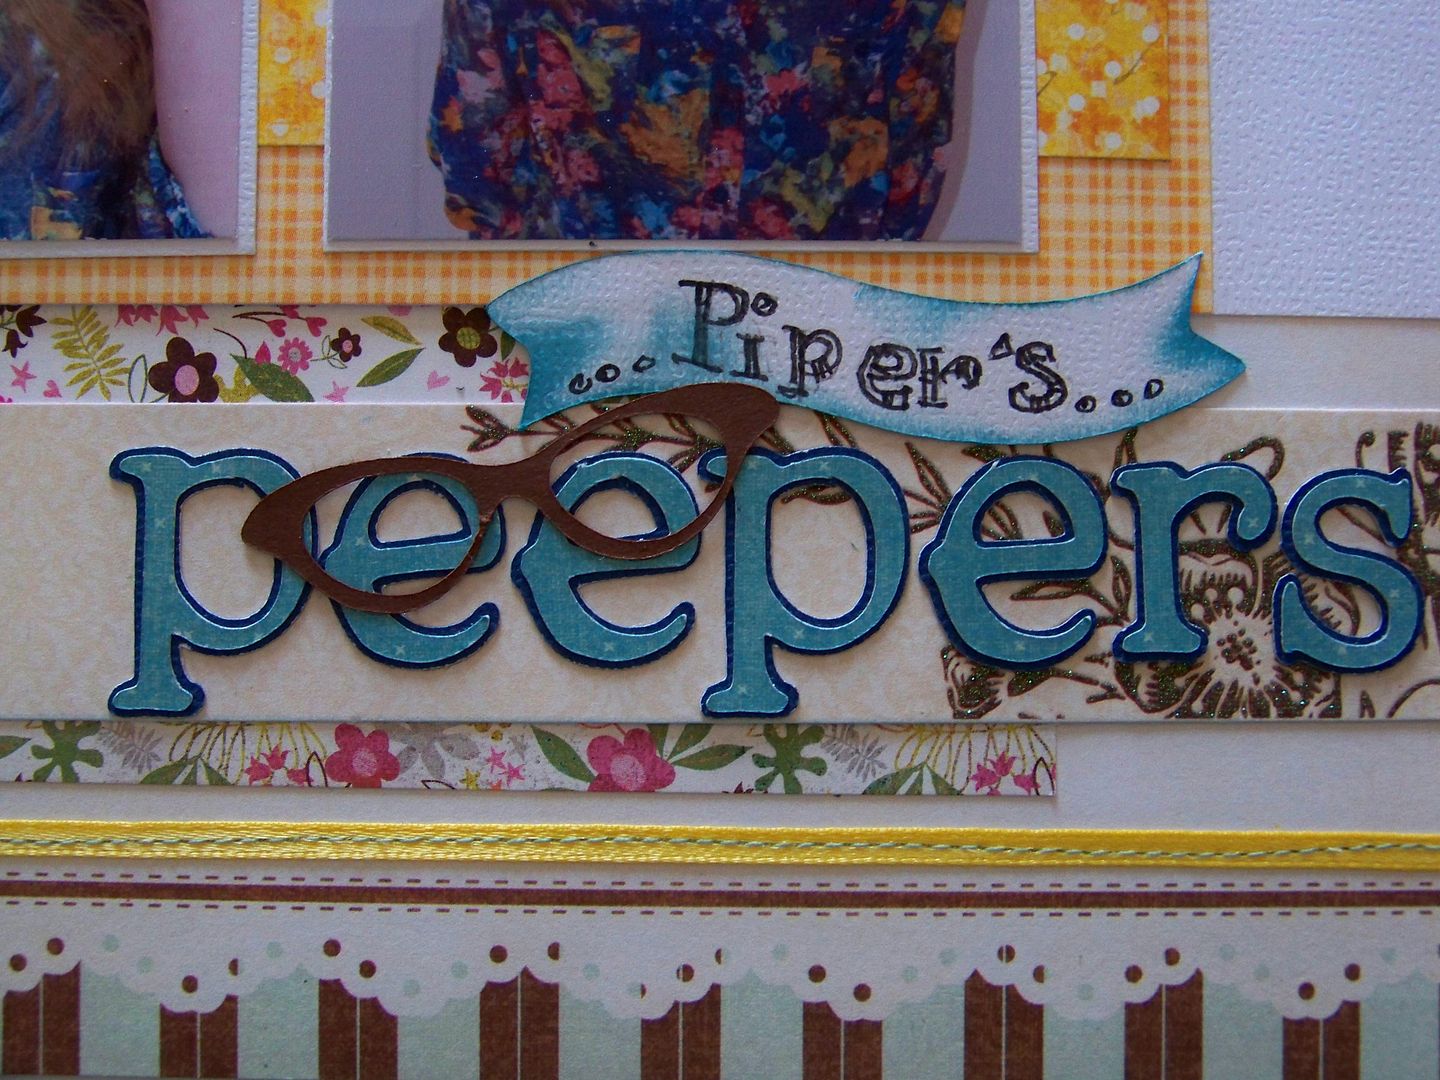
I started with a figure on Cricut Country Life, a hair style from Cricut Paper Doll Dress Up, a cake from Cricut Imagine Yummy, glasses from Nifty Fifties, and a tiara from Cricut Princess Party.  From there, I hand-cut her gown.

I cut the figure in flesh and traced the bodice in patterned paper so I could give her a little frontal 'enhancement', which I popped up.


The sleeves are tissue paper and the trim at the bottom and collar is some that Donna herself bought me last year at a little shop when we were all together in Atlanta for Circle Mania!


I trimmer-cut papers for the front of the card and created a birthday candle trim using an edger punch and hand-colored the flames.


The cake was added and adhered with pop dots.


In the end, I placed the image so that the card would open from the center on the paper mats.


Happy Birthday, Barbara!  
And may the Birthday Queen continue to bring you many happy birthdays!


To see another birthday queen, check out a post here on my blog:  click here.
To see many of my other paper projects, check My Project Gallery.

And I have works of art from Barbara, in case you don't know her!  Click here to see a gorgeous multi-media canvas she gave to me.  Click here to see a mini book she sent me featuring some of the Ryan Gosling "Hey Girl" statements we used to laugh about on the message boards.

Thank you for checking my post today.


Sunday, April 21, 2013

Best Friends Page -- Scrapfriends Sketch Challenge #12


I am working (slowly) on a mini album of my daughter for 2013.  This is another 8" x 8" page using a sketch-- this one is from Scrapfriends, a site new to me that I just found a couple of days ago.


I went into high gear because there was an impromptu, on-line challenge announced yesterday on a favorite message board to coincide with the events at Circle Mania in Atlanta.  How could I not participate?  After all, Allison's on-line crops were my favorites in the first year of the Cricut Circle, when all of the live events were too far away!

I started with a school picture of my daughter and her BFFs.  This was the spring photo, one where the kids were allowed to come in street clothes and pose together.  It is dark and a little edgy for these girls, a problem for me as I started with dark papers.  After re-doing it and struggling with paper choices, I decided to focus on the pink and turquoise and ignore the bricks and denim.

Just for fun, a couple of days ago, I tried cutting from a digital image I won last year.  I had never cut anything using CCR on my Cricut so I was pleasantly surprised that it wasn't too bad... and since it was the only way I would ever be able to cut this Teressa Collins Basics image, that was a relief!  I used the negative space from the cut on this page to give interest to the plain white corner and to cover some of the text on the printed paper on the opposite side of the page.


The framed photo was popped up 1/8" to pull it off the page.  I used embossing folders to give a little life to the solid papers.  I used and punches, die cuts, and stamped images for kid accents.


All die cuts were made with a Cricut Expression:

  • Frames were cut from Fancy Frames (key 23) at 3-1/4" and 3-1/2".
  • Shamrocks were cut from A Child's Year (page 31) at 3/4" icon-shift.
  • Tab was cut from a file folder image on Fabulous Finds (page 131) at 3-1/3" blackout.
  • Peace signs were cut from Feeling Groovy at 1/2".
The bugs, butterflies, and teeny hearts were punch cut.  I used a microfine pen to add details and text.  The tiny tickets were stamped on and hand-cut.  The metal "Live Loud" embellie was something from my stash.  


Thank you for checking my post today.  (And thank you, Diane, for the deadline so I could get this puppy done today!)  To see many of my previous paper projects, check out My Project Gallery.

I am linked up and so impressed by the fantastic interpretations of the sketch by all the other participants!

ScrapFriends button


Friday, April 19, 2013

Jeepers! Piper's Peepers -- a challenge from The Paper Bakery!


I have been delighted lately to find more and more fun sketches by some of my favorite crafty people!  I just found one created by Juliana Michaels on her blog that led me to a challenge on The Paper Bakery, a new site to me.  And do they ever have awesome stuff!!  


What I love about this challenge is that you don't have to use specific papers or other merchandise-- anything goes!  (Anyone who knows me knows that I am very big into using up my crazy stash.) 

For my project, I used a couple of photos of my daughter from the day she got glasses.


She had wanted glasses when her two best friends got them so... when she suddenly showed the symptoms of needing them, I thought she might have been faking!  She is the most honest, compassionate, and kind person, so I should have known that simple vanity and peer pressure was not directing her.  In the end, she is near-sighted and really needed them!  I felt like the worst mom ever for doubting her!  These pictures are of her purple pair-- I can't believe how grown-up she looks here.

From the sketch, I used the idea of overlapping rectangles  the left-of-center placement of dual photos, the title placement, and the rows of upper and lower dots.  

The font is from Cricut's Doodletype cartridge, cut at 1" with shadow.  The glasses are cut from Cricut's Nifty Fifties cart, cut at 1-3/4" (layer one). The banner is cut from Cricut's Artiste cart (page 58), cut at 3/4".  My page finished at 8"x 8".


Thank you for checking out my post today!  To see many of my previous paper projects, check out My Project Gallery.


I'm linked up and loving everyone's take on this sketch!  


Thursday, April 18, 2013

At Circle Mania in Spirit Only


One of the most fun weekends I have ever had without my sweet husband was at Circle Mania last September!  Sadly, I have to miss the one going on this weekend, but I sent along a door prize-- and made a card to go with it so I could be there in spirit!


Lately, I have been playing with the figures on the Cricut cartridges again.  This card features the French woman from Summer Celebrations, tweaked a bit to look less French and more Circlet-y.  She was cut at 5" on my Expression.  I hand-cut to remove her beret and add locks of hair.  I added a nose and a skirt.  I cut an extra sleeve to pop up and cut off her arm that is furthest away and reapplied it with pop dots to give her even more dimension.  I put a Circle logo in her hand.  (This one is from Sandy's Circle event in Louisville when Provo Craft sponsored our crops and meetups-- part of the confetti on the tables.  Yes, I kept everything!)  Her earring is cut from metallic paper and I added a little ink to her cheeks, hands, arms, and decolletage.


Her dimension is from the attachment of her arms with pop dots and locks of hair added and popped up.

The figure is adhered to the card with 1/4" pop dots.  I used my Circle embossing folder for the background mat and layered it over the other mat and card.  I adhered a gift card inside and added a message using my computer's printer.

I am so sad that I will be missing this event and so happy for my friends who are able to go!  This is a photo from the last (and first!) Circle Mania. I am in there somewhere!


Thank you for checking out my blog post! To see many of my previous paper projects, check out My Project Gallery.


I'm linking up today!
Pink Cricut

Sunday, April 14, 2013

Happy Spring!


Finally, the snow and cold are gone (I hope!!) and the flowers are in bloom around here!  The day I made this card, it was 81° (ok, a little warmer than spring-like temps, but welcome nonetheless) and all the ornamental pear trees in my neighborhood bloomed all at once on that day!  The sky was blue and the breeze was perfect.  Between my errands and walks, I was stuck in the office... but I stole away a bit of time in my crafty space to make a quick card for a friend.

For this card, I started with the cheerleader image on Cricut cartridge All Sports and cut it at 6" on my Expression.  I cut away her legs and pompoms.


I trimmed down her hair and hand-cut a couple of extra locks.  I cut  an extra "hair do" from flesh colored paper, and created an extra face from the waste, backed it in black and added a little hand-drawn detail to her eyelashes, instead of trying to glue on those teeny, tiny features!  Doing this, she also gained a chin and her head tilt changed.


That GINORMOUS mouth was cut from the cartridge at the 6" relative size (like the body) but my 9-year-old daughter told me it was ridiculous.  Kids tell you honestly what you already know!  I peeled that crazy, big ole mouth off and re-cut only the white layer at 5-1/2" relative size and edged it with hot pink marker.


Much better, don't you think?  I added the collar detail from the cartridge cut and hand-cut a skirt.

The background was printed from Imagine cartridge Best Friends-- I have had it in my stash for a while.  I trimmed it to 5-1/8" x 9".  The figure was popped up on all edges except for the bottom which was adhered flush to the page.

The text was cut from Alphalicious at 1".  The flowers were cut from Mother's Day Bouquet at 1/2" using keys #5 and #27 and layered for dimension.  The grass was edge-punch-cut and the leaves were hand-cut.


Thank you for checking my blog today.  I hope you are having a bit of spring wherever you are today.

To see many of my previous paper projects, check out My Project Gallery (click here).
With Glittering Eyes is on Facebook (click here) and on Pinterest (click here)!

Monday, April 1, 2013

April Fools!


Today, I am on Bitten By the Bug 2, where I have been asked to do a project with the clown bear from Teddy Bear Parade!

Since it is April Fools Day, I used the image to pull a prank on my kiddo!  I cut the bear from vinyl and applied it to glasses that I filled with Jell-O and a straw and allowed it to set-up.  This looks like a drink and she was so interested in the clown image that she didn't seem to notice the tell-tale jiggle! This bear was cut at 2-1/2".


I found that it is best to take short-cuts with the layers when putting images onto cups; it just makes it easier with fewer things to line up!  Using just the head and hands in brown, for instance, makes more sense than lining up the whole body when it will be covered up with the clothing layers.


I had this idea that it would be funny to see the word "GOTCHA" in the bottom of the cup as she tried to drink it!  I cut the letters mirror-image at 1/2" and placed them on the outside of the glass so that it reads correctly when you look into the glass.


And what is an April Fools prank without yelling out "April Fools" so I made a little card with that inside.  I used the same bear, juxtaposed and cropped.  I used embossing folders and a dry brush with white acrylic paint to add pattern to the clothing.  I added a button and mini pom for dimension on the hat.  I used UTEE to make a shiny clown nose.  This bear was cut at 7"; the letters were cut at 1" with shadow for this 5" x 6" card.


My sweet daughter, who is big Jello fan, didn't seem to mind this little joke at all and was happy to pose with her card.  She's a good sport, especially considering my little joke came a tad early.

If you are looking for a challenge using a clown image, head on over to BBTB2 and check out today's post!  I look forward to seeing what you make!

To see more of my paper projects, check out My Project Gallery (click here).

But wait! There's more! Click 'older posts' above!

But wait!  There's more!  Click 'older posts' above!