
During Christmas, I met up with my Aunt Joan at the mall, and later, on Christmas Day at my house, where the subject of embroidery came up. She found an awesome deal on an embroidery machine at a yard sale (everyone should be so lucky!!) but she put it away because she couldn't figure out how to use it. My take on this: it is not an awesome deal if you don't use it! So, for her (and anyone else that finds this helpful especially those who got an embroidery machine for Christmas), I have created this tutorial. From here on out, I will be talking to Joan (and you) directly!
There are two keys to going from having a "never-used" machine to having a stitching addiction:
- Know your machine. Do that by reading the manual so that you can thread your machine, thread your bobbin (even if you will be using pre-wound bobbins, which I highly recommend), get files from your computer to your machine, skip color steps in a design, and go back a few stitches (one stitch at a time). You need to be able to use the built in letters on your machine so that you can test-stitch when something goes wrong with your machine. Learning to fix stuff (like thread that shreds) means that you will want to test to be sure you "got it" before you put in your real project on the hoop. I only use my built in machine designs for testing.
- Get software and learn to use it! It should be the last sentence at the end of the machine manual! I got my software just after I finished going through and trying everything in my manual. It was three days after I got my machine so it is never too early to get software!
I use Embrilliance and I started with Essentials. That is what I suggest to EVERYONE. It is the only embroidery software I have ever used (so I cannot compare it to others) but it was so easy to learn Essentials and it has everything you need to really get going with this. You can find it at Embrilliance.com.

Essentials will allow you to merge files, add text by simply typing, alter the size (with stitch recalculation) and placement of files, add color stops, change colors, see a virtual stitch out of the project, and make a real-size paper printout of the design with a list of steps by color. You can place a design in the center of your frame with one button click as well and size your design to the maximum hoop size with a second click. You can import any embroidery file format and save in your machine's format! You can save machine applique pieces as SVGs so that you can cut them in your die cutter. (I use my Silhouette to cut the fabric for my appliques.) You can split designs for multi-position hoops. (That is how I embroider my pillowcases). You can convert thread brands if you like to show on the screen the colors that your brands will stitch out. If you merge different files together and make them overlap, the program will automatically remove under-stitching for you! You can group and ungroup objects. The program gives you stitch counts on your project and allows you to select elements to see the size they will stitch out. It will tell you if your file is too big for your hoop.
Two GIANT benefits of getting Embrilliance over every other option: keyboard text (using bx fonts to type in fonts instead of importing one letter at a time and manually placing them) and being able to add more features to the program by buying more modules later. I have been reading that some stitchers use the free Embrilliance Express to get keyboard fonts but then use programs like Sew What Pro for their basic program in order to save a few bucks. Aside from that being a bit of a pain to do (creating text then opening a second program and importing Embrillance text), what if you want more special features? Like knockdown stitching? Like stitch editing? Like 4x mirroring? Like digitizing? Like density repair? Those other modules with these features fit seamlessly with Essentials but not at all with other programmers' software! And the most expensive way to buy Embrilliance is to buy the wrong thing first and then buy it later once you realize that you need it and like it better!
Important: Embrilliance is sold in modules or nuggets of features. Essentials will have everything you need to get started but there are lots of things to add when and if you are ever ready. I have them all but I have really awesome and talented friends who have everything they need with just Essentials. It is about options and not being forced to pay for things you might not need!
So this is a photo tutorial of how I go from a file I just bought online to a finished item, ready to gift!
I open my Embrilliance. Every file, no matter if I will be changing anything or not, starts with Embrilliance.

I have all the modules so there are more buttons here than your Express or Essentials will have. I tell you that to keep you from being annoyed if you refer back to this once you have the software AND to emphasize that that modules all plug into the same software. They fit together seamlessly; adding modules means simply adding features and each modules does something different.
Then I click on the Merge Stitch File button.

This is how I bring a digitized file to my virtual hoop on my screen.
I have organized my files by vendor on my computer (and I have all my files on Pinterest by vendor, type, and theme. For info on how I did that, you can check out this page on my blog: Organize With Pinterest.) I find my file and click import. (You can see that these are all zipped files and it allows me to import them without unzipping!)

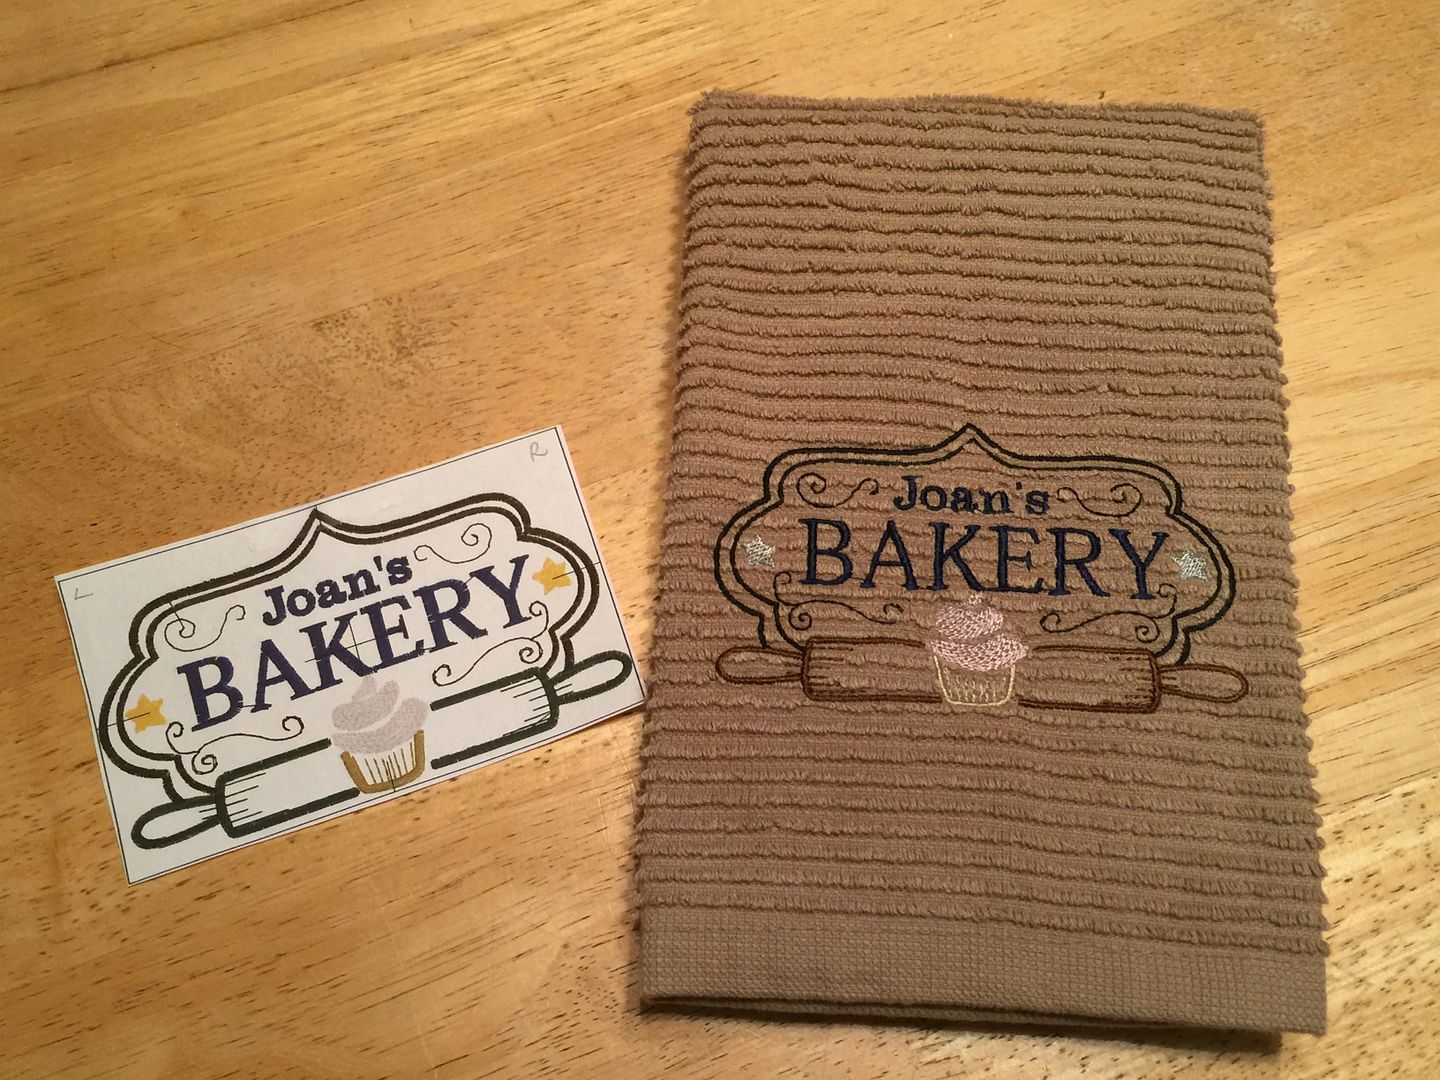
It pops up on my screen. (This file is from Boutique Fonts. I just took advantage of a deal where the entire site of 870 files is $50, but you can also buy it as an individual file.).

Since "Mom's BAKERY" is all one color, I could delete just that color step (by selecting it on the objects pane and clicking the delete button on my keyboard. I could replace it with "Joan's Kitchen" or even "Joan's Bakery" if I wanted to change the font. But for purposes of showing what else you can do, I want to change my design to remove "Mom's" and add "Joan's". There are quicker ways in an editing module from Embrilliance, but even in Essentials, I can do this. Since all the lettering is the same color, I can't just remove a color step, so I use the Stitch Simulator to create a color stop!

I play the simulator, and as soon as the stitching is finished for the "s" in Mom's and moves down for the "B" in Bakery, I click the little stop sign....

A window pops up to allow me to change the color of the word "Bakery" and then I can delete the word "Mom's" since now the two words are two different objects!
I do that by selecting the object I no longer want and hit the delete key on my keyboard.

With the word "Mom's" gone, the artwork on my screen now looks like this.

So now, for fun, I am going to put in the text "Joan's" using a BX font. (This one is Davidson from Applique Corner). I simply click the Create Letters button...

I type in the lettering I want to add using my keyboard and pick the font I want to use.

I can resize the lettering I added to fit perfectly by holding the shift key and moving a corner handlebar toward the center. I can also change the color back on the word "Bakery" so that it is colored like the original file. I can change the colors of any objects I want to here or just make changes when I select my actual threads to stitch out. (I usually don't change the colors in the file unless the digitizer has used something crazy that is too distracting, but if it is simple like this, I just decide my colors at the machine. The reason I changed the "Bakery" to match the "Joan's" is so that it would be one color step, but sometimes keeping them different even if you are going to stitch the same color makes sense because it eliminates a jump stitch.)

I can also now rotate the design so that it stays that size AND still fits in my hoop by selecting all objects (control and A at the same time) and clicking the rotate buttons....

Or I can resize the design to keep the orientation but fit the hoop by clicking the Fit To Hoop button.

Since this will be on a kitchen towel, I know I will be adding a topping so that the stitches won't sink in. I add a basting box that will be the first step of my embroidery. It is temporary and I often use them whether I will use a topping or not because I always "float" my embroidered blanks instead of hooping them. To add a basting box, go to Utility and add Baste Hoop or Baste Design. This temporary stitch is very long and easy to remove once the stitching is done and you take the project off the hoop.

Then, I like to save my design. (File, then Save As.) I save all my embroidery files, even ones like these that I have put in Embrilliance and altered, on my external hard drive.

And then I print it. (On the upper toolbar, just like for Windows applications, select File, then Print). Printing gives me a full size mock up of the design and a list of color steps!

OK, before I go any further, I want you to see the Stitch Simulator (since that really will show you so much about your file and it is what I used to do that color stop earlier). I run this whenever I have a question about a file and sometimes just so that I won't be surprised about what order things are stitching in or if I am not sure what step number is actually stitching. It is really helpful when I merge lots of things together or add text to things like in-the-hoop 3D items. It allows me to make sure that my additions are in the right order. So this is the Stitch Simulator of the final file...(please excuse my very amateurish efforts on video!)
Next, I move a copy of the file I have just made to my thumb drive because that is how I transfer files to my embroidery machine. You will need to read your manual to see how your machine needs files transferred. I always keep the original file (before my changes), as well as my altered file, on my external hard drive. I TEMPORARILY put a COPY of the file I want to embroider on my thumb drive. I find that it is easiest for both me and the machine if I only have one file on my thumb drive at a time! (The external hard drive is the house where my files live; the thumb drive (also called a flash drive/usb drive) is the car that takes my files to the machine where they work!) Your machine may use a cord to connect it to your computer instead.
Then I open the file on my embroidery machine. (Read your manual to see how to do that for your specific machine!)

I prep my hoop. I am stitching on a dish towel for this project. I prewash my dish towels since I am one to abuse and misuse my towels and then toss them in a rough wash and a hot dryer. I expect you do the same, but I do have friends who do not pre-wash and who do hang their embroidered dish towels to dry. So you have options.
I hoop tear away and use the insert to mark the vertical and horizontal lines of the cross-hatch.

I iron my dish towel in half, right sides together to make a center crease.

I use my paper print out of my embroidery to decide where I want it placed. (I have placement charts on my embroidery page on this blog if you would feel better with a guideline. You can find them here. Scroll down on the page to the section called "Embroidery and Monogram Placement Guides." I usually "eyeball" it.
I lightly spray Mettler WebBond on my hooped stabilizer. I do it all the way at the end of the room, away from my machine. A little goes a long way and you only need it to hold a short time until the basting box sews.

I lay the fold of my towel on the vertical axis. I match the horizontal axis of my paper pattern to the horizontal axis of my hooped stabilizer, shifting the towel up or down as needed to get the paper mockup in the correct place. My design will stitch in the center so I make sure my design cross-hatch marks are placed to match the stabilizer's cross-hatch marks.

I move the paper pattern away and open up my towel. The wrong side of my towel is now smoothed against the hooped stabilizer. The right side of my towel is facing up and ready to be embroidered. I do tend to roll up and pin the sides of my towel to be sure they don't accidentally get under my hoop!

I use my print out with color steps to pick my thread colors.

I start by placing a topping of water soluble stabilizer (WSS) and allow the machine to stitch the basting box.

Then I stitch my design. When it is done, I remove the hoop, cut my jump threads, remove the basting box and WSS.


I find that I can use the rubber end of my seam ripper to help with removing WSS.

Any WSS that will not come off, can be removed by placing a damp wash cloth over the design and going over it with a steam iron.

I try to avoid this so that I don't have to wait for my towel to dry. I remove all the tear away from the back of the towel. Any that you miss will eventually get washed out but it is best to remove it before it goes into the wash.

Start out for FREE:
And if you read all of that and honed in on FREE EMBRILLIANCE EXPRESS, then yes, there is a completely FREE version of Embrilliance that will only allow you to use the bx fonts. I did start by doing the free software. I found it frustrating because I wanted to do so much more, but if you are unsure, then guess what? There is an awesome tutorial that shows you a link to get the software, a how-to for downloading the program, a how-to for using the program, and they give you a FREE bx font for lettering so you can play with it. IT WILL ONLY ALLOW YOU TO WORK WITH BX FONTS!! I emphasize that so that you don't go a-tryin' to add files and stuff like that. It only does one job! OK, so if that sounds like a better starting place for you, then check this out from digitizer, Itch2Stitch: http://www.theitch2stitch.com/How-2-Use-the-BX-format-with-Embrilliance_b_6.html

By going on and downloading the free version, you will have Embrilliance on your computer. Once you are ready to "go for it" and add Essentials, all you will have to do is to add the product number you get emailed to you once you pay, close the program on your computer, then open it back up and VOILA! New Essentials features will be there for you! That is how it works to add any modules to the program.
OK, so there you have it. If/when you are ready to get it, go to the store on the Embrilliance.com website. If you buy it there, you get the advantage of any sales going on and get a 90 day money back guarantee if you really don't like it. And you will want to join the Embrilliance page on Facebook so that you know when they offer coupon codes for an extra 10% off. It is typically around holidays.
Links mentioned on this post (none of these are affiliate links; they are all direct links):
- Embrilliance Essentials info: click here.
- Embrilliance Essentials in the store to buy: click here.
- Free Embrilliance Express tutorial and free BX font from Itch2Stitch: click here.
- Organize with Pinterest page on this blog: click here.
- Boutique Fonts' file -- Mom's Bakery: click here.
- Boutique Fonts' Entire Site Buy Out (fundraiser): click here. EDITED DEC 30: her buy-all sale is over at this time.
- Davidson Font (Applique Corner): click here.
- Also, I have all of my notes on my blog's Embroidery page with resources, sources for where I buy my supplies, lots of tutorials from other sites, general info about Embrilliance and embroidery in general. There's even a link to a tutorial on how to download files you buy if that is eluding you.
- Be sure to join the Brilliance Embrilliance group on Facebook for news and support as well: click here.
Lastly, be sure to follow some of the Facebook pages of some of your favorite digitizers. That is where you will find out about sales. Many also have customer/fan pages where they give away free files but some of them are secret groups and you must request to be a member. There are also a number of Facebook pages for people who do embroidery. Those are great places to look for help or ideas.
Be looking for the towel I made, Joan. I am sending it to you via mail. :) Happy stitching, everyone, and thank you for checking out my blog today!