Showing posts with label Layouts. Show all posts

Sunday, April 21, 2013

Best Friends Page -- Scrapfriends Sketch Challenge #12


I am working (slowly) on a mini album of my daughter for 2013.  This is another 8" x 8" page using a sketch-- this one is from Scrapfriends, a site new to me that I just found a couple of days ago.


I went into high gear because there was an impromptu, on-line challenge announced yesterday on a favorite message board to coincide with the events at Circle Mania in Atlanta.  How could I not participate?  After all, Allison's on-line crops were my favorites in the first year of the Cricut Circle, when all of the live events were too far away!

I started with a school picture of my daughter and her BFFs.  This was the spring photo, one where the kids were allowed to come in street clothes and pose together.  It is dark and a little edgy for these girls, a problem for me as I started with dark papers.  After re-doing it and struggling with paper choices, I decided to focus on the pink and turquoise and ignore the bricks and denim.

Just for fun, a couple of days ago, I tried cutting from a digital image I won last year.  I had never cut anything using CCR on my Cricut so I was pleasantly surprised that it wasn't too bad... and since it was the only way I would ever be able to cut this Teressa Collins Basics image, that was a relief!  I used the negative space from the cut on this page to give interest to the plain white corner and to cover some of the text on the printed paper on the opposite side of the page.


The framed photo was popped up 1/8" to pull it off the page.  I used embossing folders to give a little life to the solid papers.  I used and punches, die cuts, and stamped images for kid accents.


All die cuts were made with a Cricut Expression:

  • Frames were cut from Fancy Frames (key 23) at 3-1/4" and 3-1/2".
  • Shamrocks were cut from A Child's Year (page 31) at 3/4" icon-shift.
  • Tab was cut from a file folder image on Fabulous Finds (page 131) at 3-1/3" blackout.
  • Peace signs were cut from Feeling Groovy at 1/2".
The bugs, butterflies, and teeny hearts were punch cut.  I used a microfine pen to add details and text.  The tiny tickets were stamped on and hand-cut.  The metal "Live Loud" embellie was something from my stash.  


Thank you for checking my post today.  (And thank you, Diane, for the deadline so I could get this puppy done today!)  To see many of my previous paper projects, check out My Project Gallery.

I am linked up and so impressed by the fantastic interpretations of the sketch by all the other participants!

ScrapFriends button


Friday, April 19, 2013

Jeepers! Piper's Peepers -- a challenge from The Paper Bakery!


I have been delighted lately to find more and more fun sketches by some of my favorite crafty people!  I just found one created by Juliana Michaels on her blog that led me to a challenge on The Paper Bakery, a new site to me.  And do they ever have awesome stuff!!  


What I love about this challenge is that you don't have to use specific papers or other merchandise-- anything goes!  (Anyone who knows me knows that I am very big into using up my crazy stash.) 

For my project, I used a couple of photos of my daughter from the day she got glasses.


She had wanted glasses when her two best friends got them so... when she suddenly showed the symptoms of needing them, I thought she might have been faking!  She is the most honest, compassionate, and kind person, so I should have known that simple vanity and peer pressure was not directing her.  In the end, she is near-sighted and really needed them!  I felt like the worst mom ever for doubting her!  These pictures are of her purple pair-- I can't believe how grown-up she looks here.

From the sketch, I used the idea of overlapping rectangles  the left-of-center placement of dual photos, the title placement, and the rows of upper and lower dots.  

The font is from Cricut's Doodletype cartridge, cut at 1" with shadow.  The glasses are cut from Cricut's Nifty Fifties cart, cut at 1-3/4" (layer one). The banner is cut from Cricut's Artiste cart (page 58), cut at 3/4".  My page finished at 8"x 8".


Thank you for checking out my post today!  To see many of my previous paper projects, check out My Project Gallery.


I'm linked up and loving everyone's take on this sketch!  


Sunday, May 6, 2012

Color Challenge: Silly Crazy Cousins

I love a challenge!  The color challenge on the Circle Blog threw me for a loop though, for some reason.  I had an idea and cut my elements and.... nothing.  After the Mess On Your Desk timed challenge (my previous post), I got a fun, creative boost, changed the photo, and started fresh!  I found some old photos of my daughter and her cousins on my computer and the silliness inspired me to go in a new direction.


This is my entry for the Cricut Circle Blog NSD Crop:  Color Challenge.

We were given a picture with a color palette to use and I actually had the papers!  *miracle!*


For the crafty how-to:

  • I hand-cut the aqua base mat and green stripe.  
  • The daisy border was from Paper Trimmings (page 37), cut at 1"  (Fit-to-Length was 11.5").
  • The Circle border was from Elegant Edges (page 24), cut at 1-1/4" (Fit-to-Length was 11.25").
  • The semi-circle with daisies was from Pretty Pennants, cut at 5-1/4" (Fit-to-Length was 9-3/4").
  • The face was from Paper Play (page 12), cut at 8".  Popped up at 1/8".
  • The crown was from Rock Princess (page 39), cut at 1".
  • "Crazy" was from Mickey Font, cut at 1-3/4" and embossed with Cuttlebug Chevron.  Popped up 1/16".
  • "Silly" was from Quarter Note, cut at 2", embossed with Swiss Dots, and inked.  Letters were not welded, just cut and glued together.  I overlapped the two "L"s a bit.  Popped up 1/16".
  • "Cousins" was from Art Deco, cut at 2-1/4" for the "C" and 1-1/2" for other letters.  I created a wonky-striped paper from which to cut the letters.  Because of all the adhered layers, I used multi-cut 3.

Thank you for checking out my blog post!  I have several more Challenges from the Circle Blog NSD posts to try to crank out.  Hoping to get at least one more done today... fingers crossed!

To see many of my previous projects on my blog, click here for My Projects Gallery.

Saturday, January 7, 2012

Elizabeth-Marie-Gertie-Jean, Birthday Queen

Decades ago, when I was in my 20s *ouch*, I created dimensional stuffed cloth dolls for local art galleries.  One of my favorite series was the Birthday Queens!  These were dolls for women, not girls, and though whimsical, had a little story to tell too.

I decided to resurrect a Birthday Queen in honor of my upcoming birthday-- this time in paper.  I wanted to get back to a little paper crafting after a fabulous time of loom knitting and sewing.  I thought you might enjoy...

Elizabeth-Marie-Gertie-Jean
 The Birthday Queen


My project was inspired by the jaw-dropping gorgeous figures by George Stewart at the Ventura Museum, photos of which I caught on a blog from MJ Ornaments.  Click here to see them!  You can see all of George Stewart's Historical Figures by clicking here.  They are incredibly fun to look at.

For the crafty how-tos:  Well, I really have to admit that Elizabeth-Marie-Gertie-Jean is pretty much a hand-cut gal.  I did start with a figure from Country Life at 9" on my Imagine, floodfilling her with RGB 250, 229, 210, but my scissors really re-cut everything on her from her head to her chest and arms.  (I know what you are thinking and, no, none of the women-folk on Country Life have bosoms.  Those were hand-cut too with 'droop' and all.)  Her lower body was completely cut off, since it was not needed with the dress.  I did appreciate having the upper body as a guide, but I changed her proportion when I gave her that lean, long torso in the form of a fitted bodice.


In the past, my Birthday Queens were matronly, more than a little thick through the middle, and a little too prophetic for my ease.  I decided that I wanted a lean and long Queen who obviously worked on her core muscles and did a little yoga.  Maybe that would come to fruition too....fingers crossed, yoga mat placed.

Her dress was embossed with two Cuttlebug folders.  The birthday candle trim on the bottom of the underskirt was made from an EK Success edge punch.  The gold paper is part of a paper pack my Santa-Mom gave to me this Christmas.  Tissue paper was used for the collar and cuff flounces.  The gold stars are the waste from a Martha Stewart edge punch; the silver stars were in with the metallic shred I used for her hair... more about that in a moment.  The jewels are self-adhesive rhinestones and pearls from Kaisercraft.  (I absolutely love those but can only find them at Meijer.  What's up with that?  So much easier than hot-fix jewels or using glue.  Each pack has a great variety of sizes coiled together and they have a great hold.)

Her hair is made from twisting Metallic Shred basket fill from Hallmark.  Her head is incredibly heavy.  I twisted the fibers until they curled onto themselves and hot-glued them in place, suffering one of the worst burns ever. (Whininess is ageless don't you think?).


Her crown is a Cricut cut combined with edge-punched gold paper.  I started the crown with a 3" layer from Baby Boutique, printed and cut on the Imagine.  I trimmed it, jeweled it, and manipulated it to curve out.  Then I placed it behind the birthday candle edge cut, that I wrapped around her head.

Her face is hand-drawn and inked.

I hand-cut her gift... and her fingers that hold it.  You know, historically, royalty has given the absolute best gifts, right?  Just a needless reminder:  Birthday Queens bring wrinkles with wisdom so use care (and eye cream) when accepting their mandatory presents. 

So... as I was saying, the background paper was from a paper pack that has been setting, ignored, for too long.  The birthday cakes are from Yummy, printed and cut in various sizes.  The tables are from Serenade at 4" and 3" with hand-cut and trimmed tablecloths.


It's a new year and we are all a little older.  Happy Birthday to all the January babies (you will always be a baby to someone somewhere).

More gifts to me from me in the next few posts!  Can't wait to show you!


Pin It

Wednesday, July 27, 2011

Keith in a Pickle...Costume

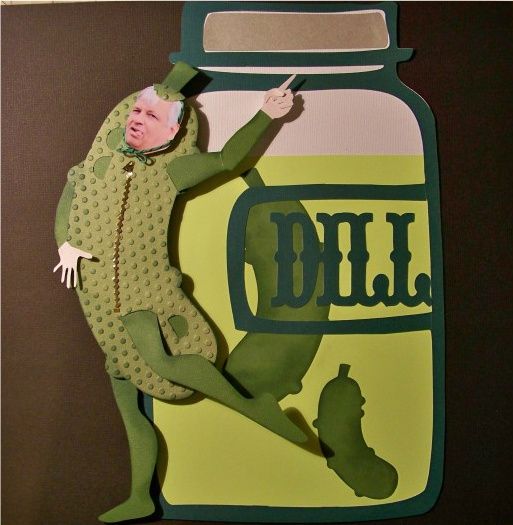
Some say the pen is mightier than the sword. I say the Cricut trumps 'em both. Never mess with a paper crafter!   Today, revenge comes with a little paper and my Cricut. I call this 'Keith in a Pickle...Costume.'


In case you don't know, my friend Donna's husband has called me out!  (You may know Donna as Scrappymama on the Cricut message board).  In his travel blog, Keith recently renamed The Three Gossips formation in Arches National Park in his post.


He said, "I nicknamed them Donna, Rebecca, and Nadia. Names are purely fictional. Any resemblance to real people is well deserved." You can see the post for yourself -- click here

That my friends, says he's ichin' for a fight!  I knew that Keith would be my helpless victim on paper.  Oh, the power!

Amazingly, there was a lot to learn in doing this!  First, I had to figure out how to use the pun 'in a pickle' to see my revenge.  That bit of genius was provided by the lovely Donna, my co-Gossip.  I wanted him to be a pickle, but I wanted to make it clear that this was Keith, so I opted to put him in a pickle costume.

I had asked for pictures of Keith so I could make a paper portrait of him.  I had learned to do that in a previous post.  You can see that by clicking 
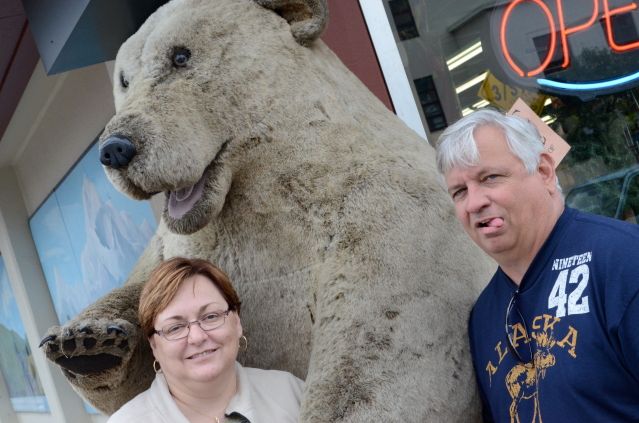
here.  After I received a perfect photograph of him with his tongue sticking out, I knew that I was going to use the actual photo instead!  (How could I top this?!)


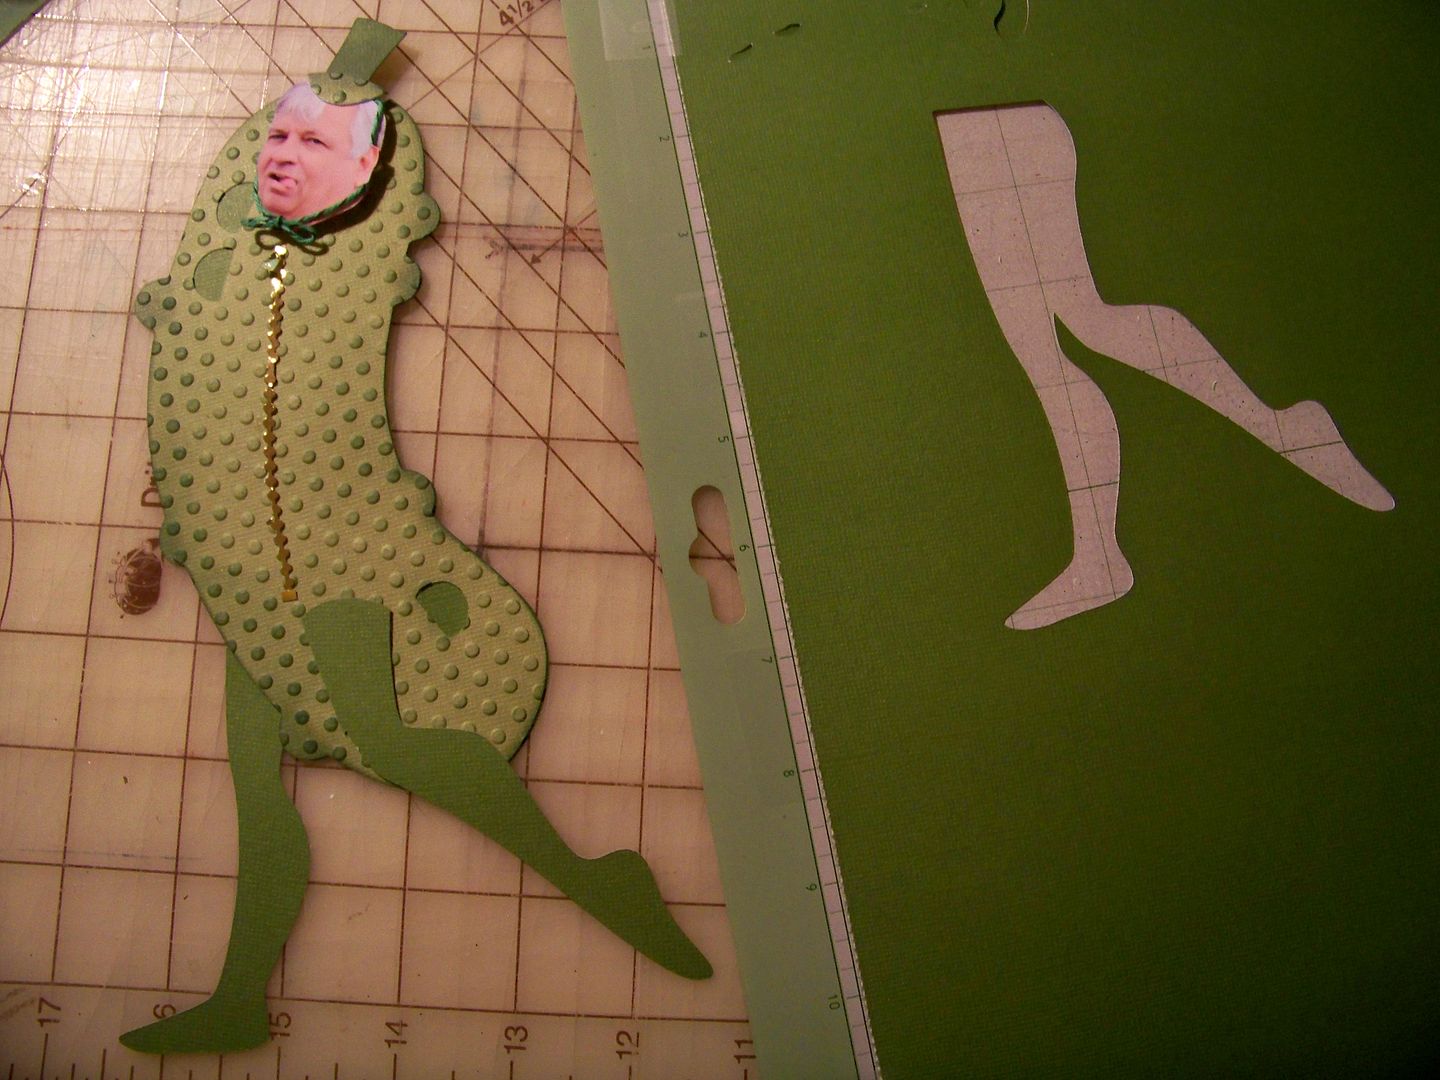
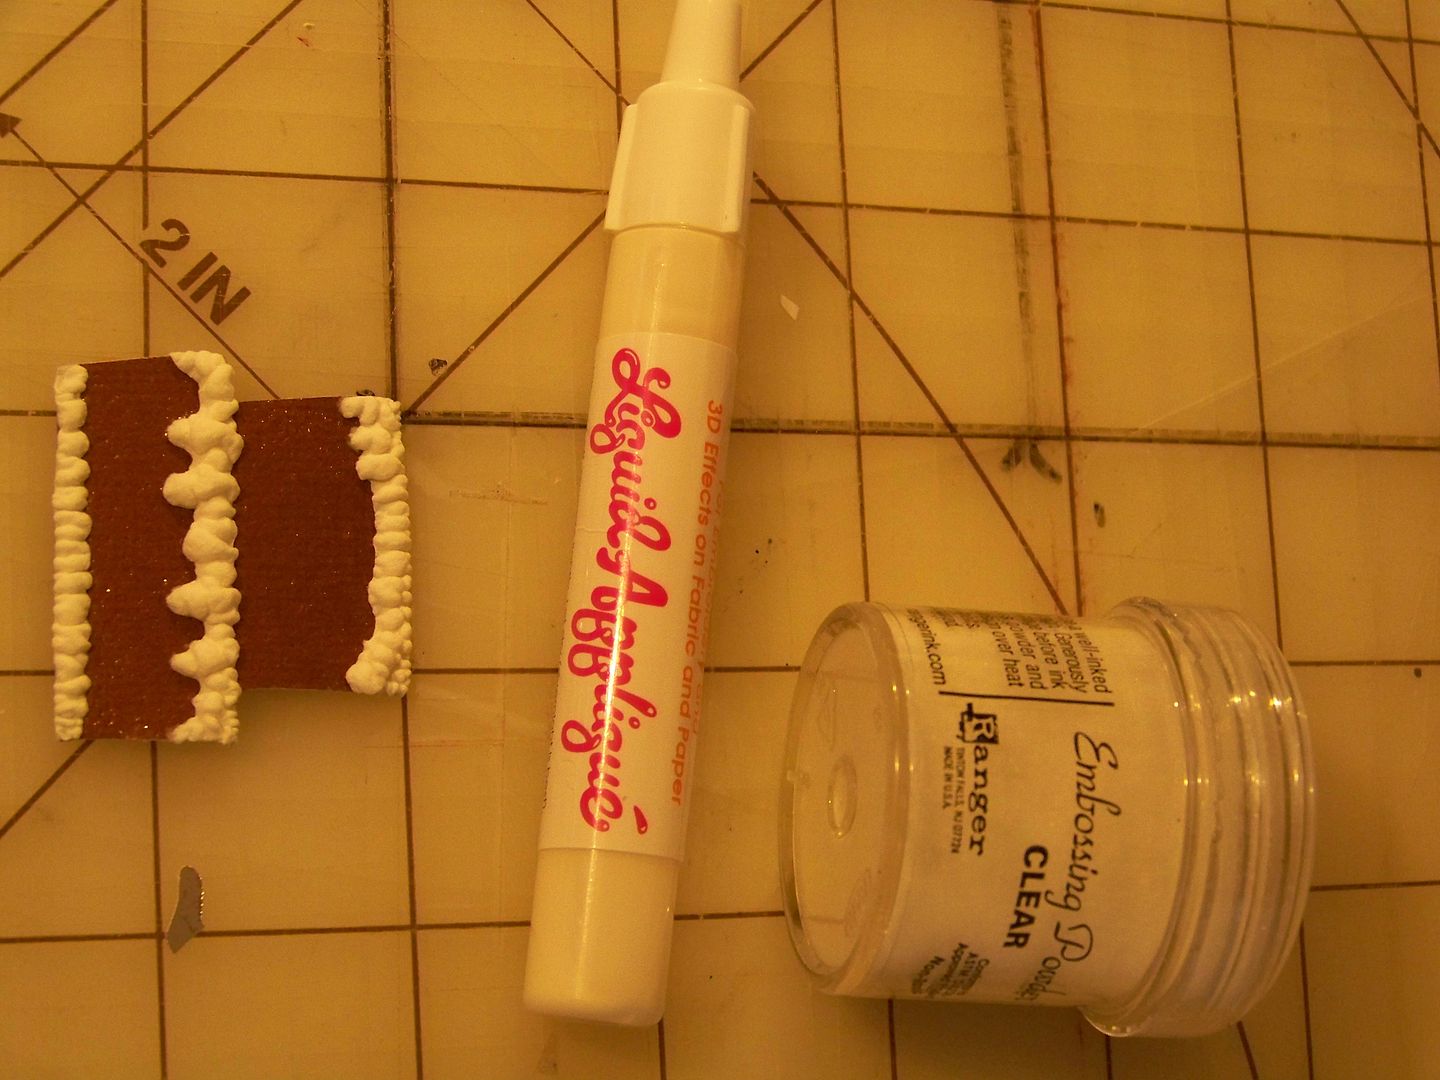
The cut I used for the pickle costume is from Just Because Cards cartridge, page 26, cut at 10-1/2" on my Expression.  (The other pickles in the jar were my test cuts.)  I needed the costume pickle to look a bit different from the 'real' pickles in the jar--the way real costumes look different from the objects they depict.  I opted to ink the real ones and only use the base layer.


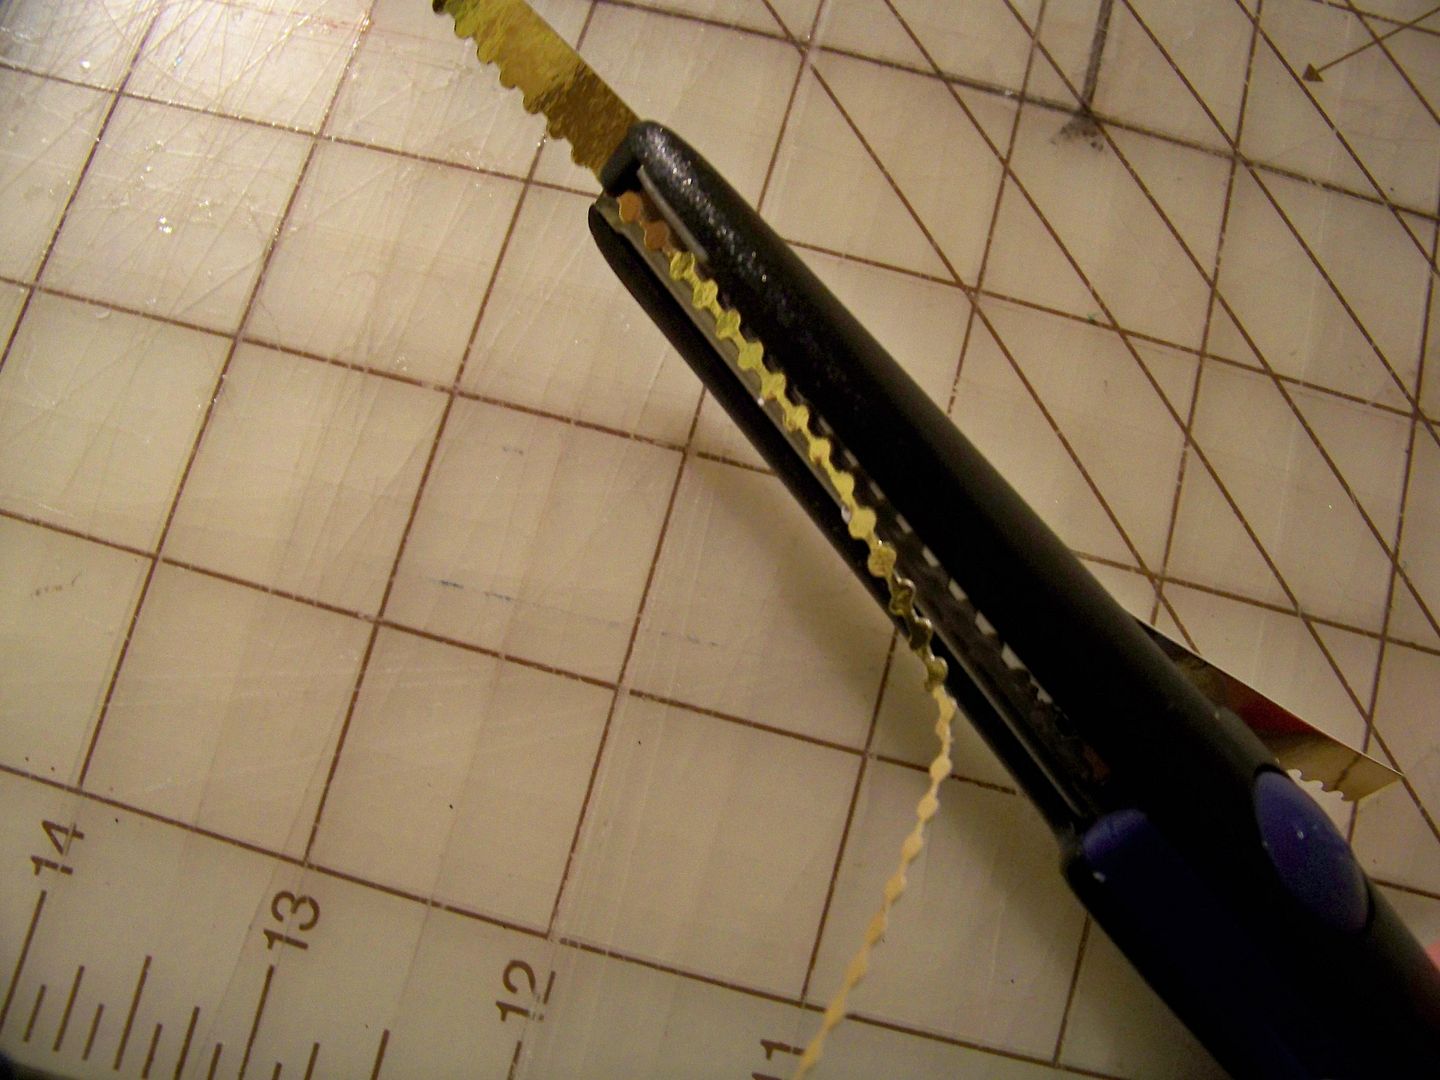
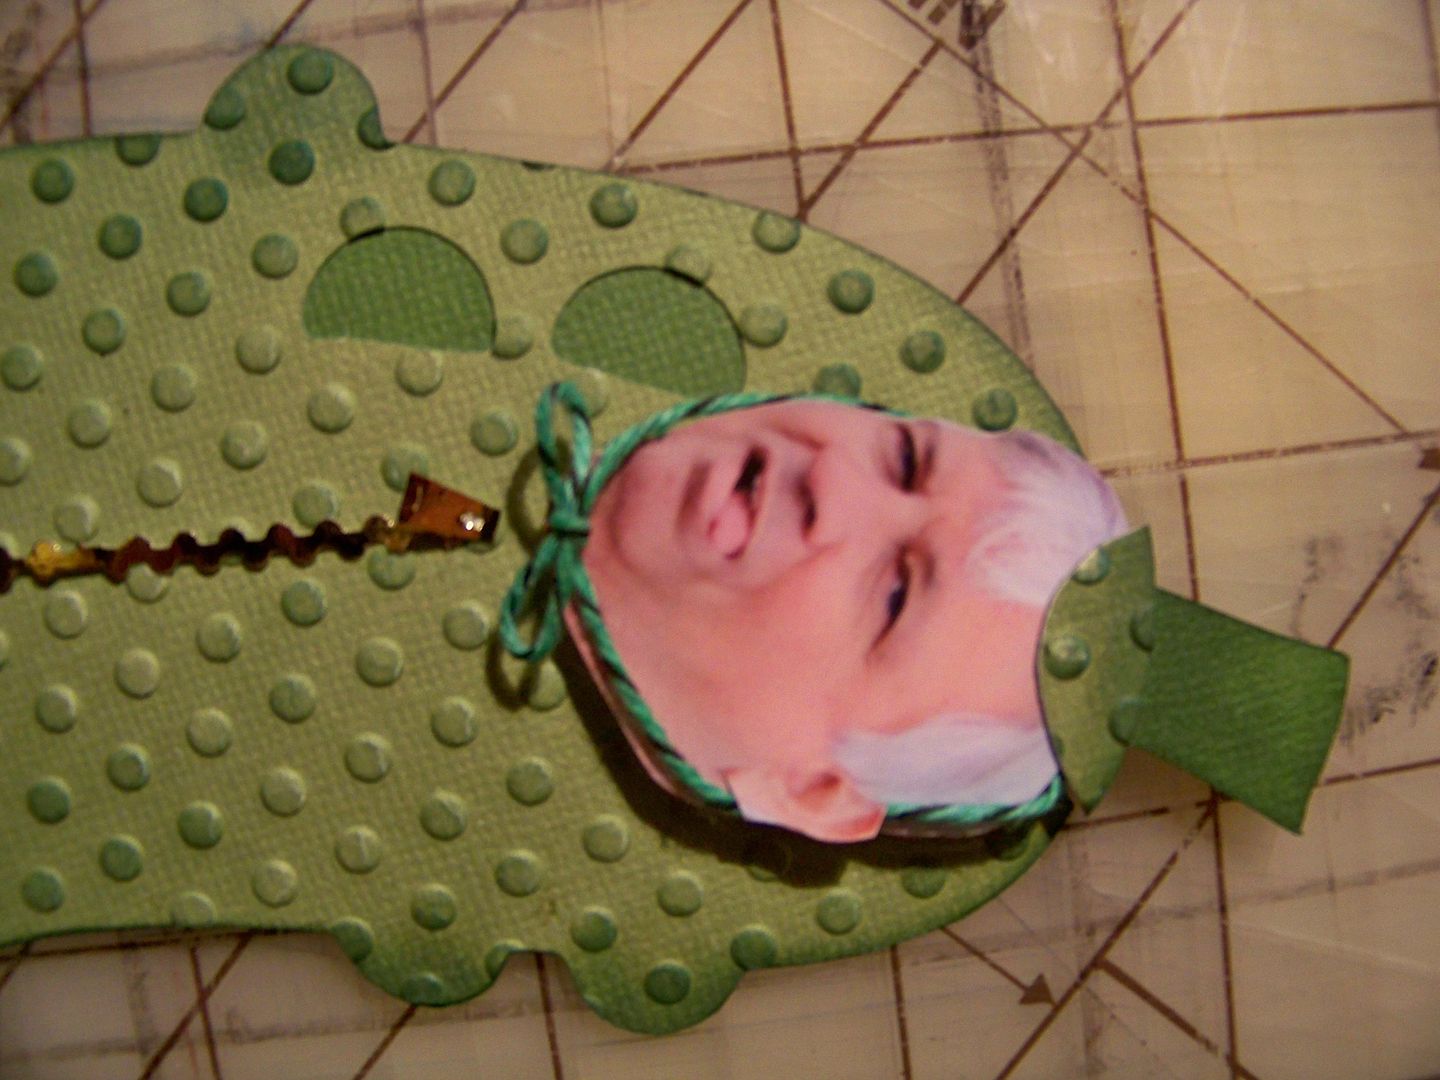
For the costume pickle, I used a top layer, pressed it through the Cuttlebug for fakey pickle bumps, and inked over them.  I created a zipper using decorative edge scissors and metallic paper.  I hand-cut a little zipper pull.


I cut out Keith's head from the photo.  (It seemed like he was actually sticking his tongue out at me once I did that, which propelled this project, giving me the little boost I needed to continue... or maybe it was just late and I was getting weird.)


I popped his head up with pop dots and cut off the top of the pickle so I could make him a hat.  Don't you just love the chin strap!!  (Chin straps, beanies, and clown noses all have the same goofiness to me).  I made little slits at the top and bottom of his ear so the twine would tuck behind the ear.  The twine I used was some that I had dyed recently.  You can see that post on how to dye twine by clicking here

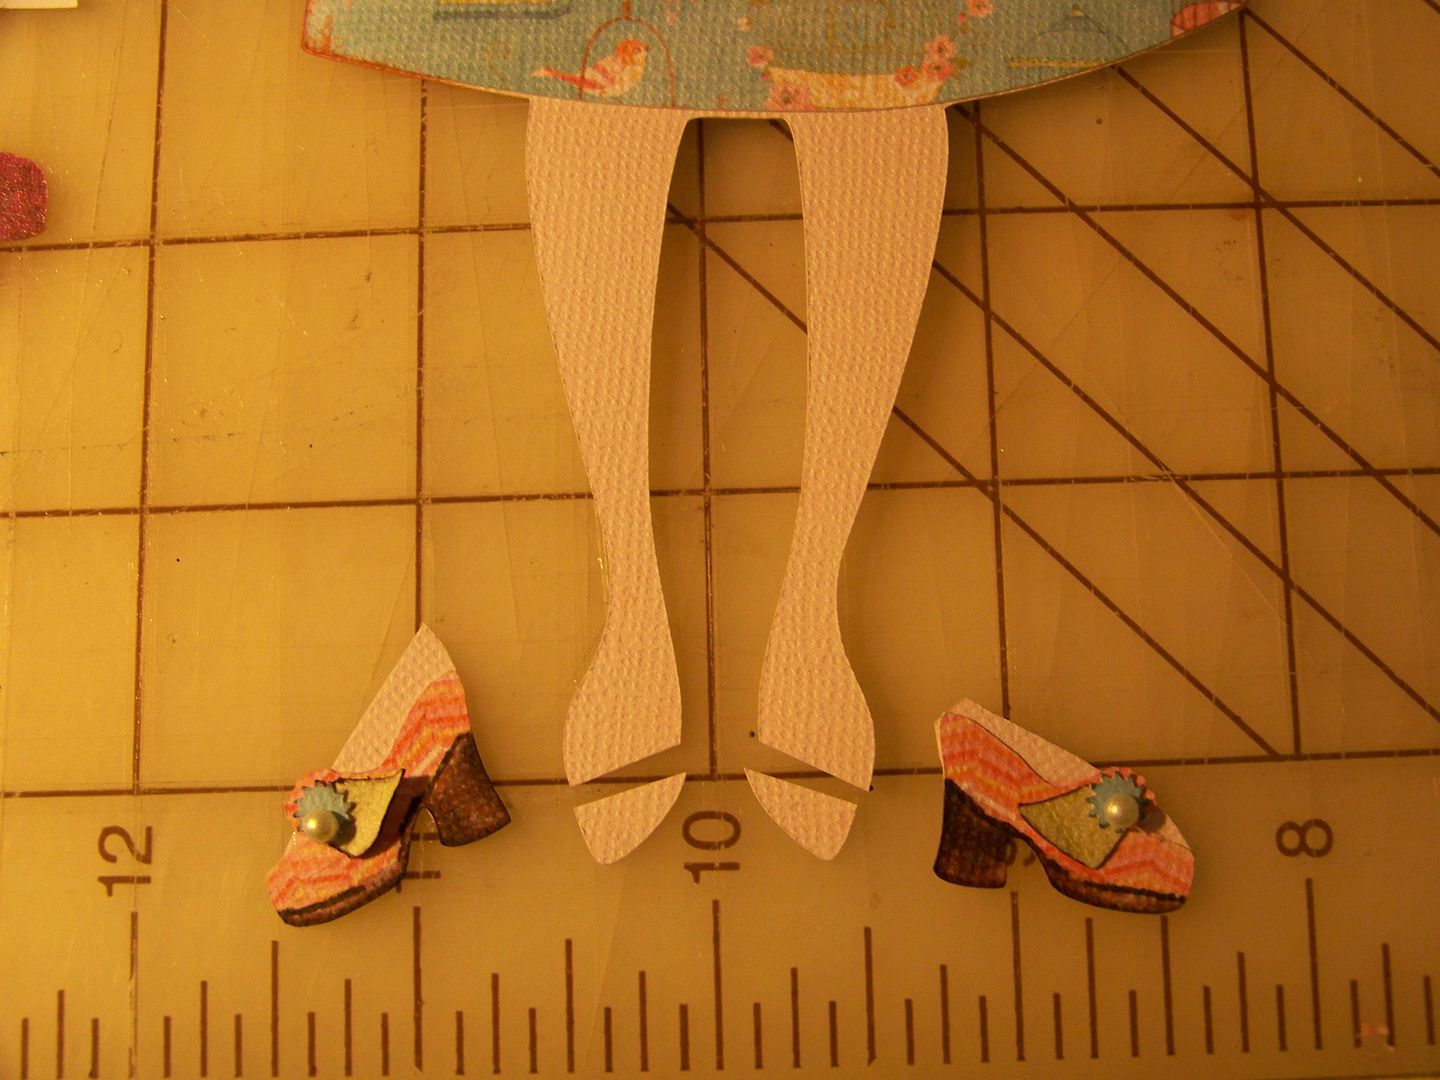
Next, his legs.  I don't care what you say about the Shall We Dance cartridge; boy, was I glad to have it on this project!!! Where else would I have found men's legs in tights????  I loved this!  (I never, ever thought I would use this particular cut, so thank you Keith!)


The legs were cut at 9", flipped using shift and the layer feature, from page 49,  I  cut them apart, creating a thigh for the top leg and inked the edges.  Nice calves, huh!  I used an X-acto knife to cut a slit just above where the top leg would be positioned.  I wanted it to look like it was coming from a leg hole in the costume.  I tucked it into the slit and glued it flush at the top, but used a pop dot at the knee to pull his leg into a little kick.  The bottom leg is attched with a pop dot to build a little depth.


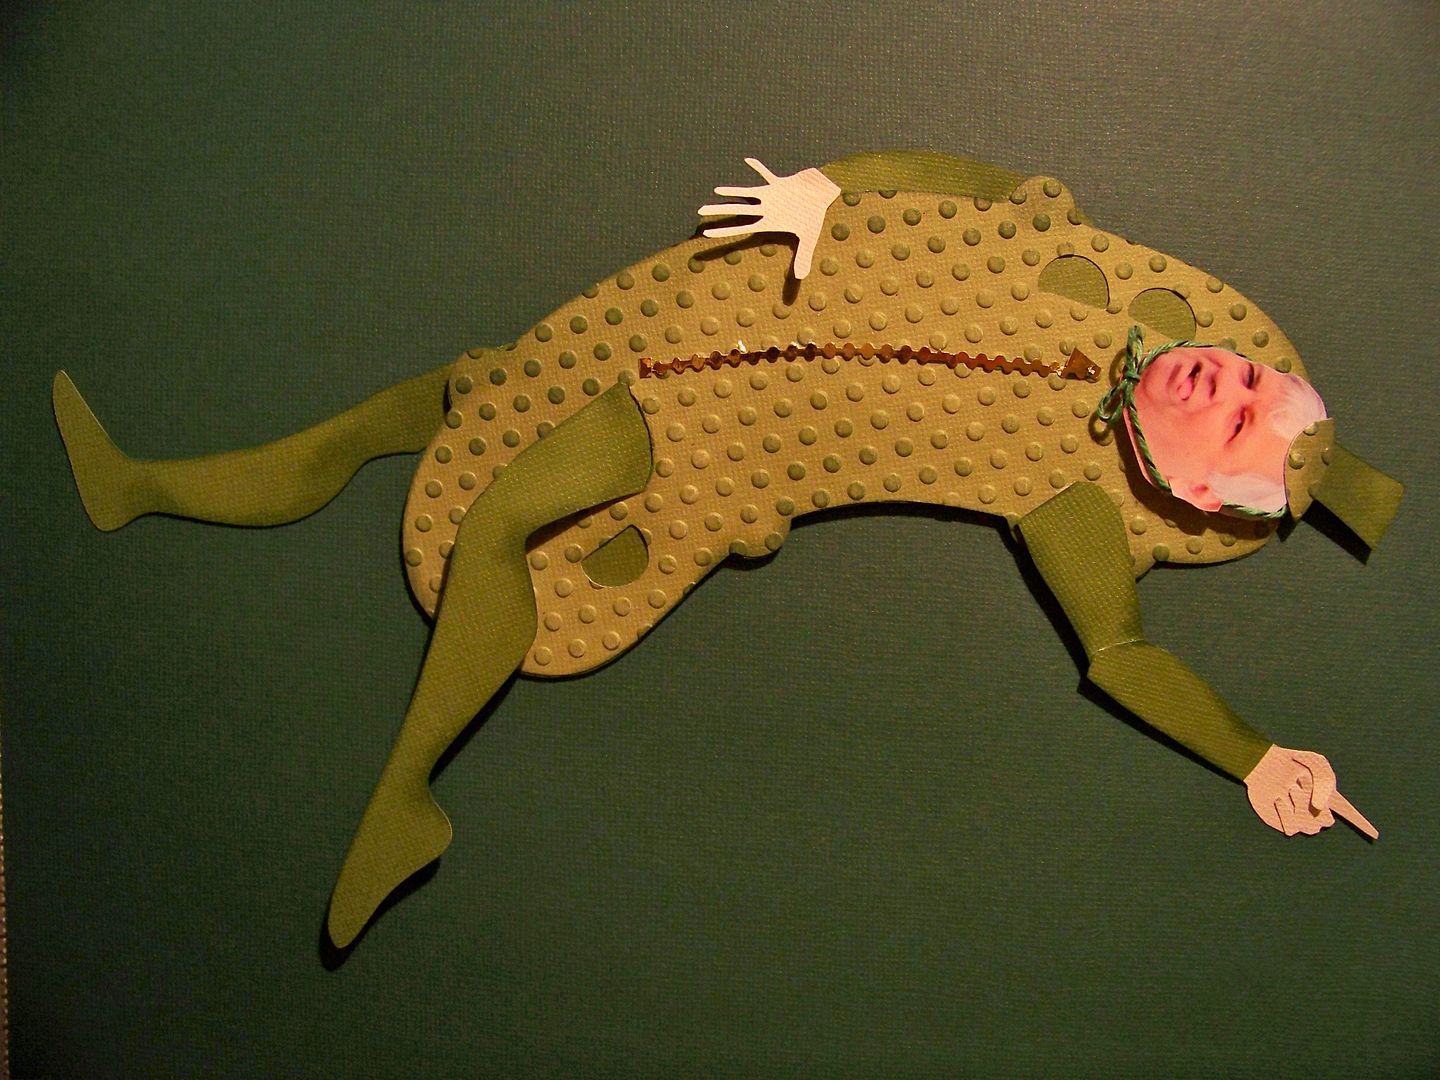
So, the legs made him look like he is dancing.  Seeing that is when I knew he needed to be giving us disco hands.  There's nothing like a pointed finger in the air to say 'look at me shake my pickle booty.'  That was the next element!  The Feeling Groovy cartridge would not cut the arms to the scale I needed on a 12x12 mat, so I decided to make custom hands and arms.


I used the search words 'hand sihouette' in Google Images to find these great hands.  They were already the perfect scale!  I simply used the hands I wanted as patterns and hand-cut around them and the flesh-colored paper at the same time.  (I used paper that I had printed on the Imagine for the flesh, using RGB code 250, 229, 210). 


That worked just fine for the open hand.  For the pointing hand, I had to create fingers and a thumb.  I took a picture of my daughter's hand in that position.  Then I cut a second pointing hand, cutting away all but the folding down fingers, and a thumb shape that matched what I saw on Piper's hand.

See how the thumb overlaps?  That is the key!

I glued only the top edge of the fingers and side edge of the thumb, bending the ends slightly. 

For his extended arm, I found one just like I found the hands, by searching 'arm silhouette'.  For the arm close to the body, I just cut a simple shape and attached it behind the body.  I adhered the hands to complete the figure after inking the arms heavily.


All along I had kind of thought he would be in a jar of pickles.  I had envisioned that I would use acetate that I colored pale green to be the water.  The error in this thinking is in forgetting how dimensional I made Keith.  I would lose some of the dimension and have to pop up the acetate layer.  At this size, I opted instead to keep the jar behind him for reference and have him doing his little dance in front.

For the jar, I used the Savory cartridge, cutting at 11-1/2".  I altered the cut somewhat, cutting away the pickles on the original, since I had made my own pickles.  I cut the base twice;  cutting once in white for the jar and once in light green (cutting off the top to adjust the level of liquid) for the pickle juice. 

I mounted the jar and the costumed Keith on a piece of 12x12 black cardstock. 


Thank you for looking at my blog today!  I hope you enjoyed my paper revenge! 

Edited 7-29-11 to add:  As the pickled gentleman that he is, Keith created a follow-up post on his blog where he showcases Donna's beautiful mini book.... and has an answer to my 'pickle post'.  I also get the honorable title "Cricut Whisperer," which I vow to make into a Yudu project!  You can see his follow up post by clicking here.  Thank you, Keith, for being such a good sport!

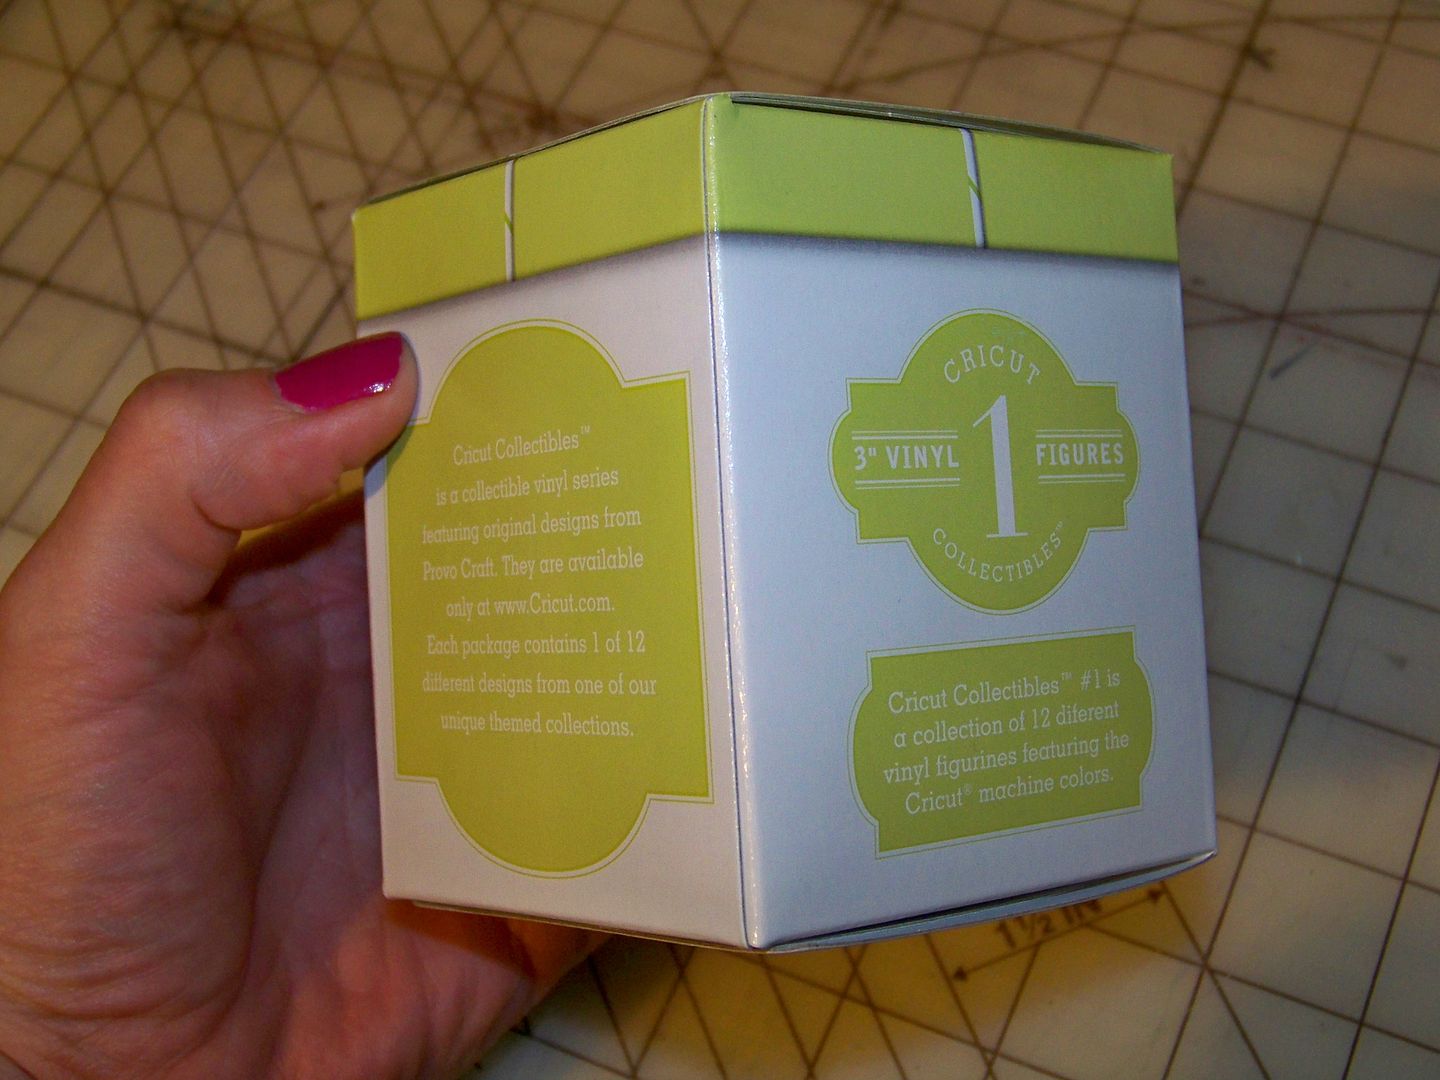
If you are viewing this before July 30, 2011, it is not too late to have a chance to win a Cricut Collectible!  You can do that by clicking here to go to that post! The collectible I am giving away is not yet for sale anywhere!  (How exciting is it to win something that you can't even buy yet!!!)  It is unopened so the secret of which color is inside is still in tact!!  Check it out


Friday, April 22, 2011

Bird-day Lady -- 5th Anniversary Design Challenge


I am so excited to share with you my entry for the 5th Anniversary Design Challenge.  Working on this project has felt more like the first challenges I did with the Cricut Circle where my goal was to try harder, work out some paper building solutions, and the prize was getting to show off my work.  In that spirit, I wanted to share my project!  The rules for this challenge were simple:  make a 12x12 scrapbook page with a birthday theme and without photographs, using any Cricut cartridges.

I don't like to sketch out a project before-hand.  I started, like I often do, by making individual elements.  This is the most fun for me!  I knew the figure would be central and I was most unsure of how she would look so that's where I started.  I used Country Life, cutting on the Imagine using Fit-to-Page and entering RGB 250, 229, 210 to create a skintone.  (Remembering that the Imagine does not have an indicator to know the actual cut size when using FTP, I plugged the cartridge also into my Expression and cancelled before the cutting began, in order to know that the cut size for this figure is 11.5" at FTP.) 

I traced a couple of extra heads to play with.  I have been looking at those fabulous works by Brittney Lee and Jayme McGowan (you can find links to their sites by looking on the list of Inspirations on the side bar!) and knew it was time to start "getting a little 3D" with my faces!  I also wanted to start using paper to add facial features instead of just my Zig fine pen.
I made a nose and eyelids by hand-cutting.  I used Everyday Paper Dolls for hairstyles and cut some ideas on my Expression, noting the sizes on the samples.
Once I decided on a style (in this case, 5" Everyday Paper Dolls page 31), I cut two (one for the base and one for some layers).  The hair color is RGB 181-82-57.
I used a bit of Liquid Applique to make eyeballs, removing my heat source before they got too puffy.  I drew, using a super fine Zig pen, eyelashes on paper crescent eyelids and attached them.  I hand-cut a layered mouth.  Layers of hair were inked before being glued on.  I glued the hair flat that was coming from the top of her head and popped up sections as they moved away from the scalp.  Cheek rouge came in the form of ink from an inkpad dabbed on with a sponge eyeshadow applicator.
I hand-cut ears, using a little ink to give detail.  The glasses are from Nifty Fifties, page 53, cut at 2".
The dress and apron are cut using prints from Lori's Garden.  I cut two aprons so I would have extra 'fabric' to cut a 3D ruffle with the same scale print.  I printed a super small square (.9")  and flood-filled it with the same (shrunken) print.  This is the 'fabric' that I used to hand-cut my heart applique.  The print on the dress gave me a second layer to the theme:  birds.  I wanted this to be more than just 'Happy Birthday Cricut' and this paper gave me that!  In the tongue-in-cheek way that Provocraft cartridges use puns, this character became my 'bird-day' lady!

Well, I love details!  This is where I like to give a little extra 'love' to my characters.  I thought, even with those big ole ears, she needed a necklace more than she needed earrings!

I found the Cricut logo on Google Images.  I copied the image and shrunk it down to teeny (that's the technical size).  I found a sweet charm on Paper Lace (page 68) and cut it twice - once at .75" and once at  .5".  The larger charm was cut to become the choker on which the smaller was a charm.

She needed great shoes... and slightly different feet.

I cut away the figure's toes to make way for those fabulous shoes on the Paisley cart (page 51), cut at .6".  I had to add a little flesh for the tops of her feet.

What's a birthday without a great cake?  I had learned to make the exact cake I wanted from something I had figured out months ago for one of Doxie's Sunday Challenges.  You can find that project here.
I used Sweet Treats for the cake (page 39), cutting off the top layer (so the height would be right once I added the candles).  It was cut at 2.2".  I used clear embossing powder to get a shiny chocolate frosting.  I used Liquid Applique for the decorative white icing and hand-cut a little silver tray.

The candles were cut from Birthday Bash.  I cut off one candle so there would be only 5 in honor of the 5th Anniversary.  Because the cut was so small, I hand-colored the candles.  I added Glossy Accents to the candles and flames!
I was so happy with the final character! 
My bird-day lady is kind of quirky so I thought her guests would be too, following the secondary theme, I made the party birds... and the gifts. 
This bird is from Birthday Bash cut at 1.8".  An extra wing and beak were cut and popped up for dimension.  I used the Cuttlebug on both birds.
This was cut at 3.2" on the same cart.
I love how the Imagine has coordinated solids on the carts with the prints.  These are all printed using Lori's Garden.  The cuts are from Birthday Bash at 3.1" and Sweet Treats at 1.5".  Check out the tag -- another thing I printed from Google Images.  I cut extra bows and popped them up after inking.
This is that same Birthday Bash cut, but this time cut at 3.5".  I transformed the front package into a gift bag, tucking in tissue paper, adding handles and a tag cut from Imagine More Cards at 1".  The gift bag was embossed with the Cuttlebug.

So, now I had all of these cute elements.  The next question:  how to make them work together.  I found that fantastic bonus paper on Kate's Kitchen and knew that was it!  I printed out two copies, cut off the floor and cut apart cabinets, removing the refrigerator (since it had a face) and adding extra cabinets.  I love that window!!!! 
I added a Cuttlebug and Cricut Baby Bug from Cricut Everyday, cut at 1.2", for her counter. 
The floor and all the cut elements of the kitchen were adhered to a piece of tan cardstock.  I cut down the floor a bit and lowered the cabinets once  I decided that I would use woodwork to place the character at the edge of her kitchen, looking into the next room. 
I added a piece of parchment to cover the kitchen back wall (but not the floor).  I wanted to create atmospheric perspective and mute the colors a bit so the figure and elements in the foreground would pop and look closer than the kitchen elements on the 'back wall'.
I added more banner cuts, just by making the same one as before and cutting away the bird, attaching as needed for added length.   The letters on the banner are from Cherry Limeade, cut at .8". 
I added a mitered wood trim using Imaginisce paper I won at the Cricut Circle Ohio meetup.  This is one of my favorite details:  I bent a mini brad, leaving part of the shank on the top of the paper, to resemble a nail holding up the banners.
I placed my packages and the little bird, finally finished!  I also added a bit of ink to her legs, to keep them from blending in with the flooring.

I used pop dots that were 1" thick to pull the figure up off the page.  Other elements were popped up 1/8" to 1/2". 
 I absolutely love the 3D features that I figured out for this project.  This is my new favorite character.  She really seems to have a personality and somehow she looks familiar.  Once I finished her, I started thinking about pieced paper portraits of real people and even tried a self-portrait -- you can see it on the sidebar!  That is opening a whole new world for me!

So, you say, what if this were a keeper and you wanted to add pictures from the party?  I love making vignettes and never really combine them with photos, but if this is supposed to be a scrapbook page, this is how I envisioned adding photos with these real party pics with The Bug!

Thank you Okie and Kendra for giving me permission to use your celebrity photos with our favorite birthday bug!  Looked like a rockin' party didn't it!
Thank you for visiting my blog!  I am so excited to share this project and I really hope you like details as much as I do!  I cannot wait to see everyone's projects -- I think this is one of those challenges that brings out the best in everyone!  I had so much fun with this... I hope it shows!

But wait! There's more! Click 'older posts' above!

But wait!  There's more!  Click 'older posts' above!