Thursday, November 30, 2017

Personalized Ballet Bears


For the first time, my 13-year-old daughter's ballet teacher asked her to assist with the kindergarten class and she has loved it. She comes out of there with a smile from ear to ear and stories about how cute the little dancers are.  This weekend is the annual Christmas Tea at the ballet school.  She wanted something to give each of her little dancers.  She had her second knee surgery of the calendar year about three weeks ago, so she has missed her little class and is so excited to have something to give them.

I needed an idea that wouldn't mess up my Christmas budget.  I started by going to the Dollar Tree.  I had hoped to find girl elves that I could personalize with heat transfer vinyl and my heat press, but a happy accident happened:  they had no elves.  They had bears!  I had hoped for all polar bears, but I was happy to find what I did and noticed that their cheap little raggedy scarves were barely attached.  That sold me.  I knew I could take off those scarves and make these into ballet bears for the little students.


I picked up a 25 yard spool of sparkle tulle and a 5 yard spool of 5/8" wide grosgrain ribbon at the craft store.  I use 3 yards of tulle for each bear and just under 30" of ribbon that I trim down after I tie it on the neck for each bow.  The GREAT news is that this time of year is the best time to get that for half off so that put my supply budget at $4.  That meant I could make six personalized gifts for a total $10.


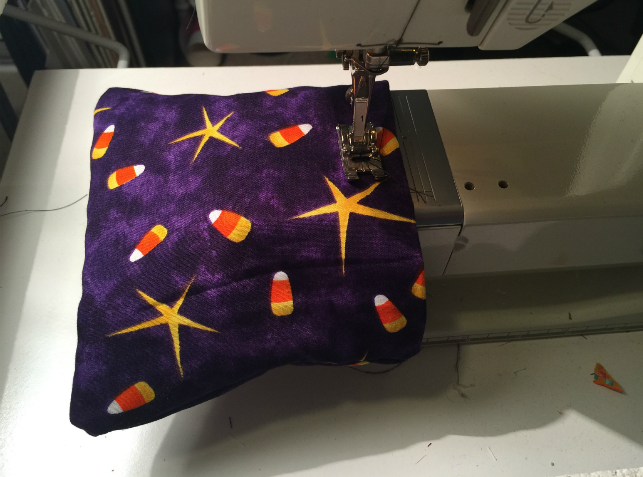
For each 3 yard length of tulle, I folded it in half, making it 3" wide.  I put the fold side under the presser foot of my sewing machine and zigzagged gimp cord on top.  (Perle cotton and buttonhole twist can also be used for this.) This is the method I use to gather stuff.


It makes it really easy to gather quickly--- just make certain that the stitching clears the cord and never catches it!  I leave a short tail at the beginning and leave a short tail at the end.  The stitching doesn't even have to be perfect.  The tutu is so tightly gathered that uneven cord application will never be noticed because the cord never shows.


After stitching, I hold the cord and draw up the tulle, keeping it from twisting.


I put a tutu on each bear, using the gimp cord to tie it on.  I make several knots and trim the excess length of cord right off.  It is so full and fluffy, it stays put with no other stitching needed.

Next I am ready to stitch on my ribbon.  I think there is something really special about personalized stuff.  It is my favorite thing to take something inexpensive and transform it into something no one can buy off the shelf.  I love that the tools in my craft studio afford me that.

I opened up my Embrilliance embroidery software.  Using the list of names the ballet school owner texted me, I used a free BX font that was created by Lisa Shaw.  I originally picked it up off the CME Magazine website, but Lisa has it on her blog and that makes it easier..  One thing I know for sure:  stitching on ribbon without a basting box is a disaster... but with a basting box, it is perfect every time.  I highlighted the first name and, in the software, I clicked the utility tab and chose "Baste Design."  I continued all down the virtual hoop. That put a basting box around each word, just as I need it to keep even tension on the stitch area of each ribbon.


I printed out my design (that's just done by clicking the 'file' on the toolbar and clicking 'print').  That allowed me to put my ribbon over each word to make sure the basting box would fit inside the width of the ribbon.  For the names with the "g" and "y",  had to adjust the height of the name.  This font resizes and adjusts just fine.  I simply removed the basting box for the specific name and then used the handlebars to squish the text so it would be less tall. I highlighted the name and gave it its basting box back.  The program automatically sizes the basting box to the adjusted design size.

Next, I printed my design again because I needed the corrected copy and I went to my light box.


I hooped tearaway and marked my cross-hairs on my hoop using a pencil.  I extended the cross-hairs on my printout to make it easy to match up over the light box.  I used tape to hold the ribbon in place.  I used about 30" of ribbon for each name even though I knew 22" would be the final length.  I wanted a little wiggle room even on the end by the name.  It is much easier to trim down than to keep having to re-adjust the bow!  I pinned the ribbon out of the way and stitched.  (Little note from me on this-- make certain that your first needle prick on each basting box is going in the ribbon.  Stop your machine and move the ribbon a teeny bit if you need to because having the basting box around each name is just that important!)


Then I simply removed the basting boxes and tore the ribbon free from the stabilizer.  I tied a bow on each bear and trimmed the ends.  They each seem to have a little personality.  I guess that is the silver lining of cheap bears:  the lack of quality control means they have unintended expressions.  Ha!


This one has an attitude!  I think he's a boy and hates his outfit but don't tell Lydia.


Right now, my Dollar Tree also had Nutcracker storybooks so I also got one of those for each student.  We find out at the Christmas Tea what ballet the students will be performing in June.  We did the Wizard of Oz last year, Sleeping Beauty before that, Alice in Wonderland before that.  It is different every year and this will be the 10th one my daughter dances in and hopefully her knee will finally be healed and healthy and for that we are so excited. 

Mentioned on this post:


Thank you for checking my blog post!  Happy holiday crafting!

Thursday, October 19, 2017

Halloween Treat Bag - Lined Drawstring Bag with Embroidery Charm


In putting together some soap shares, I wanted to make Halloween candy treat bags to go with them.  I was inspired with skeleton earrings digitized by Sonia Showalter and thought they would be perfect for charms.

I opened the file in my Embrilliance embroidery software and added as many skeletons as I could easily fit in the virtual 5x7 hoop.  I used the color sort feature so that the black loops and the area that will make the eyes are stitched first on all of the bodies, then the white stitches are all done.  That would allow the embroidery machine to handle this part of the project while I made the bags.  My machine stitched three hoops of skeletons.


I hooped two layers of vilene stabilizer.  This is a heavy water soluble type of stabilizer.  After stitching, I trimmed close to the stitching and ran each skeleton under hot tap water, dissolving the stabilizer, leaving me with these free-standing-lace-style charms!   Leaving in some of the starchy stabilizer meant that they are kind of stiff and have a little character!  (Allow them to dry completely before using.)


These are very stitch-heavy, as you can imagine they would need to be!  The good thing is that while the machine stitched these, I was able to use my sewing machine to make the bags.

I started with stacking my fabric and using my rotary cutter and mat to cut bag pieces that are 7.5" wide by 6.5" tall.  I cut two for each outer bag and two for each bag lining.


I sewed two bag fronts, right sides together, sewing all the way down one side, across the bottom, and down the second side, leaving open a space on one side.  I did that by stitching down 1/2", backstitching, leaving a 3/4" gap, backstitching, and sewing down the side.  (see diagram above) When I turn this right-side-out, I see a gap in the seam.  This is required for the ribbon casing later in the project!


Now, at this point, I must say something:  in the picture above, you can see that I serged the edges of the fabric pieces.  There was a time in this project when I thought I would make an unlined bag so in true workroom style, I prepped all the pieces, but after I tried one, I really didn't like it!  I decided that a lined bag would be better looking and take only three extra steps so it was a no-brainer!  Un-serged edges are much easier to work with in the casing so don't serge the edges!

Next,  I sewed the lining.


I did that by placing two lining pieces, right sides together, and sewing both sides and the bottom, leaving a nice, big opening on the bottom.  (see diagram above) Leaving this opening in the bottom is required so that the bag can be turned!

I clipped the points off the corners of both the outer sewn bag pieces and the lining bag pieces.  This will help later when I square the bag so it sits up by iteself!


I turned the outer bag right-side-out but kept the lining right-side-in and put the outer bag inside the lining.  


I stitched the upper edge with a 1/2" seam, matching side seams.


Using the opening in the bottom of the lining, I pulled out the bag, ending with both fabrics right-side-out and looking like a long rectangle.


I stitch the lining closed by folding in the seam allowance and top stitching.  It will be in the bottom inside the bag so it really doesn't need to be perfect!


I tuck the lining down into the bag and find the upper edge seam, rolling in my fingers to get the seam on the very top edge.


I stitch my casing by stitching 3/4" from the top edge.


To make the bag one that will sit on its own on the table, I square off the corners.  I do this by turning the bag inside out, lining up the seams (peek inside to see), and stitching 1" from the point.


Now, when I turn the bag back so that it is right-side-out, the corners are gone and the bag sets on the table open (easy for getting candy out!)


Next, I measure 17" of ribbon and stick a safety pin in one end to make a bodkin with which to feed ribbon into the casing.  This is the drawstring.


I feed it into the hole that was left in the seam.


I pull the safety pin through, keeping the ribbon flat, and feeding it until I get back to the opening and pull the ribbon through so both ends are out.


I pull the ends to even it up and tie in a knot close to the end of the tails.


I set my sewing machine for a wide zigzag and zero length to sew on the skeleton charms below the casing.


Ta-da!  Making these essembly-line style, meant that I got 15 done while my embroidery machine made the charms!  This is much, much faster than doing an in-the-hoop style bag (and I don't have any size restrictions)!


These were filled with packaged candy.


I combined these with soaps (calorie-free Halloween treats!)  that I made a couple of months ago in order to have them completely cured.  There were eight soaps used (three were combined with each treat bag).  All the soap recipes can be found on my soap page (or click here) and are soaps #29, #31, #32, #33, #37, #39, #41, and #42.

I wrapped the soaps with food-safe paper and used decorative washi tape to keep together.  I made ingredient labels this time for each soap and wrapped with bakers twine for decorative purposes.  I included a homemade soap info sheet to explain a bit about my soaps.  I don't sell my soaps, so the labels and info sheet are just for educating my gift recipients.


My super simple tags were made using the Tim Holtz stamping platform and Close to My Heart #S1608 Purr-fect Halloween Stamp of the Month set. (It's an oldie from my stash).


List of links and items mentioned in this post:


Happy Halloween crafting!

Friday, August 18, 2017

August Soap Challenge: Intaglio Soap


The soap challenge this month uses a technique called Intaglio.  You say you have never heard of doing this technique on soap?  Neither had I!  Intaglio is usually thought of as a print making technique of engraving but we were instructed to pour a super thin base of soap in the bottom of a slab mold and cover with a contrasting color to create a surface that could be carved.  That thin layer became the top of the soap and we removed parts of it to expose the contrast while creating a pattern.

My first attempt was actually soap #36 in my Soap Gallery (click here and scroll down the page to see that one).  That one had too thick a layer for carving.  I didn't want to plane it off because I really liked it as it was.  I decided that I would work at getting my top veneer thinner and give it another go with different colors and a different idea.

I made a coffee scented soap and initially thought of a faux bois design.  I love faux bois!


But I hated that there was no connection between the coffee and the design so I tried some coffee motifs, carving out coffee cups and coffee beans with rays behind them.


I didn't add color to the batter for the top surface because I didn't have a brown (and I had been thinking of faux bois at the time of making the batter), but I did use Bramble Berry's Espresso fragrance oil that promised that the soap would turn dark.  I could see a difference in just a day between carving and going back to clean up the 'crumbs'. You can see it in the two previous photos!  I am gambling that as it cures it will be more brown and hoping it won't be as dark as the black charcoal base.

My recipe and process:

This soap is #43: Coffee.  The recipe was part experiment and part using up odd amounts of oils I had in my soaping cabinet to make room for new stuff or before they get old!  I wanted to see if I could "feel" a difference in using sunflower oil with the vitamin E it provides without adding vitamin E as I have been doing recently.  I wanted to use up the bottle of that, the olive oil pomace that I bought before understanding how it is made, and I wanted to use up the last bit of grocery store lard before moving to a new supplier of preservative-free, organic lard (to explain my weird percentages of oils).
My Recipe: 30.77% sunflower oil, 20.51% coconut oil, 20.51% olive oil pomace, 13.59% lard, 5.13% shea butter, 4.36% cocoa butter, 5.13% castor oil.  33% lye concentration.  5% super fat.  Soaping temps:  91° oil; 114° lye water.  Additives:  Powdered sugar was added to distilled water pre-lye.  Sodium lactate was added to cooled lye water. Fragrance:  Bramble Berry's Espresso fragrance oil mixed with 1T kaolin clay.  I used the lightly scented quantity per their fragrance calculator and it was plenty.

Once it traced, I added a thin layer of batter in the bottom of my slab mold, trying to keep it as thin as possible.  This will eventually turn dark per the supplier's website but now it is a buttery yellow.


To the remaining batter,  I added 3 teaspoons of activated charcoal that I had mixed with 2 tablespoons of my oil mix that I reserved before adding lye.  I mixed in  2.7 oz of brewed and squeezed espresso coffee grounds (the amount in my husband's coffee maker-- probably needed more for the exfoliation I wanted).


Because I soaped hotter than usual and mixed to a heavy trace, my soap was ready to unmold within a few hours.  For carving my designs, I used a lino cut tool, ceramics tools, and my peeler.


My first cut was the faux bois design but before it was even finished or cleaned up, I started thinking a coffee theme design made more sense.


I used a stylized coffee bean and coffee cups for my designs.


Having the top layer thin is really the key to doing this!


I am still learning how much is too much and how much is not enough when it comes to activated charcoal, but the good news is that this soap doesn't seem to have a gray lather.


This was a fun challenge and definitely nothing I would have tried without the Soap Challenge!  I just peeked at the soaps other people have done for this challenge and already posted and I was blown away by the talent and detail.  My soapy entry is so simple comparatively, but fun is fun and soap making is addictive so I am so grateful to have had a chance to play along!   I can't wait for these to be cured so I can test again and see if I can tell a difference with this oil mix.  And I am curious how this scent will be in a couple of months.  Thanks for checking my blog post.  To see all the 42 soaps I have made, along with their recipes, notes, and links to stuff I learned to make them, check out my Soap Gallery page on this blog or click here.  

But wait! There's more! Click 'older posts' above!

But wait!  There's more!  Click 'older posts' above!