Showing posts with label gift wraps. Show all posts

Monday, February 23, 2015

Oo La La French Theme Birthday Gift Wraps and Grace Thomas


Oh!  How much fun it has been to make Parisian-inspired gift wraps and presents...  and to order some special things as well for my sweet girl this year for her birthday!  This year's birthday has been a bit of a challenge.  The week she normally would hand out birthday invitations to her school friends, she was out sick.  The next week, there was no school at all due to snow! That has put her sleepover off for a week.  Having to also reschedule the family dinner she wanted over the weekend due to icy roads has kind of put a damper on the whole thing for her, so it was time to ramp up the fun.

In addition to the desk that she asked for and knows that she is getting, she is also getting the new American Girl Doll of the Year, Grace Thomas, and this one has a French connection.  (My daughter thinks she will have to hope for money from grandparents so she can buy the doll herself.  She even told her grandpa, who says he will give her $1 for every year of her age, that she is turning 60.  Ha!)  I wanted all of my wrappings to make her want the doll all the more to build the fun when we surprise her at dinner.  The only problem:  the doll is set to be delivered today, and with the weather challenges, I am biting my fingernails on this!  But the silver lining, with no doll-sized box for her to see, is that she really has no idea that we have this surprise for her.

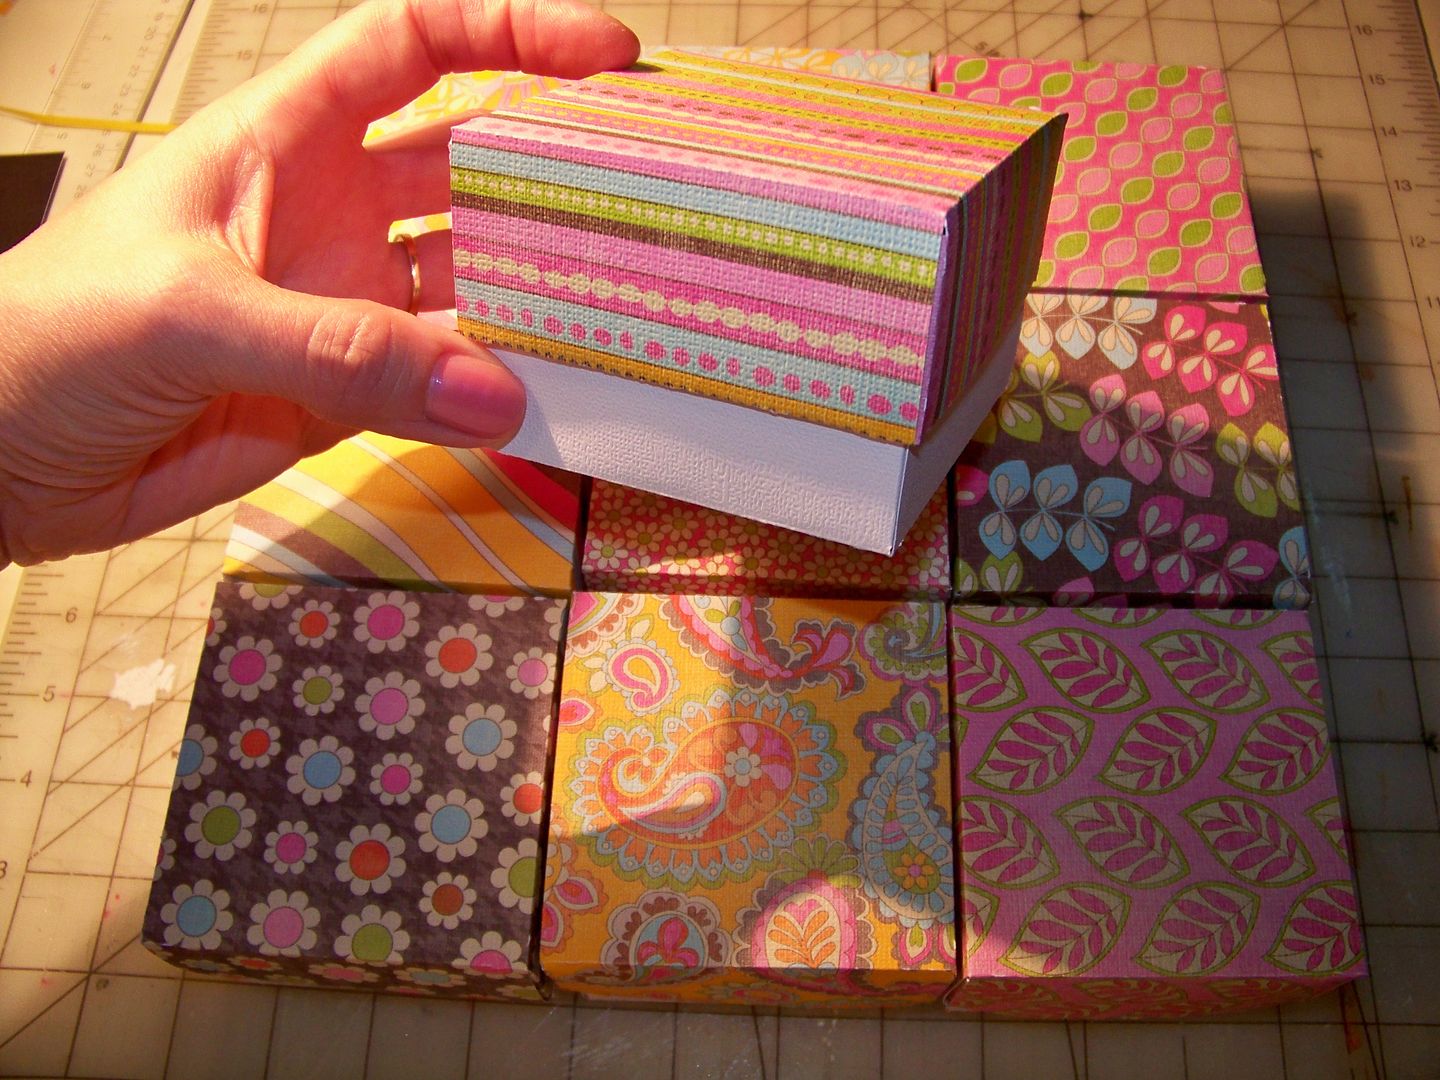
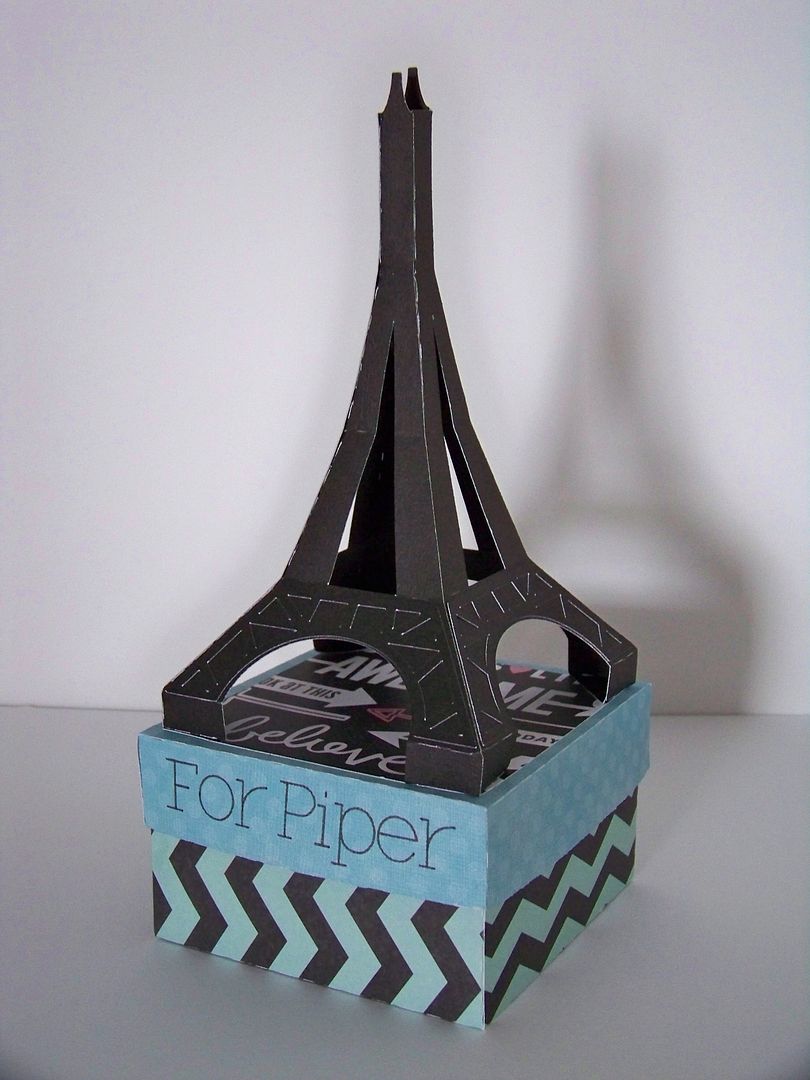
I made this little box for one of her gifts.

Click here for file.

This was cut on my Cricut Explore using an svg that I loved!  The Eiffel Tower is made to set on the box that is included in the file.  The legs of the tower form nice, dimensional corners with flat bottoms that make it perfect to adhere on the lid.  There are bottom panels that are designed with cut-outs that give the impression of the tower's metalwork, without tedious cutouts all the way up the design.  Click here to link to the svg file I used from SVGcuts.   I used the writing feature of the machine to personalize it, using an American Crafts Precision Pen.  This pen fits perfectly in the Explore without any aftermarket tools.  To see my whole list of pens that will work in the Explore, click here.

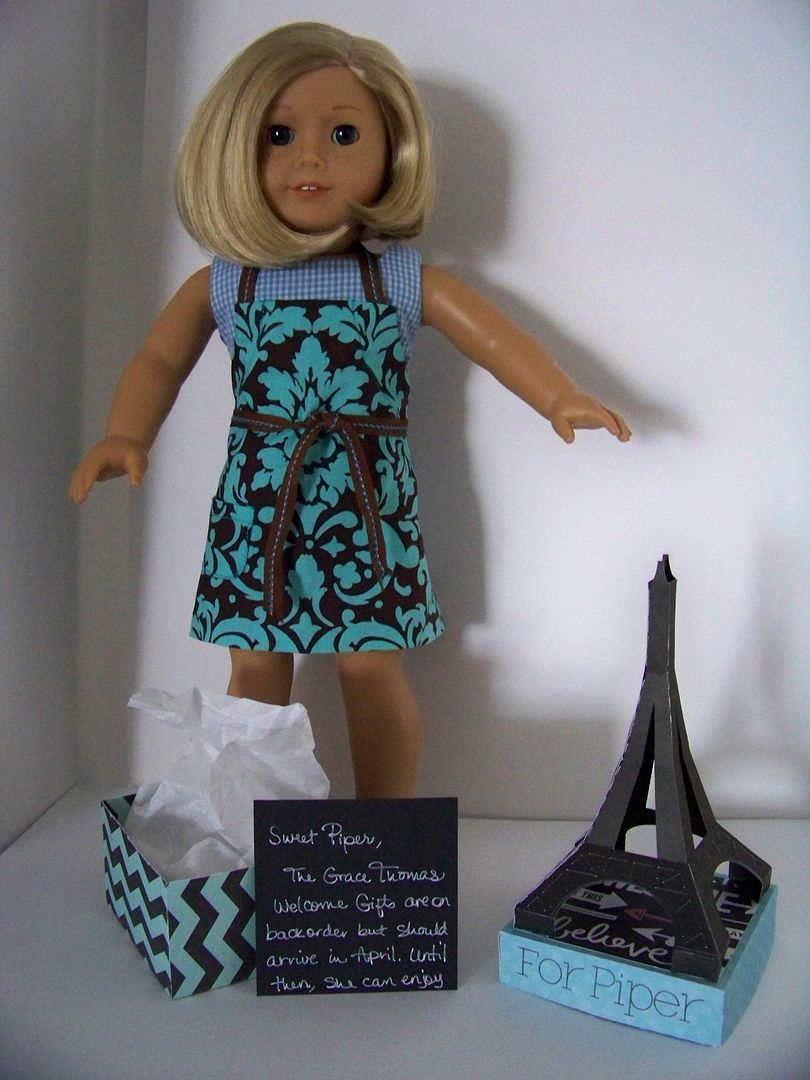
I borrowed my daughter's Kit doll.  Shhh...don't tell.  
Of course, the fun of American Girl dolls is the detailed and endless accessories!  Unfortunately, the "Welcome Gift" that one can order with the Grace Thomas doll is backordered.  No worries, that will be a fun thing for her to get in the mail in April, and I made up for that with a quick little doll apron. (Grace's story is that her aunt owns a bakery in Paris.) I used a fabric from my stash that felt appropriate for her story.  I made this using McCall's M6451.


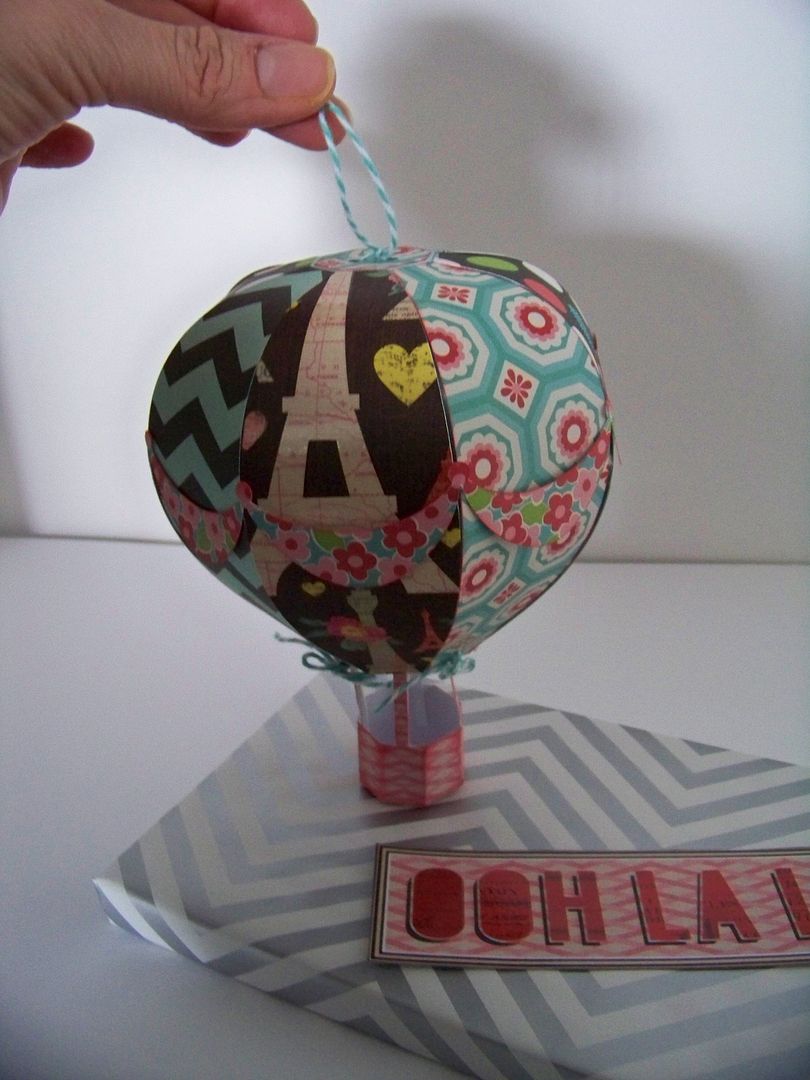
Next, I worked on a 3D hot air balloon package embellishment.  The gift inside is a DVD and there is nothing more boring or tell-tale than the way a DVD looks if just wrapped.  But, when I put something fun and dimensional on the package, no one ever guesses what is inside.  Neat trick, huh?  (Or maybe we are all easily distracted in my family?)


I loved making this hot air balloon so much!  My husband wanted me to make him one!  And I wanted to make five of them to hang in the window over my sewing machine!  For hanging it was perfect and I did include a small twine loop on top in case my daughter keeps it to hang. (We'll use fishing line to hang from the ceiling if she decides to do that).

Click here for file.

But for standing, such as I have done on this package, I did reinforce the "ropes" that connect the basket to the balloon.  I used the thinnest pop-dot foam that I had on hand and cut a thin strip.  Then I backed it with a thin strip of white card stock and attached it to the backside of each rope, allowing it to touch the floor of the basket.  Without the support, the ropes bent under the weight of the balloon.

Next, I wanted to try an overall pattern for dolls after my daughter showed me Kit's Chicken Keeping outfit on the American Girl on-line catalog.  I wasn't trying to copy the pattern, although it would have been easy enough to do, but rather, I was thinking spring and wanted to make her something cheerful and sunny.


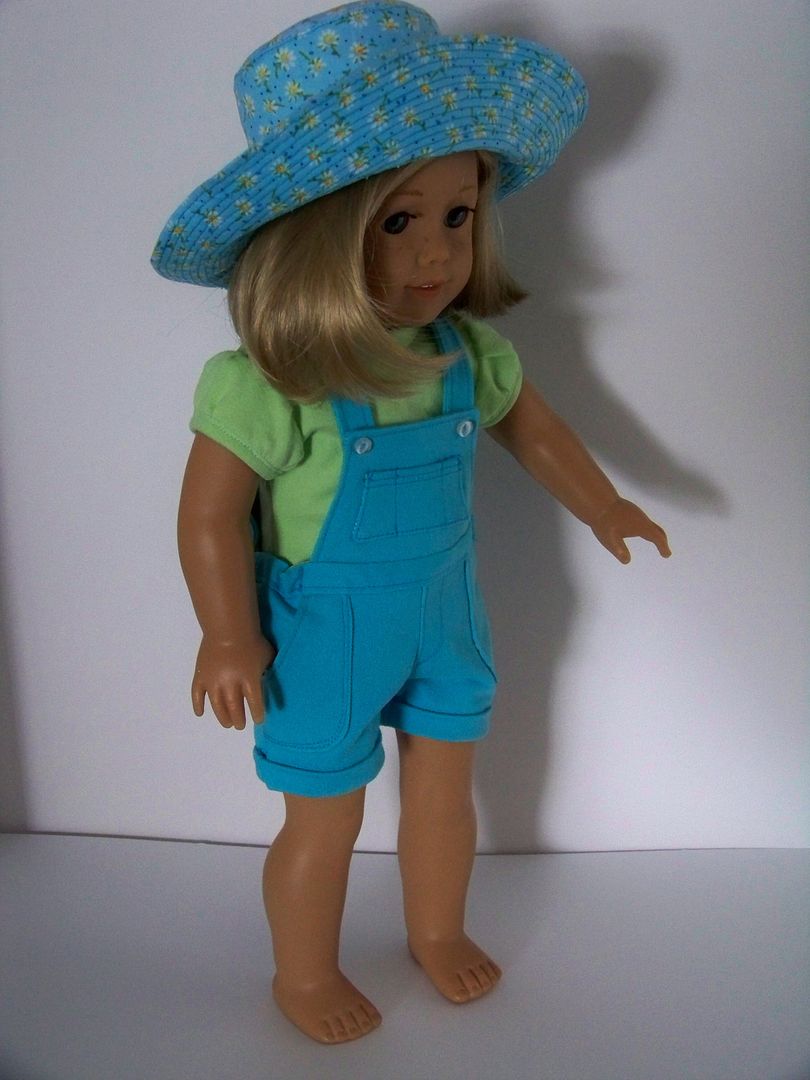
This was a joy to make!  All three pieces, hat, top, and overalls, were made with different pdf patterns purchased on-line:
The hat is from Bonjour Teaspoon, the Phoebe Hat.  
The knit top is from Liberty Jane's T-shirt Variations.
The short overalls is from Forever 18 Inches' Not Your Mama's Overalls.

For all patterns that you print yourself, be sure that your printer is set to "actual size" and NOT "print to fit."  They all have a 1" scale so that you can verify that you printed correctly.  

I loved the topstitching on the hat and overalls!


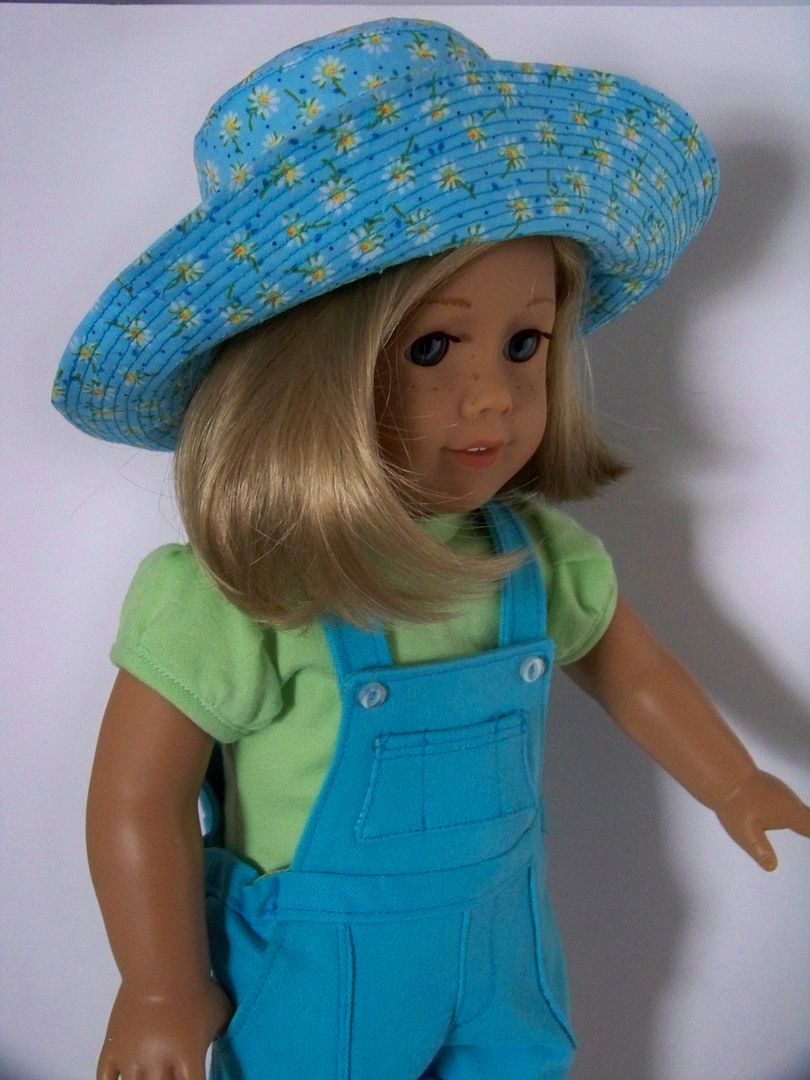
I used colored denim that I upcycled from old jeans.  (Thrift shops are my source for colored denim for doll clothing).  The knit top was cut from a toddler's size t-shirt that I bought and stashed and recently found among my fabric.  The print was from my fabric stash.  The overalls go on and off easily-- a real requirement for doll clothes in my opinion.  I altered the pattern a bit.  There are options for a drawstring casing with cord that ties at the front and an OshKosh-style back.  Then there is an option for elastic in the waistband and long straps that criss-cross.  The pair I made combined the two without the drawstring or long straps.  I would have gone out specifically for tiny overall buckles if not for the snow and ice we received!  In lieu of that, I used the snap-backed-button option!  I love all the little pockets on these.


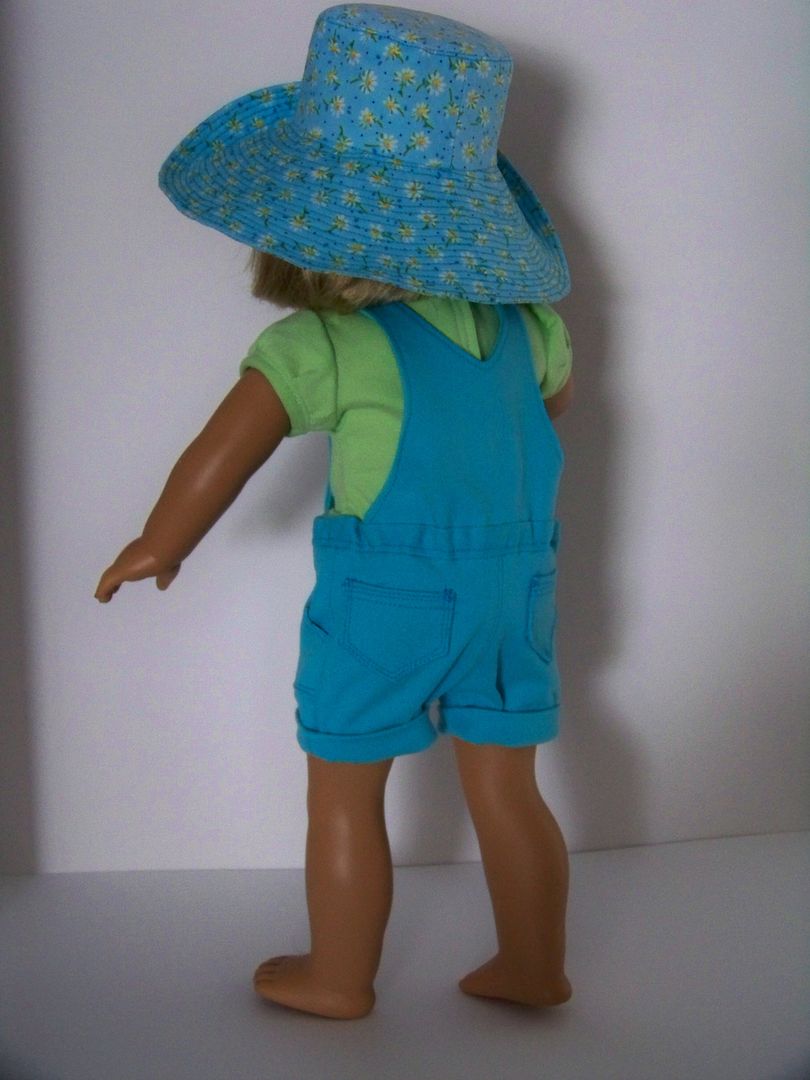
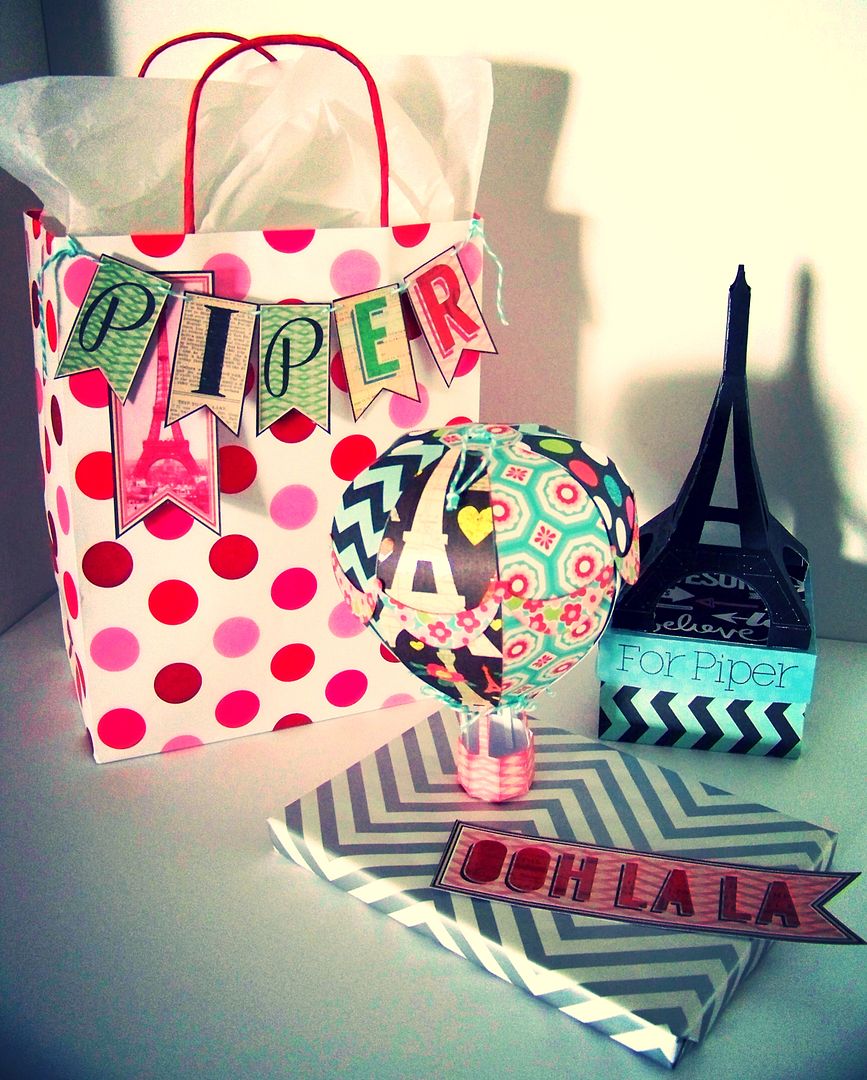
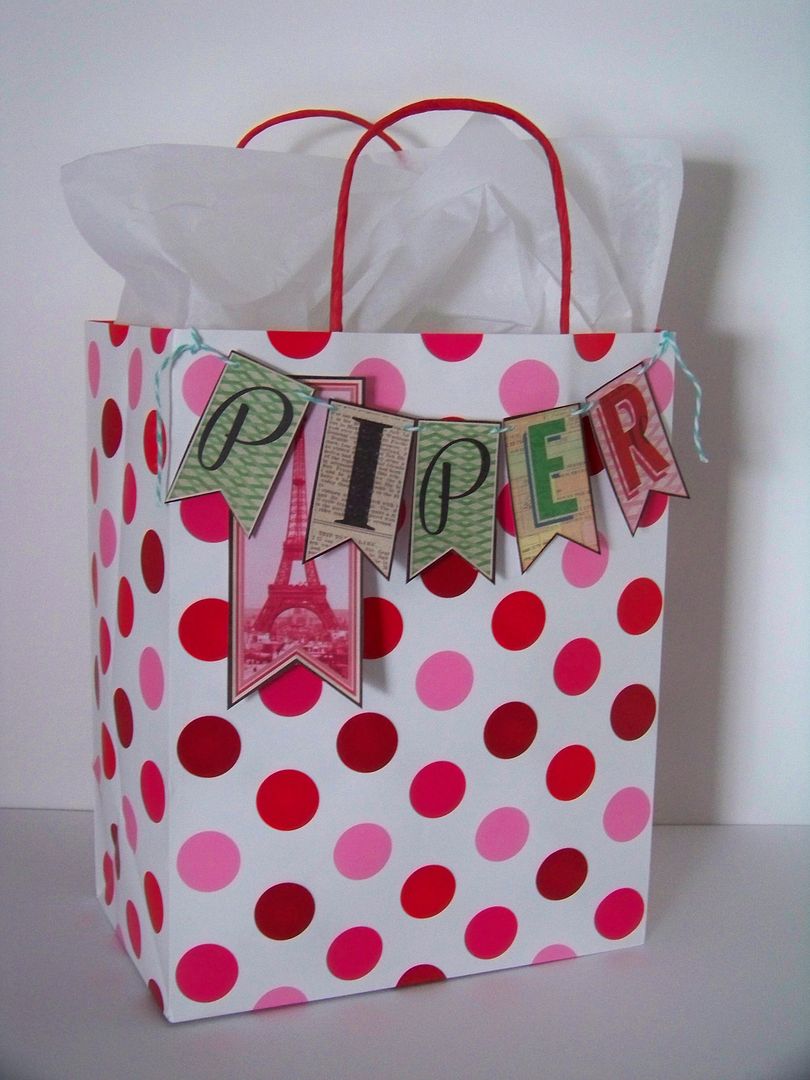
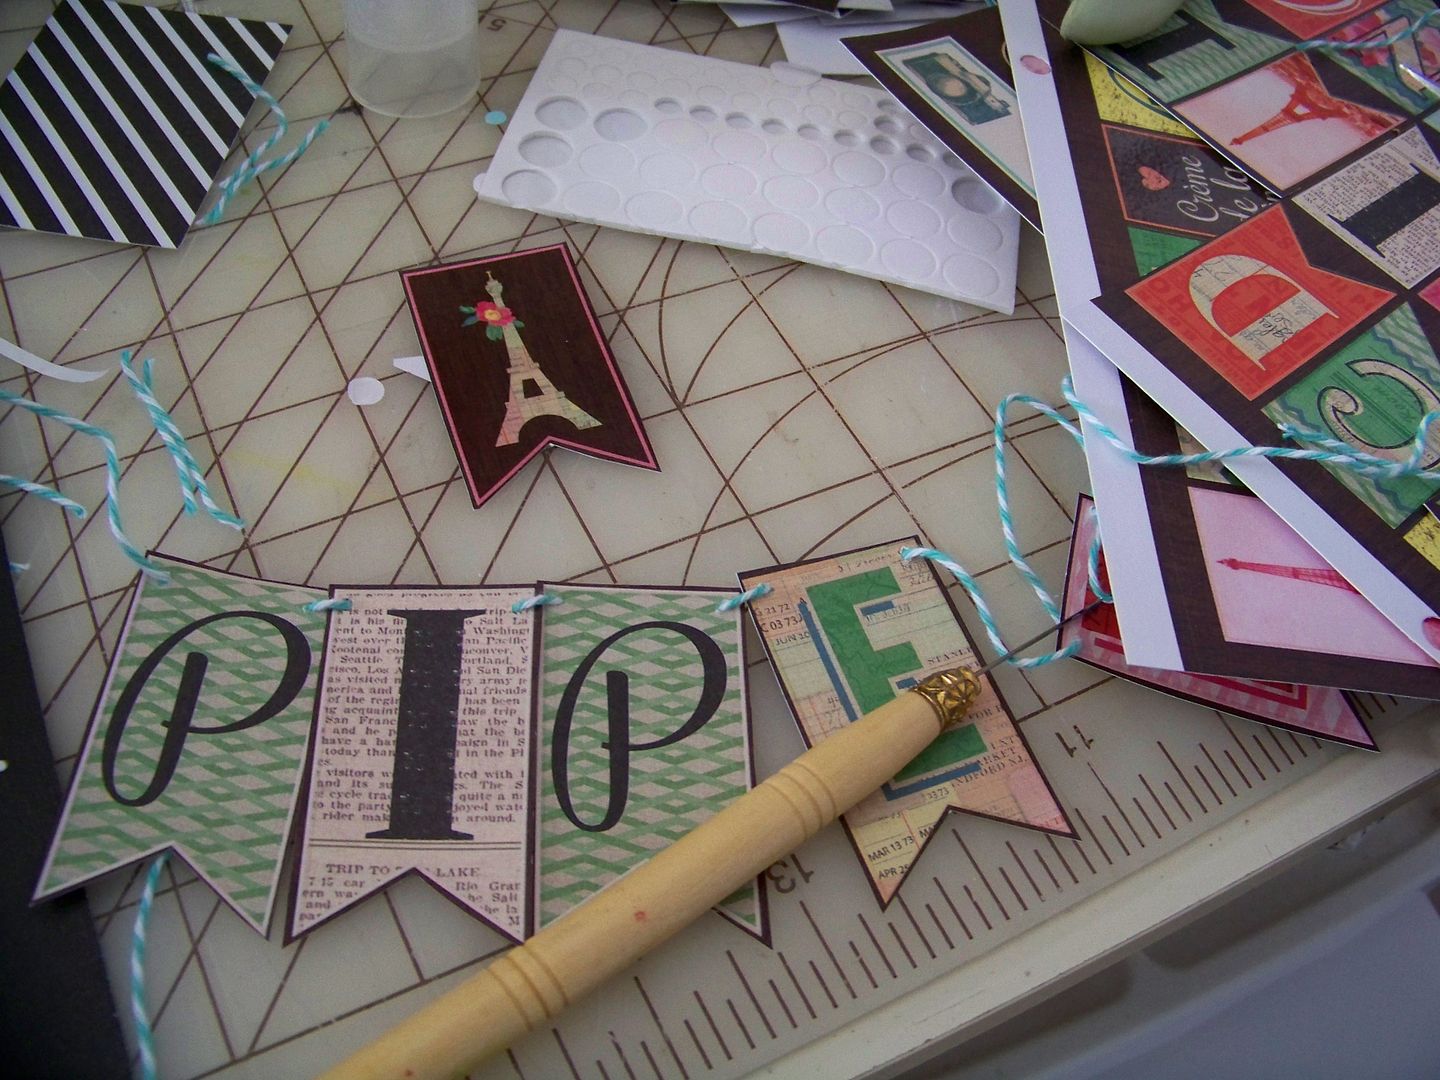
This little outfit was wrapped using a purchased gift bag, embellished with elements from DCWV's La Vintage Boutique stack.  


I used the printed banner letters in the stack to create a little package decoration, strung together with twine.


Quick Links to the files and products I used:

Eiffel Tower Box svg:  click here.
Hot Air Balloon svg:  click here.
Doll Apron Sewing Pattern:  McCall's M6451
Doll Sun Hat:  Bonjour Teaspoon's Phoebe Hat.  Click here.
Doll Top (worn under the overalls):  Liberty Jane's T-shirt Variations.  Click here.
Doll Overalls:  Forever 18 Inches' Not Your Mama's Overalls.  Click here.
My list of pens that fit in the Cricut Explore: click here or go to the tab at the top of my blog.
These are the two paper stacks I used for my packages on this post:

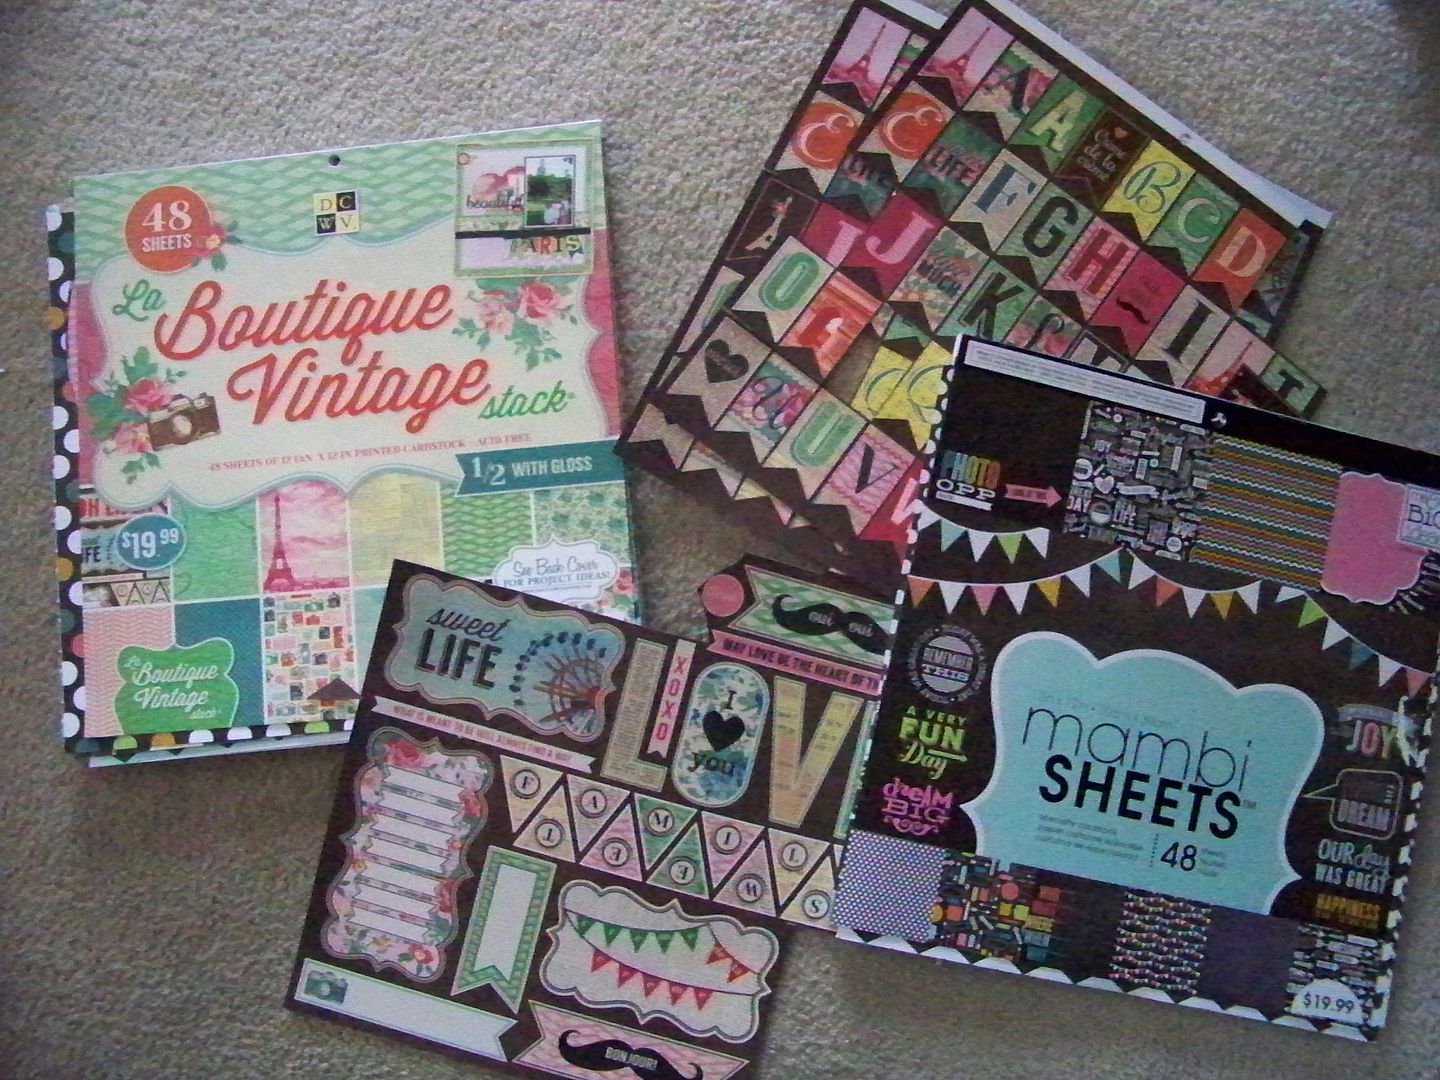
DCWV's La Boutique Vintage Stack and Me and My Big Ideas' Mambi Sheets.

Thank you for checking my blog today!  Well today is the day.  I am off to pick up cupcakes to drop off at her school and will be peeking one more time to see if Fed Ex has left anything...

Look who's here now!!!!  Birthday happiness is saved once again.  Ha!


Wednesday, December 10, 2014

3D Camera Box and Album Gift!

I have been so excited about this project for a couple of weeks!  Every Christmas, I give albums of photos (taken throughout the year) to my mom and my in-laws.  This year I am also giving one to my aunt.  These are people who aren't interested in Instagram and never download pictures I post from Facebook.  They, like me, LOVE real photos and they love my kiddo so providing photos for them every Christmas has become a fun tradition.  It started one year when the finances were lean and I needed extra gifts for everyone to supplement the ones I bought for them.  They were a hit and I have continued the yearly albums even as times and our family's economics have changed.

This year, I have my most favorite presentation for my albums:  3D camera boxes!!!!  These are from SVGcuts and you can click here to see the file!


I made them in different colors for each recipient.


They are each personalized.  I did that using a Chomas Creations pen adapter, a Gellyroll pen, and a handwriting style font.


They open to reveal an album!


The albums coordinate with the camera boxes!


The camera is an svg file, part of a collection by SVGcuts.  You can cut svgs with a number of electronic die cutting machines.  I used a Cricut Explore to cut these.  In addition to this project there are several other cards and boxes in this collection.  The albums were simply made using my trimmer, an Xacto Knife, and a Zutter binding machine.

My idea, the minute I saw this file in the spring, was to use it as a box for a photo album.  I had hoped that 4x6 prints would fit perfectly, but I did find that I needed to cut down the height in order for the lid to close as designed.  I suppose I could have played around with the sizing of the file to enable the use of 4x6 photos but I chose to trim the photos instead.  There is plenty of room in the box to accommodate the 6" length, but I found that cutting each picture's height to 3-11/16 was the perfect size.  This was easily done with my trimmer.


My covers were made with art board from Michaels.  I cut it with an Xacto Knife.  Honestly, I cut the covers the same 3-11/16" tall as the photos and 6" in length.  With the o-wires I used with my Zutter binding machine, the album finishes at 3-11/16" x 6-1/2".  As you can see, this box will accommodate many more photos and other binding options.


If you are looking for a cheap and effortless way to have piles of printed pictures from the ones you take on your phone, you need to check out Groovebook!


This is a service that was newly bought by Shutterfly, but I started receiving them about a year before the company was featured on Shark Tank.  Basically, for $2.99 a month, you get to select 100 pics from your phone.  They print them and put them in a little book with the date of the pics above them (next to the photo, not printed on them) and MAIL them to you!  The shipping is included in the $2.99.  Everyone who has a Groovebook subscription has a code to allow others to have a free month of Groovebook to see if you like it.  If you want to try it for free, this is my code:  HERBST-MCCONNELL8,  You have to download the app on your phone to get started (just search "groovebook" in the app store) and enter the code at checkout.  I have enough pictures by October to make albums for my mom, my mother-in-law, my husband, my kiddo, my aunt, and myself!

I had so much fun with this project!  These are the papers I used if you were wondering.  I bought the American Crafts pad from Target.  I bought the Paper Studio pad from Hobby Lobby.  Both were bought in November of this year, so they should be pretty easy to find.  I bought them for my Christmas Journal, but I have been using them on gifts, gift wraps, tags, and more!


Thank you for checking my blog post today!  I have been wanting to share this project for a week or so and I am so happy to be able to share it now!


Sunday, December 7, 2014

More Christmas Gift Wraps!


Happy December!  Shopping is almost done here, Journal Your Christmas is in full swing, and gift wrapping is getting pretty out-of-hand!  My last post was all about using 3D files and the writing feature on the Cricut Explore to make dimensional tags.  I have been having so much fun with my gift wraps that I wanted to share a few more of them!  Links to SVG files and any other info on each is captioned with the photos, for anyone wanting to make any of them.  Apologies for this abbreviated style of blogging today; so many things still to do to get ready for the up-coming week and on-going Christmas activities!

This is an SVG that can be found by clicking here.  This is one of my favorite svg collections in the SVGcuts library!  Everything in this file has been so simple to put together!  The tag is from Cricut Picturesque.  I used the Explore to write on the tag using a Pilot Precise V5 pen. 

This is an svg from Snapdragon Snippets.  It can be found by clicking here.  This was the first time that I had used a file from this company or this designer (Crafty SVG Designs).  I will tell you that it was a bit of a challenge.  There was a link to a tutorial, but it was not specific to this design, just to one in this same general style and the svg had no sizing info.  This is what I did to get this size:  while keeping it grouped, I pulled it to size until the inside window was 4".  I had the grid lines turned on in Design Space to do this.  Then I ungrouped it and highlighted each piece with scoring and clicked 'Attach.' Note that the large box back and sides are scored by use of dashed lines.  I kept it just like that so that the score marks would be cut.  The small inserts with single ballerinas have one long, continuous score line on each side.  I changed those to "score" in Design Space and used the score tool.  (Not changing it will make your machine cut the tabs right off!)  Next, I copied the single leotard and tutu and pasted it for all the ballerinas.  Note that the ballerinas are not all the same size.  I zoomed in and pulled the costumes over to the dancers and adjusted as needed to make the costumes larger to fit.  I think I had to do that for two of them.  I changed the color of the costumes so that DS would put them on separate mats since I wanted them cut from glitter paper. Because my pale pink paper was 8.5x11 instead of 12x12, I changed the colors on some of the cuts so that they would pull to three different mats (one for single dancers, one for two internal tabbed layers, and the third for the final tabbed layer).  Despite it all, I was pleased with this and would make it again.  This is actually a box card, so I did add a strip that was placed on the bottom, perpendicular to the layers.  This locked the shadow box in place and gave me a surface to glue to the package.


The barn is an SVG that can be found by clicking here.  This is from the same SVGcuts collection as the church box above!  This time, instead of cutting the box from the file, I used the optional bottom piece and made it like a little 3D stand-alone building.  This gave me a surface to glue onto my package.  The wreath is from Cricut Paper Trimmings but a quick search in DS for "wreath" will afford you many, many options.  I sized it by dragging the wreath over the barn front in DS and used the handlebar to size it appropriately.  I hid all layers except for the wreath base and just drew them in since the cut was so tiny.  The cut with Santa and flying reindeer was from Cricut Christmas.  I hid the moon layers.  I simply glued the bottom rail of the sleigh to the barn roof from the back.  Super fast to put together!
These are all from Cricut Christmas Kitsch.  I actually cut these in my Expression.  I just used the Fit to Page feature and cut these.  I think they were each 11.5 in height.  

I featured the first light-up gingerbread house I did in my last post, but they are so cute that soon I will have a settlement of these under the tree.  There are three house designs in this SVGcuts collection.  To see info on this file, click here.  
For all of my gift baskets, I am making dimensional holly from Cricut 3D Floral Home Decor.  There are a few holly designs.  I have been putting together two sizes and combining with the paper fir twig.  After I heat wrap my baskets, I have been adhering the holly with pop dots on the outside with a tag. 

With all of those fir branches I have been cutting, the negative space has started looking beautiful to me.  I started using them as a stencil.  Gold Krylon spray paint has been fun to use with the stencils on brown paper.  These simple wrappings have been really fun to make.  My 10-year-old daughter told me these were some of her favorite packages.
These are the simplest of all 3D embellies!  These are trees from the Cricut cartridge, Winter Woodland, cut at 5.5" and 6" tall on my Expression.  The snowflakes are from a Martha Stewart punch.


These are all packages from my last post.  For details about any of them, check them out by clicking here.
Quick Links and Notes:
  • Church Box -- click here
  • Ballet Box -- click here
  • Barn Box -- click here (Santa is from Cricut cart Christmas)
  • Gingerbread Boxes -- click here
  • Santa, Snowman, and Rudolph bags designs -- Cricut cart called Christmas Kitsch
  • 3D Holly and Fir Twig -- Cricut cart called 3D Floral Home Decor
  • 3D Trees -- Cricut cart called Winter Woodland

Sunday, June 15, 2014

All Beauty and No Beast!


We just marked the start of summer at our house:  completion of dance recital performances!  My kiddo's ballet school has a special way of doing recitals:  they do a full ballet with two performances in lieu of a standard recital that includes all the students from age 5 to age 18 in the show!  The high school seniors and advanced dancers have the starring roles; the younger classes have supporting roles.  My daughter's class performed as the Silverware and the Dream Belles. The parents do the set design and creation, make costumes, do lighting, stage management, house management, handle tickets, props, sound, and keep the kids ready for their parts! Some dads even have roles in the performances!  It is such a huge production and undertaking!  I took off two weeks of work to help and I needed an extra week to recover, but that didn't happen!  (My daughter always seemed so surprised that I was tired when she was the one dancing.)
Rehearsal for the Finale
Each year, at the December Mother-Daughter Tea, we learn which ballet the girls will perform in June so we have known for a bit that this year would be Beauty and the Beast.  The two employees (and that includes the owner!!) of the school choreograph the show and teach the girls their parts.  I find it incredible that they do this all with parent volunteers and only two employees.  It really is remarkable!  This is the 30th year for the school and the current owner is the daughter of the original owner.  It is a family affair in many ways! And it is so much more...they make all the little girls feel important and like they are part of something BIG!  My daughter told me, "Whatever the year, my class always has important parts in the ballet!"  (And that from a salad fork, her role in one of her dances!)  They make it fun, using a blend of the traditional music from the ballet as well as some from the Disney movie.  It seamlessly works together like magic.

Each year, my daughter gives Opening Night gifts to the ballerinas in her class.  For the past couple of years, I have made the gifts and tried to make them as wearable keepsakes that represented the ballet for that year.  You can see last year's post on the Cinderella Ballet by clicking here!  

Last year was Cinderella!
Each year, it seems a little harder to think of something that the girls would enjoy.  My daughter, at age 10, is one of the youngest in her class.  Students in this pre-pointe class go all the way to middle school.  I thought silver bangle bracelets might be the way to go this time around and my kiddo approved.  I fell in love with Alex and Ani bracelets but needing eleven meant I had to come up with something that wouldn't break the bank! I found so many great options with A Bead Story brand!  Their round bangle bracelets feature a screw-off bead on the ends which makes adding and changing beads a snap!  This is so easy! Their spacer beads have what I suppose is a silicone liner that keeps the beads from sliding too much.  After depleting the supply of bangle bracelets at the store nearest me, I went online and found slightly different oval bracelets, a different brand.  They worked just fine and my daughter actually liked those better for her small wrist!


I chose beads that represented elements of the story:  the rose, the yellow dress, the dancers, the dome over the rose.  These girls have all out-grown the Disney Princesses and so those icons were not an option for this project.  


I added spacer beads between the charms.  These made the various charms seem to be more integrated with the whole bracelet, though admittedly, less like the style I had originally been trying to copy.


I also made some drop charms using head pins, crystals, and smaller silver beads.


I found my supplies at Hobby Lobby for the A BEAD STORY round bracelets and all siver beads.  The oval bracelets were from ebay.  I found the crystals at Michaels.  The ballerina charms and the crystal ball charms came from both michaels.com and Hobby Lobby.  The 3D flower charms came from Michaels physical store.  The flat siver roses and the large amber rondelles were from Fire Mountain Gems.  The small crystals and head pins came from Michael's. 


To package them, I used my favorite gift box:  the jewelry box on the Cricut cartridge, Bridal Shower (page 14).  I cut it at 11".  


I use upholstery batting (dacron) for the inside padding.  


I decorated the tops with yellow roses.  I learned to make these from Juliana Michaels when she was part of the fantastic Circle Design Team.  You can find her video on how to make them here.  She uses Mother's Day Bouquet to make them.  They are fabulous!  For the sizes, I have a cheat cheat based on the sizes I make them:

I cut the ones for my boxes using key 27 cut at 1.25" and key 8 cut at 2.75".  Juliana shows how to make them on her video (link above).  

After cutting the floral pieces, I assemble them using hot glue.  The nice thing about having an Explore and an Expression is that you can cut the same thing on both machines since you can use the physical cart in the Expression and the digital version in the Explore.  For projects with lots of duplication, it really makes the cutting go fast!


Wrapped with yellow ribbon and tagged.  
Of course my kiddo gets one of the bracelets, and all of the ballerinas receive flowers from their families on opening night, but I also get her something special.  I decorated her gift bag with another yellow rose, but I wanted to go overboard on size so I made one from the Cricut cartridge Giant Flowers, cut at 10.5"  


She kept it and put it on a shelf.  It is a fun decor piece!


They were a hit (always a relief!) and it's always fun on opening night with all the energy and excitement.  Gifts just add to the fun.  I will say that this is my daughter's fifth ballet, but the first one where she smiled during all of her performances.  She really looked like she was having fun.  

Thank you so much for letting me share my project and photos of my kiddo!  

But wait!  There's more! On a totally unrelated note, I wanted to give a big shout-out to my friend, Danita, and suggest you go look at her blog.  She has been ramping-up glass etching and she doesn't use etching cream.  She does what she calls "Air Erasing" and I was so impressed (and scared) that I think you need to see this!  She always does great work and has made several blog posts of her projects, but this time, she shows us a tutorial and all of her tricks!  Check it out:  Danita's Designs.  And if you need a little more of a nudge, she says that it is easy, cheaper after the initial set-up, and you get a much nicer effect than by using etching cream on your glass items!  True, high quality etched glass items that look like high-end boutique gifts!!  Ooooo...maybe next year's ballet will feature etched glass pendants!  I'll be driving to Danita's house for help with those!


But wait! There's more! Click 'older posts' above!

But wait!  There's more!  Click 'older posts' above!