Showing posts with label Brother PE770. Show all posts

Tuesday, January 8, 2019

Christmas Journal 2018 Plus Embroidery Gifts


Well, I don't know about you, but I sure am glad 2018 is over!  I haven't blogged since 2017, and I thought that was a hard year!  2018 almost killed me!  It started with my daughter recovering from a second knee surgery, my husband selling one of his companies, and an IRS audit on one of our businesses.  It ended with me falling off a ladder, completely tearing my ACL in my left knee, spraining my MCL, hurting my elbow, shoulder, hand and back.  In between, my husband started a new company while simultaneously a company he started a couple of years ago started to take off as government licenses and labels were completed and approved.  Seriously, it was work, risk, and pain! 

So, here I sit without any New Year's Resolutions but plenty of things that need to improve, after two bad years, and one improvement needs to be finding time to create stuff!  I have missed being creative, making things, and writing about it!  In that spirit, I reversed my decision not to do a Christmas Journal this year and gave myself one day to do it.  I have been doing my Christmas Journals since 2012.  Typically, I work on that year's journal daily.  It really makes me focus on the holiday season and special Christmasy things each day.  This year, I didn't have it in me.  I had to move all the big family celebrations to my cousin's house due to my injuries, I didn't put up a tree until a week before Christmas (and even then it was just lights, garland, and a star!), I missed Black Friday, I did all my shopping on-line or at the gift card display, I made very few gifts, and did almost no baking.  We decided not to see the Nutcracker Ballet (my daughter danced in the Nutcracker at her ballet school in June and was Nutcrackered-out).  Despite all that, I am a serial picture taker with my phone and a list maker.  My Christmas Journal is heavy on both of those, plus journaling, so deciding to make one made sense because I was half-way done!

I decided to use only papers in my stash and to do a simple design that I would bind with my Zutter and wire o-rings I already had.  Some of my pages opened up and some had internal pockets to hold journaling tags.  I ordered my photos via app and picked them up.  Despite having my new Cricut Maker that I won from the company (my Christmas gift from the Crafting Fairy), my Christmas Journals have always been done on my old Expression using carts.  I used it for my tags this year.  The one thing my Christmas Journals always have is a Letter to My Future Self, a prompt from Shimelle's Journal Your Christmas that she sends each year.  Something about that is cathartic so it is a must but I do hide it in my journal in plain sight.


I stopped putting a CD of all the holiday's photos in the back of my journal since everything now is by date and duplicated on Dropbox.  I do, however, still keep all the Christmas cards I received by friends and family.  This year, our Christmas card was one of my pages.

The cover was simply acid free mounting board adhered with regular acid free scrapbooking paper.  I didn't have time for a complex cover so I picked busy paper for the cover and created a belly band (since I knew this thing would be fat and pop up).  I like the idea of a fabric-and-elastic belly band (instead of a card stock one) so that it will hold up with repeated movement as the album is viewed over time.  I used my simple Brother PE770 and Embrilliance software to do mine.


To do this, I merged the 'Lorie' frame from Lynnie Pinnie with BX format font 'Good Morning' from Applique Corner.  I deleted the text from a freebie by Sonia Showalter, leaving the Santa hat.  I moved the hat to the "0" of 2018.  I made sure the "Remove Hidden Stitches" was selected in My Preferences in the software.  I resized everything to fit the width of my hoop.  I stitched it on Vilene, using the same technique I explained in my patch-making post, which can be found by clicking here.  That technique includes adding a piece on the bottom of the hoop to cover all back stitches except the final satin stitches and wetting the finished edge to remove all trace of the Vilene.  I joined a piece of fold-over elastic and sewed it to the patch. 


Finished and final, my Christmas Journal was complete just as decorations were put away-- and I appreciated how little decorating I did once it was time to put it all away!  My husband said he was thinking the same thing!

I will say that I did create time to do a few projects for gifts before Christmas.  Nothing like the amounts of things I normally make, but I was trying to ease back into it and thought it would be easier but I didn't anticipate pain issues from my back.  That made these even more special to me to give.

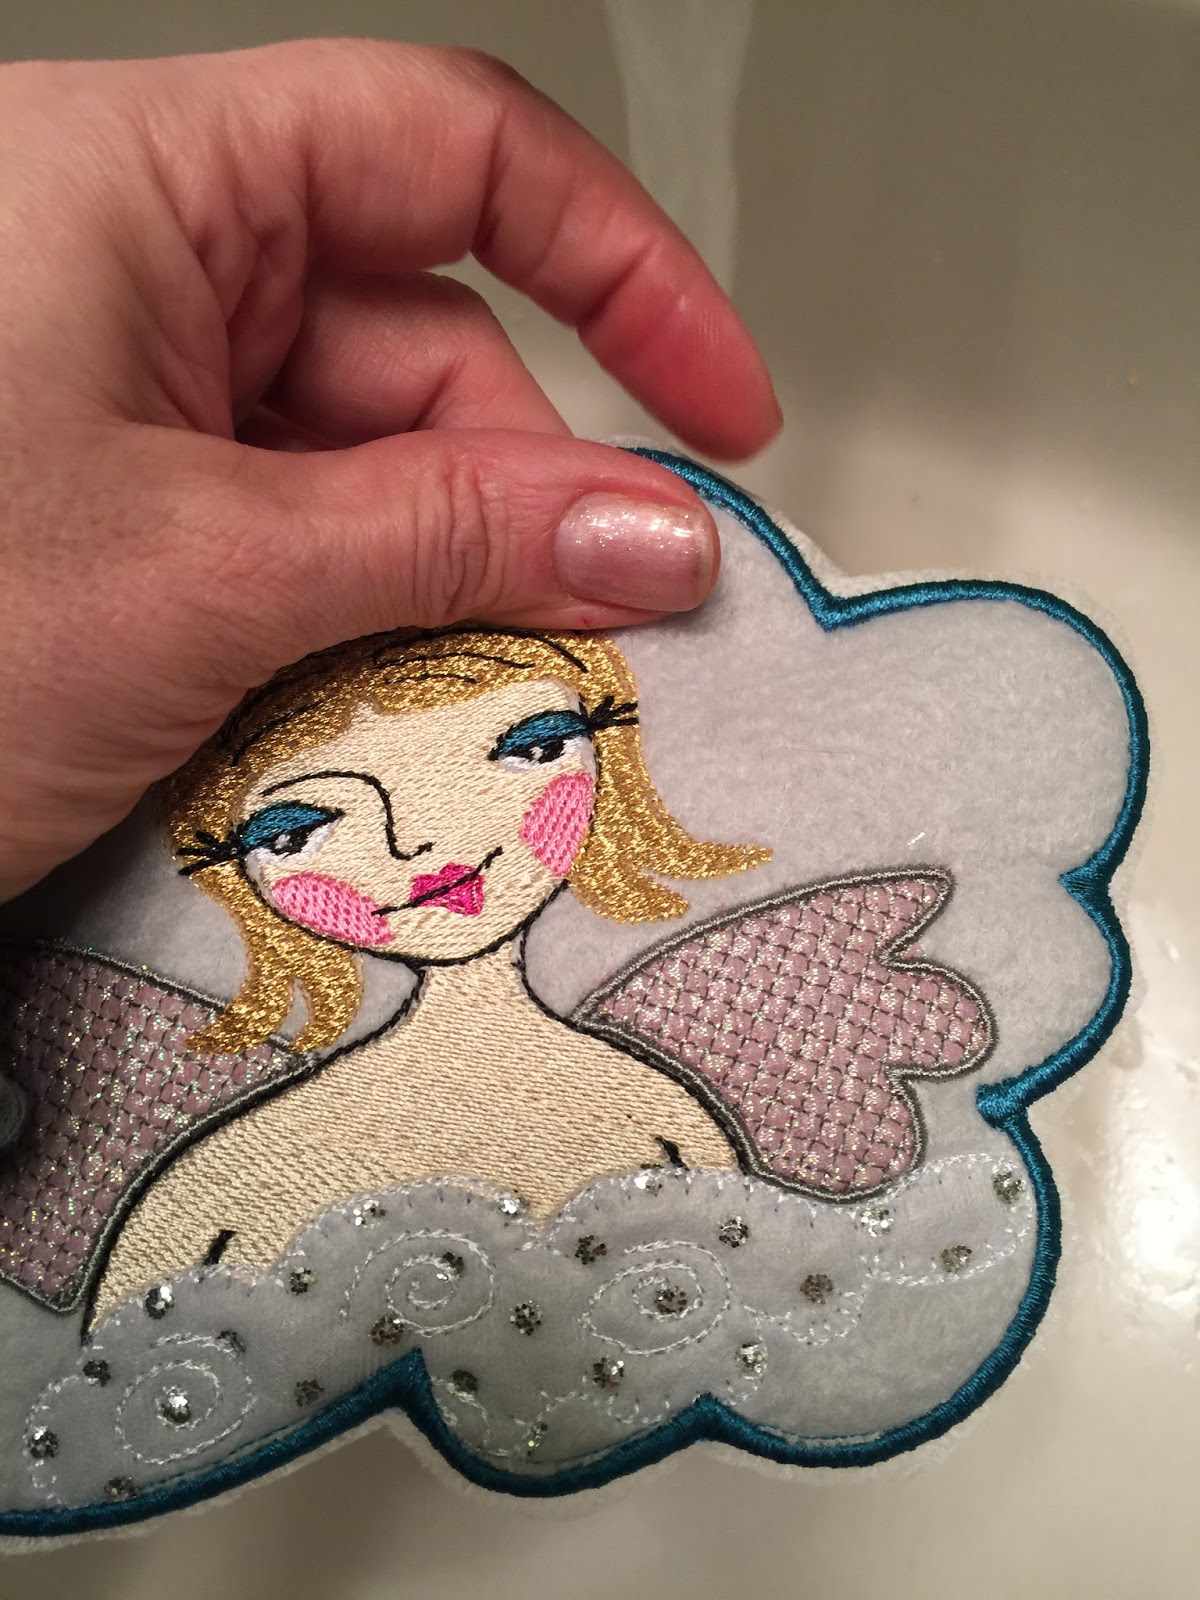
The first thing I did was an applique project.  


My daughter is a ballet dancer and she gave this to her little cousin, along with a set of ballet student dolls.  I was trying to find something that seemed like something she would give.  This took me forever because the file had missing elements that I didn't notice initially.  Luckily, I always open my file in my Embrilliance software and print out a list of color steps so I can take notes while I watch the virtual stitch out.  I eventually found a format that had all the elements. I am not sure if this was a problem with the file or just my download.  I saw this artwork as a png on Etsy last year so I fell in love with it as a blanket stitch applique!  It turned out so cute with its million color steps!  This was from Alphalicious. It was personalized with Jolsens 231 in .5" size.  Embrilliance allowed me to size it perfectly and curve the text.


The next thing I made was a bed-sized reading pillow for a preschooler.  I just cut the fabric to the size of the pillow for the body of the pillow and for the pocket.  The peeker design was from French Frills/Sweet and Sassy.  The alpha was Itch2Stitch Closer to Free and is available in BX.  I used a 5x12 hoop for the name and Embrilliance split it for me so that I could stitch it nice and big.


Next I tried something new to me:  I opened up the leg on toddler pants to stitch near the hem.  It was quick and painless to serge closed.


I stitched a design to go with a larger design on the top.  These were from Lynnie Pinnie:  mini colorwork ballerinas and matching larger ballerinas.  


Hyperlinks of Things Discussed in This Post:
I have a few other projects from 2017 that never made it to my blog that I will try to post soon!  Until then, you are welcome to view my Embroidery Gallery with most of my projects and links to their posts.  My papercraft posts are on my Paper Gallery. I never posted my 2017 Christmas Journal but these are links to other previous Christmas Journal posts on this blog: 2016, 2015, 2014, 2013, 2012.

Happy New Year and thanks for visiting!

Sunday, April 23, 2017

Monogrammed Straw Hat


We went to Sarasota, Florida for a spring break trip for work and I was struck by all the ladies who wore their pretty straw hats while shopping at St. Armand's Circle.  I knew I wanted my own before we went back to Sarasota.  I have done ball caps before so that was my previous hat experience, and I do have a tutorial on that on this blog that you can visit by clicking here, but following are my notes on embroidering on a straw hat.

As luck would have it, I found this sweet and simple straw hat at Walmart for just under $9.  I used my Embrilliance Essentials software to type in a font from Eight Paws and a Claw called Infinity at 3". This is a BX font.  In my Embrilliance software, I have the ability to adjust density, which I accessed by selecting the object, clicking on the stitch tab in the Properties Box, and sliding the satin density lever.  I wanted to add to the density since this font was not digitized for foam.  I have not done much in the way of experimenting here so if you have insights, I would love to see your notes!  I stayed a bit conservative on my adjustment just to keep it from getting crazy.  I moved the slider to 11%.  I knew my foam would match my thread exactly since I was using black, so I had a lot of margin for error! If I had been using a different color, I might have been more inclined to test this before stitching on my hat.


I printed off my monogram to see if the size looked right.


I hooped tearaway in my 5x7 hoop, extended the cross-hairs on my printout, and aligned the cross-hairs on my design with those on my stabilizer.  I taped it in place.


I use the thumbtack method to place my project so that the exact center of what will be my embroidery design is in the exact center of the hoop, instead of moving my needle to the center. I place three thumbtacks from the back, through the stabilizer and the paper print out.  I pick places that will be covered in stitches so that no holes would remain!


 I used a pen to circle the pin holes, just to make them easier to see.


I remove my paper print out, leaving behind the thumbtacks.


I pin my paper print out to my hat, making sure to align the vertical crosshair with the center back of the brim.


Then I place the hat and print out on the hooped stabilizer, carefully making sure that the thumbtacks go back in the EXACT holes that were made previously in the paper.  This is the key to the whole thing.


I pin the hat in place and remove the paper print out AND THE THUMBTACKS.  I squish the crown of the hat to get it (and the bow) out of the way of the embroidery machine.  I want my pins out of the way too so the needle won't chance a meeting with them!


I cut two pieces of 2mm embroidery foam a little bigger than my template.  SPECIAL NOTE:  I have thought this was just craft foam ever since I received it from World Weidner.  I said that in the cap tutorial as well.  It looked like craft foam just like the kind I have gotten at Walmart in the craft department.  There is a part of me that still wonders if it is simply craft foam because it is so much less expensive than the Sulky brand foam, but the company promotes it as "embroidery foam".  Kyla McCrary, so knowledgable and from one of the embroidery Facebook groups, has clued me in that regular craft foam is not good for embroidery machines.  For this reason, I have to alter my notes here to suggest that, washing or not, I will be using embroidery foam in the future and investigating from World Weidner if their product is as stated or simply just craft foam.


I let the machine stitch out the design.


I trim any jump stitches and then peel off the foam.


The tweezers help for little pieces. I tear off the tear away, making sure to get all the little bits.  This is the reason I didn't use spray textile adhesive.  Although the wrong side of the stitching is hidden by my neck, I want the back as clean as possible just for neatness.


Now...this is where I have to tell you something.  You may have noticed in my baseball cap tutorial that I used the tip of my iron to melt away an little raggedy bits of foam.  Well...and this is the confession part of this post, I got a clever idea to use my Plaid 2-in-1 Wood Burner so I could easily pinpoint just the edges and bits.  Apparently this tool heats roughly to the temperature of molten lava.  It melted my polyester thread a bit.  You can't see it by looking but there *might* have been a little smoking and I can feel it!  It didn't seem to ruin my hat at all, but DON'T DO THIS (said in my firmest parental voice).  I won't be doing it again. Next time, I will go back to using the iron (or more likely, I will keep my eyes peeled for something similar with a heat control).


Despite that, I love how this finished up!


List of links and resources from this post:

  • My baseball cap tutorial on this blog:  click here.
  • Floppy hat with bow from Walmart (I got mine at the store):  click here.
  • Embrilliance Essentials embroidery software:  click here.
  • Embroidery foam from World Weidner (this is what I used but until I find out if it is true embroidery foam, I will be using Sulky brand foam from here on out):  click here for the World Weidner.  Sulky makes verified embroidery foam.  
  • Infinity font by 8 Claws and a Paw (website is no longer available but they are on Etsy)
  • I used polyester thread by Metro and tear away from World Weidner.  I used an Organ titanium embroidery needle (size 75/11 sharp).  
  • I got the idea for what I call "The Thumbtack Method" from a class I took on Craftsy by Lisa Shaw called Big Embroidery with a Small Hoop.  I highly recommend this class.  She uses this method for aligning designs but it took it past that and now I use this method most of the time for centering my projects on my hoop. She recently blogged about this if you are not quite ready for a class but are hungry for a little more: click here.
Thank you for checking my post today.  To see all my embroidery projects with my notes, my resources, links to videos, and other handy embroidery info, check out my Embroidery page on my blog or click here.

Thursday, March 23, 2017

fruBlomgren MugRugs - Mix and Match Designs with Embrillance


I recently "found" a new digitizer on the Brilliant Embrilliance Facebook group.  Around Christmas, Marianne of fruBlomgren on Etsy began promoting some caroling 3D angel files made with Stitch Artist.  As a Stitch Artist user, I was excited for her and intrigued. Her angels were unique and again, I began thinking of new options. Then she began sharing more designs as she created them. I was enchanted by the whimsical and folk-style designs, unlike really anything else I have seen on my happy online embroidery-shopping scavenger hunts. For some of my favorite of her designs, she credits the artist Stefanie Muehlbergen of KittieKatStudio on Etsy, who allowed her to digitize her original creations.

As much as I loved these images, and really loved that they were so different and wanted to find a way to use them, I was drawing a blank until Marianne recently posted her version of the mugrug, an in-the-hoop embroidery project.  Hers was cloud-shaped and it came with a bird!  Or is it an egg?  I knew instantly that I would finally stitch out her designs on a stack of her mugrugs, which I really needed for my family room coffee table.

I chose a gray base fabric, a fleece, from my stash and teal thread for the edges to make them coordinate with the fabrics in the room.  I used my Embrilliance Essentials software to merge, mirror, and resize-to-fit her designs into her mugrug shape, as well as to add text on a couple.

I imported the plain mugrug that I purchased from the fruBlomgren shop, which she calls the "neutral" one.  

I had decided on four designs that I wanted to use.  This one is the angel.  Although she does have a flat angel file, I purchased Angelina, a design that she shows stuffed.  To use this design, I had to simply delete the last step, the outline that is normally used to sew the front, embroidered fabric to the plain back.  I also used the lasso tool in Embrilliance Enthusiast to remove some of the stitches of her cloud so that she would fit into the shape.

The key to inserting the design into the mugrug form is to look at the the Objects pane, select the angel design, and slip it in between the applique material sewing step and the next to last step that tacks down the back piece of fabric.  I do that by selecting the angel and dragging her to the right spot.

You can see from the Objects pane above that the machine will stitch (1:1) the cloud shape to show the applique position, then it will stitch again (1:2) to tack down the fabric, then it will stitch (2) the angel design, then it will stitch (3:1) the cloud shape again, then it will end with the (3:2) satin stitch all around in the shape of the cloud.  
 To prep, I saved my design and transferred it to my thumb drive, cut two pieces of base fabric about the size of my hoop, hooped my 5x7 hoop with Vilene (fibrous water soluble stabilizer -- NOT the filmy topper kind of WSS).  I printed my design in Embrilliance.


On designs like this with a number of short color changes, I like to use Embrilliance's Stitch Simulator and take a few notes so that my print out is a true guide and I know exactly what each little icon is.


I selected a palette of threads.  I wanted to make these mugrugs look like they are all part of a set.  I tried to do that by keeping the size and shape the same, keeping the base fabric and outside thread the same, and by using the same palette of colors within the different designs whenever possible.


To illustrate the general way that these were made...
The machine stitched the placement (1st outline of the cloud).  I placed my fabric and allowed the machine to repeat that design (the 2nd stitching of the cloud design) to tack down the fabric.


Once it was done, I removed the hoop from the machine (NOT unhooping the fabric!) and trimmed close to the stitching, like you do for an applique or for making a patch.


I returned the hoop to the machine and allowed the decorative design to stitch out completely.


There were a couple of long stitches that were the result of my lassoing off part of her cloud in Enthusiast.  I made sure to snip those because I wanted no threads below my eventual satin stitch that will be the outline of the mugrug.


I removed the hoop from the machine while keeping the fabric hooped....


...I flipped the hoop over to the backside.


I placed my second piece of fabric base right on top and pinned it in place from the front.


Then, the cloud shape was stitched a 3rd time.  This time to hold the back fabric in place.  The back fabric covers all the backside stitches.


I removed the hoop again (and again NOT unhooping the fabric!) and trimmed close to the stitching.


The hoop was placed back on the machine and this time the cloud outline was stitched using a heavy satin stitch.  This is the outline of the mugrug.


 The hoop is removed and the front and back are done.


I could have used matching bobbin thread so that the back of the outlining satin stitch was a bit prettier.  I slacked on that!

 I trimmed the vilene stabilizer close to the outline stitches, careful not to cut so close as to nick a stitch!  I use warm water and my finger to dissolve the vilene just on the outside edge of the satin stitching to avoid getting the whole project wet.


I allowed the edges to dry, which only tool a few minutes.


 These are my four coasters with details...

This is Frau Blau and Ede from fluBlomgren.
Free tiny text font can be found at http://www.cmemag.com/articles/Free-Tiny-Text-Font.   
(I triple stitched the lettering so it wouldn't get lost in the pile.)
Her expression is hilarious to me.  The cat doesn't seem too happy either.  I added "Frau Blau is blue....today" to play on her name, Mrs. Blue,  and because I just love that look on her face.  There is an option to have the face filled in.  I was trying to make it fast, but I would have preferred that for the set as a whole. Next time!

This is Angelina angel from fluBlomgren.  I used metallic organza for the wings and glitter dot for the cloud.  The hair is metallic gold thread from Robison Anton.  It was so much fun for me to use these kinds of fabrics.  So often, applique is all cotton.  I like that this project allowed me to think outside the cotton print box!

This bird is on the file with the mugrug itself.  I simply copied and pasted it and used the mirror image key in Embrilliance  so they would face each other.  I did make the one on the right a little shorter.  

This mermaid is simply my favorite.  I have a little mermaid collection and used to try to find unusual ones or kitschy ones or whimsical ones whenever we went to the beach for a vacation.  She fits all three descriptions.  In the information about the file on Etsy, we are told that mermaid in German is meerfrau so her name, Frau Meer is a little play on that.  This is fruBlomgren's Frau Meer.  She is also in a separate file sitting on a rock.  That one is on my wishlist.  I don't know if it's the "Mimi makeup" or the blue "parts" but I just love this character.  

I was so happy with my little mugrug collection. I think they will be cute on my family room coffee table.  I am not sure if they will be used for hot mugs or just enjoyed.  I do think this project is gift-worthy, as I usually give away everything I make...but I'm keeping this one!


List of Links on this Blog Post:

  • fruBlomgren embroidery design shop on Etsy:  click here.  
  • KittieKatStudio gallery of paper, paper mache, and clay original works on Etsy:  click here.
  • fruBlomgren's cloud-shaped mugrug with applique bird:  click here.
  • fruBlomgren's Angelina angel:  click here.
  • fruBlomgren's Frau Blau and Ede:  click here.
  • Free Tiny Text font by Lisa Shaw:  click here
  • fruBlomgren's Frau Meer:  click here
Thank you for checking my blog post today.  To see all my Embroidery projects, resources, tutorials, and links, check out my Embroidery Page on this blog, or click here.

But wait! There's more! Click 'older posts' above!

But wait!  There's more!  Click 'older posts' above!