My newest way to personalize and create is with an embroidery machine! I use a Brother PE-770 and Embrilliance software. Here, I share my projects, link to the files I used, link to the products I used, and give info on stabilizers, threads, and needles for my specific projects. Paying it forward because my crafty friends helped me so much and made getting a machine and having successful projects so easy.
**Scroll down past the photos to see my list of resources and suppliers**
Links to My Embroidery Projects on This Blog:
Click on the photo to go to the post where the project appears on the blog for more info! Scroll down this page for resources and info.
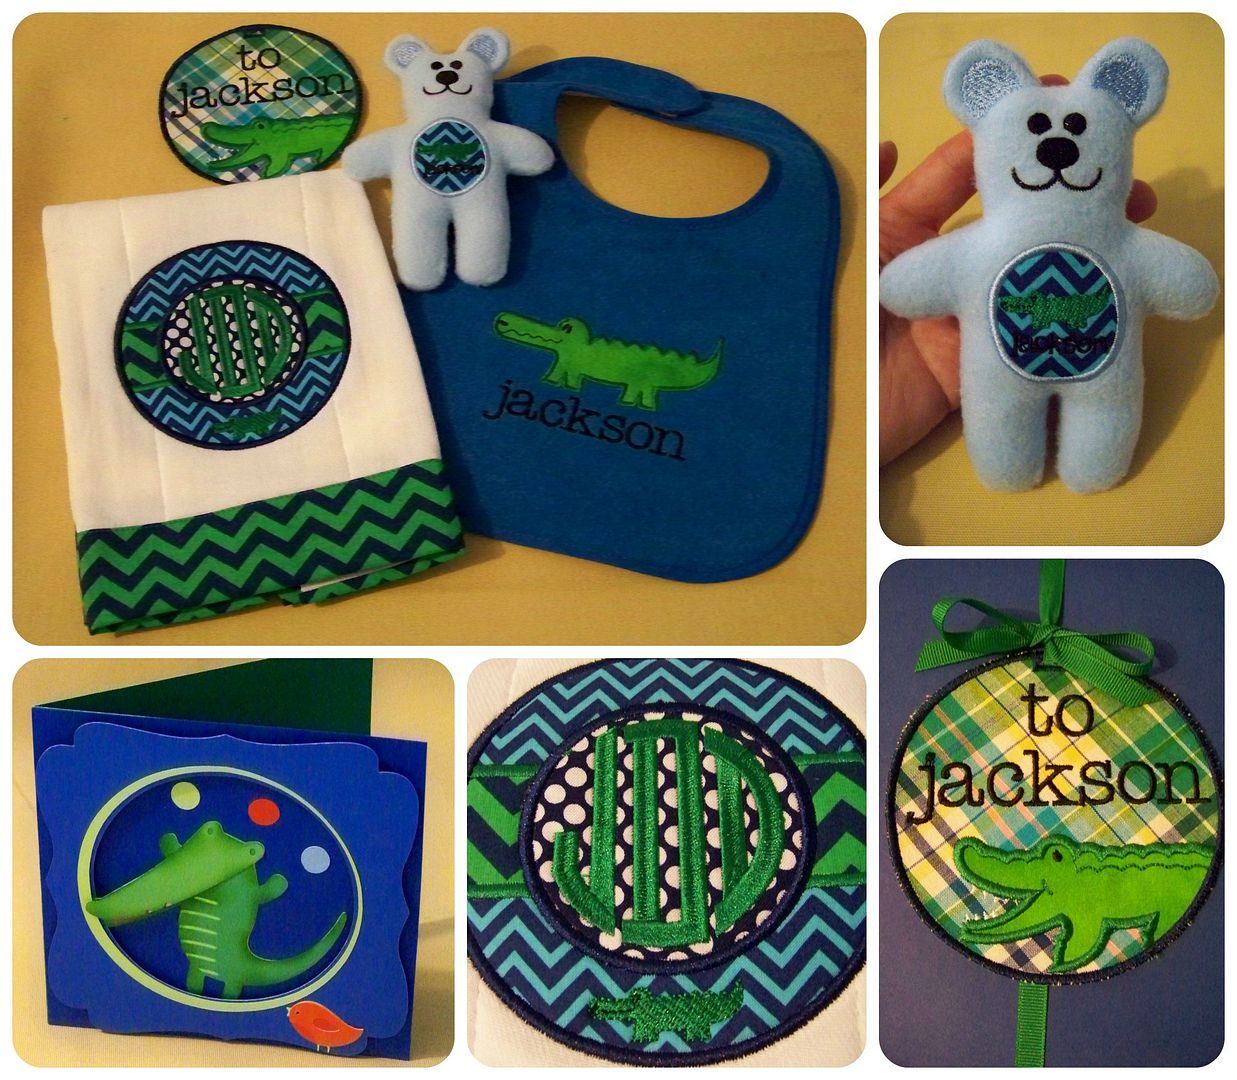 |
| March 24, 2015 - Baby Gift Set. Includes links to all files and tutorials used. These were created a couple of weeks after getting my machine and software. |
 |
| March 30, 2015 - Stitching Monograms with Embrilliance Essentials software (some tips and revelations!) |
 |
| April 11, 2015 - How to use Alpha Tricks to map fonts. |
 |
| April 13, 2015 - How to use a 5x12 jumbo hoop on a 5x7 machine with Embrilliance Essentials and How-to embroider pillowcases. |
 |
| April 23, 2015 - My Derby towel with links to designs and my notes on how I made this for my kitchen. |
 |
| April 25 - How to Embroider on a Ball Cap and How to Use Embroidery Foam |
 |
| May 25, 2015 - Removing Thread from the Upper Tension Unit on Brother PE-770 (including notes from my friend who is a sewing machine repair technician!) |
 |
| June 7, 2015 - Embroidered Thank You Cards |
 |
| June 28, 2015 - Personalized Baby Project 1: Tutorial on making baby burp cloths that have the backside of the stitching hidden and finished ends. |
 |
| July 10, 2015 - Making Free-standing Lace to create barefoot sandals using a file from Sonia Showalter. |
 |
| July 27, 2015 - Digitizing a custom snap tab with Stitch Artist |
 |
| September 13, 2015 - How to Organize Embroidery Files with Pinterest as a visual catalog. |
 |
| October 21, 2015 - October projects with links to files/patterns used. |
 |
| November 22, 2015 - Case for Bath and Body Works made completely in the hoop in an embroidery machine. |
 |
| November 23, 2015 - Hooded towel with info on files and presentation. |
 |
| December 27, 2015 - Tutorial for My Aunt - How to Use Software with Your New Machine |
 |
| January 2, 2016 - Digitizing Pattern Pieces |
 |
| January 15, 2016 - Digizing filled spaces in purchased fonts plus link to sewn pouch tutorial with easy zipper installation. |
 |
| February 7, 2016 - Lessons I Learned Digitizing Appliques in Stitch Artist |
 |
| February 9, 2016 - Personalized Baby Project 2: How to embroider onesies (step-by-step tutorial) |
 |
| February 15, 2016 - Key Fob Tutorial by Request with Baby Steps for Newbies to Embrilliance Essentials |
 |
| February 22, 2016 - Tutorial on Making Patches from Embroidery Files (with how to attach the patches) and how to combine parts of digitizing to use with other files. |
 |
| February 26, 2016 - Drafting a t-shirt for a plushie, sewing it, and embroidering it. |
 |
| March 8, 2016 - Quilting with My Embroidery Machine! |
 |
| April 24, 2016 - Using Embrilliance Density Repair Kit with Anita Goodesign files. |
 |
| April 25, 2016 - Welcome to Fabulous Louisville KY towel. |
 |
| May 6, 2016 - Mother's Day Gifts |
 |
| May 14, 2016 - Making a casserole carrier from two placemats and a fat quarter plus scraps. |
 |
| June 14, 2016 - Double Wedding Ring Table Runner Made in the Embroidery Machine |
 |
| August 28, 2016 - Busy summer sewing |
 |
| January 2, 2017 - Stitching a Cover for my Christmas Journal |
 |
| February 12, 2017 - Personalized Embroidered Bunnies (two methods) |
 |
| March 13, 2017 - Bunny Birth Announcement and Baby Gift Set |
 |
| March 23, 2017 - Mix and match files with Embrilliance using files from fruBlomgren |
 |
| March 25, 2017 - Personalized wrist strap key fob tutorial |
 |
| April 23, 2017 - Monogrammed Straw Hat |
 |
| October 19, 2017 - Holiday Treat Bag with Free Standing Lace Skeleton Charms (includes sewing tutorial for a lined drawstring bag) |
 |
| November 30, 2017 - Personalized Ballet Bears |
 |
| December 4, 2017 - Notes on stitching on high pile fabrics |
 |
| December 22, 2017 - Official Cookie Tester Gift Set |
 |
| January 8, 2019 - My 2018 Christmas Journal Plus Some Embroidery Projects |
 |
| May 29, 2019 - May Wall Hanging |
 |
| June 2, 2019 - Dorm Towels |
 |
| August 6, 2019 - Zippered Wristlets Made in the Embroidery Machine |
 |
| September 24, 2019 - Lined Crossbody Bag Made on an Embroidery Machine |
Resources (links to where I buy/bought my tools and supplies):
Machine
- Brother PE-770 (I bought mine on Overstock, as it was the best price at the time. Best price can vary between Overstock, Amazon, eBay, and dealers). This was the right machine for me with its simple qualities and 5x7 capabilities.
Software
- Embrilliance software (I use Embrilliance Essentials, Enthusiast, Density Repair Kit, Alpha Tricks, Thumbnailer, and Stitch Artist, but I started with just Essentials): click here.
- SewIconz (click here) or Thumbnailer (click here) to make thumbnails to see your embroidery and other crafting files! The benefit to getting Thumbnailer is that, like all Embrilliance products, it also works on Mac as well as PC and it will make thumbnails of the .be files!!
Threads
- Pre-wound bobbins: click here. I buy these in white and black.
- Metro Thread (I started with a package of Basic Colors then later added a package of Brights and a color card): click here.
- Sewer's Aid to prevent shredded and broken threads: click here. Use sparingly to avoid gummy build-up on tension discs. Rubbing alcohol will remove build up, but should be done by a technician.
- Metallic and Glow-in-the-Dark thread by Robison-Anton discounter: click here (it is a closed Facebook group where I buy mine).
- Cone thread holder to lengthen the thread path: click here.
Needles
- Organ Brand Titanium Embroidery Needles. These have a longer eye than normal. Titanium coating allows for less friction on the needle, which prevents dulling of the tip and wear on the needle. I buy Organ Brand Titanium Embroidery Needles, sharps and ballpoint, by the box, size 75/11. I use ballpoint for knits and sharps for everything else.
- To make it easy, these are the Organ numbers on the needles I buy: For the sharps (for wovens) 15x1STPD-11/75. Their box will have on it 15x1ST with 11PD below it. For the ballpoint (for knits) 15x1STBPPD-11/75. Their box will have on it 15x1ST with 11BPPD below it. (Decoding Organ needles: 15x1 denotes that it is flat shank for household machine, ST denotes for embroidery, PD denotes the titanium finish, 11 denotes the size, BP denotes ballpoint. For the complete guide to Organ needles: click here for PDF pamphlet.)
- Places I have ordered these Organ needles---
- Allstitch: click here
- Metro: click here
- MJ Sewing Supply: click here for sharps and click here for ballpoint.
- Schmetz Embroidery Needles. These have a longer eye, stronger scarf, and slightly ballpoint. Click here. These are widely available at fabric stores like Joann's.
Stabilizers (I get these from World Weidner via Amazon with my Prime membership for free shipping but it is also available directly from World Weidner with free shipping on their site. I find that it ships days quicker from Amazon.) The rolls are available in 8" and 12" widths. I like the 12" width to make it easier for hooping. Topper lays on top of the hoop so it does not need to be any wider than the hoop. Poly mesh is easier to deal with at 12" width when hooped for ITH projects but when simply fusing to the wrong side of a garment doesn't need to be wider than the hoop. The Amazon items on this list are affiliate links.
- White Tear Away, medium weight, 12" wide, 50 yard roll: click here.
- Black Tear Away, medium weight, 12" wide, 10 yard roll: click here. I use the black for things with a dark base fabric and key fobs that use dark vinyl with cut edges.
- White Tear Away, 10"x 12" 100 pre-cut sheets: click here.
- Water Soluble Stabilizer (topper), 8" wide, 20 yard roll: click here. (This is the filmy type of WSS for topping over the hoop for items with pile where the stitches could sink.)
- Cut Away, medium weight, 10"x 12" 100 pre-cut sheets: click here. (For garments, I don't use this product; I use no-show poly-mesh.)
- No-show poly-mesh, 12" wide, 50 yard roll: click here. This is not fusible. I still pre-shrink.
- Fusible No-show Poly-mesh, 10"x 12" 100 pre-cut sheets: click here. (This size for hooping). Note: I had stopped using the fusible kind because I would get puckering once I steam-pressed the stitching. I overcame that by pre-washing and drying my poly-mesh! Yes, I put it in the dryer! No more shrinking!
- Fusible No-show Poly-mesh, 8"x 8" 100 pre-cut sheets: click here. (This size for fusing onto the wrong side of a garment when floating over tear away.) Note: I had stopped using the fusible kind because I would get puckering once I steam-pressed the stitching. I overcame that by pre-washing and drying my poly-mesh! Yes, I put it in the dryer! No more shrinking!
- Back Cover a Stitch (another brand is called Cloud Cover, a soft iron-on product to cover the rough back-side of embroidery especially used for baby clothing): click here. This is another product I pre-shrink by putting in the washer and the dryer!
- Vilene fibrous water soluble stabilizer (for free standing lace and in-the-hoop patches, door hangers, coasters, redwork on flour-sack towels), 10" wide, 10 yard roll: click here. (This is the fabric type of WSS that is hooped.)
 |
| I used scraps the first few weeks of owning my embroidery machine to learn to use stabilizers and techniques like applique. |
Adhesives
- Mettler Web Bond temporary adhesive (Textile adhesive) I purchase in-store.
- E6000 (Plastic adhesive for attaching patches) - I purchase in-store.
Fusing Agents
- Heat N Bond (I usually purchase that at my local fabric store with a coupon). This is the better product if your are cutting the fabric in your die cutter (like a Cameo or Cricut Explore) but my favorite bonding fabric is Steam A Seam. Most embroiderers use Heat N Bond Lite and refer to it as "hnbl". Video on how to use hnbl with appliques: click here.
- Steam A Seam: I get this at my local fabric store with a coupon or on sale. It comes as narrow as 1/4 and 1/2 inch which is perfect for hemming across the stretch for knits (iron then sew) and I often use it instead of pinning. It comes wider for applique. It is advertised as washable without stitching but I always stitch so I can't confirm the claim. It doesn't work well as a backing for die cuts, though, because it isn't smooth like Heat N Bond. When hand-cutting, it is my preferred product for fusing. Click here for a comparison between Heat N Bond and Steam A Seam for machine applique/embroidery.
Scissors
- Curved scissors for hoop embroidery (Kai 5135c)-great for trimming appliques and poly-mesh cutaway near stitching: click here.
- Curved jump stitch scissors - (Kai 5100c): click here.
Hoops
- Hoop Set that includes jumbo 5x12, 5x7, 4x4, 1.5x2 sizes: Click here.
Other
- Seam Fix seam ripper to remove WSS without water (use the rubber end to rub it off): click here.
- Rattlers to put inside ITH baby toys: click here.
- Embroidery Foam: click here.
- Kam snaps, key fob hardware, webbing, findings (Brees Basement): click here.
- Kam snaps, key fob hardware and vinyl, including glitter varieties (Mikri World): click here.
- Wooden block holder for Kam plier-- makes it work like a press: click here.
- Frixion pens for marking -- I buy mine at a local quilt shop. There are caveats to using this product which are explained in this post: click here.
- Smallest USB drive/thumb drive you can find. I use a 4 GB. I bought this in-store at Staples.
- USB hub to prevent loosening the machine ports. I bought this in-store at Walmart.
- Machine needle inserter: click here.
- Clear rulers for quilting in the embroidery machine-- Omnigrid. I bought a three-pack of squares and a 24"x 6" rectangular. I found mine on Amazon and Ebay but they are sold at all Fabric stores and some big box stores.
 |
| I made the towels for Easter baskets for my mom and mother-in-law a couple of months after getting my machine. The hat was my first attempt at embroidery on a cap. These are not on my blog (not linked to a post). |
What to Get Just to Learn When You First Buy a Machine- The Bare Bones Shopping List for Learning the Manual:
A brand new PE770 comes with an empty bobbin, a spool of bobbin thread, tiny scissors, a 5x7 hoop, and a couple of needles. If you want to get together a few scraps of fabric to go through the manual and maybe try a few of the built in designs to learn what the manual has to say, you will need at minimum these items.
- Tearaway and No Show Poly Mesh Stabilizers
- WSS topper
- At least one spool of embroidery thread
- A thread stand (trust me on this) and a bottle of Sewers Aid (because shredding can happen until you figure out the thread path).
- Scraps or old clothes and old hand towels or kitchen towels.
- When you buy even one file from someplace, you will need a USB drive.
- Once you go through the manual, start looking for software! You will be ready. Then you can get all the stuff on the lists above! :)
Education:
- Applique Made Easy tutorial-- with info on how to embroider on a hand towel, how to float by Susan of Creations by Suebella 4U: click here.
- How to Embroider a Tote Bag (tutorial) by Susan of Creations by Suebella 4U: click here.
- How to Embroider a Kitchen Towel (tutorial) by Susan of Creations by Suebella 4U: click here.
- How do do applique: click here.
- How to Embroider a T-shirt (tutorial) by Susan of Creations by Suebella 4U: click here.
- Big Embroidery for Small Hoop (online class): click here and search "big embroidery small hoop". Basic class on using templates to help with multiple hooped projects. To see Lisa's abbreviated blog post on this, including free files plus and alignment file, click here. And if you really get into alignment and multiple hooping, you HAVE to check out Lisa's post with the FREE bx alignment files: click here.
- How to use 3D foam for Puff Embroidery (video): click here.
- Thread Savvy Stitch Flawlessly with Any Thread (online class): click here. Awesome class!
- Chart with fabrics and which stabilizer and needle to use. Click here.
- All about needles: click here.
- How to download, save, and extract files you buy. This is second nature to me but when people ask how to do it, it is like telling someone how to tie a shoe so I am posting this to make it easier for us both! Click here.
- How to use Cutwork Files: click here.
- How to make snap tabs (in the hoop keychains that close with Kam snaps): click here.
- Guide to Kam Snaps-- Snaps 101: click here.
- Stabilizer and Design Guide from Embroidery Library: click here.
- Embroidering last names for flags, etc.-- a guide for 'no apostrophe' (and it's funny): click here.
- Info on basting boxes: click here.
- A little lesson on pull comp (she uses a different software but still helpful): click here.
- How to embroider on a vinyl tote bag (video): click here.
 |
| Snap tabs from The Bean Stitch LLC and Buggalena. Font from 8 Claws and a Paw. These are not linked to a post on my blog. Just some fun things for my daughter's backpack, dance bag, and lunch box by request. Vinyl, snaps, and hooks form Mikri World. |
Education Specific to Embrilliance Software:
- The official Youtube channel for Embrillance is Briton Leap. These are all the playlists by module! click here.
- Embrilliance Manual: click here. This is more of a reference than it is a workbook. The videos are the place to easily start. This is where to go for more details.
- Embrilliance Essentials free webinar replay by Lisa Shaw: http://sewbubbles.teachable.com/p/introduction-to-embrilliance-essentials-webinar-replay
- How to use BX files and a free bx file to have from Itch2Stitch! Click here.
- More than you ever wanted to know about BX from LindeeG: click here.
- How to merge files in Embrilliance: click here.
- Remove Hidden Stitches video: click here.
- Change stitch order in Essentials: click here.
- Facebook group for users of Embrilliance software: Click here.
- How to edit stitches with Embrilliance Enthusiast (remove parts of stitching in large areas or one stitch at a time plus how to put in stops in Essentials): click here.
- How to add Knockdown Stitches using Enthusiast: click here.
- How to Create Text in a Circle (video): click here.
- How to create .svg and .studio files of applique fabric shapes in order to cut them in a die cutter using Embrilliance (video): https://www.youtube.com/watch?v=STLZyJ6aGdw
- How to use the jumbo hoop (5x12) and split your design in Embrilliance Essentials: click here.
- How to remove hidden stitches when combining APPLIQUE design files: click here.
- Essential Applique Functions: https://www.youtube.com/watch?v=FruERFeV60k
- Altering the basting box and centering tip using a basting box: click here.
- Making dotted and dashed dividing lines for use in subway art (video): click here.
- How to do stitch editing with Embrilliance Enthusiast (video): click here.
- Using Align and Distribute to make a border in Essentials: click here.
- Using cross-hairs to put several small items on a single hooping (this video uses the Embroidery Garden snowballs as an example): click here. For bx crosshair files: click here.
- Using fonts with alternate letters in Embrilliance Essentials or Express: click here.
- Manually splitting a design for re-hooping (using Enthusiast): click here.
- Check out this blog for tons of info on Embrilliance: http://sew-bubbles.com/
Education Specific to Digitizing - Embrilliance Stitch Artist:
- The BriTonLeap (official Embrilliance) video playlist for learning Stitch Artist. I finally figured out that I should have watched the Controls videos (parts 1 - 6) first! click here.
- How to create an embossed letter in Stitch Artist (video): click here. Note: You can only create holes from objects that are in the same design. Look at the object pane and if you have two designs, go to the Create menu, Design, Combine Designs. For letters B, D, O, P, Q, R, you need to separate the hole from the letter and assign it the same fill.
- How to make an applique with Stitch Artist: click here.
- Lisa's Stitch Artist Lessons 1 and 2 (applique based on a drawing): click here and here.
- Kelly Stodola's Video lesson on digitizing using your own drawings: click here.
- Brian Bailie's fantastic video (Official Embrilliance) lesson on creating an applique by using the spline key to trace a drawing, using care with entry and exit points to avoid jumps, and thinking of planning the sequence of stitching: click here. (Don't be turned off by Sunbonnet Sue; the info is perfect).
- Brian's video on creating overlapping appliques: click here.
- Check out this blog for tons of Stitch Artist tutorials: https://stitchingadventure.blogspot.com/
- Check out this blog for tons of Stitch Artist tutorials: http://nonnasscraps.blogspot.com/
- Why autodigitizing is a bad idea (in case you were tempted): http://lynniepinnie.com/blog/2016/12/
Embroidery and Monogram Placement Guides:
- Initial Etiquette: click here.
- Embroidery placement guide for children's items: click here.
- Embroidery Library embroidery placement guide for home items and adult clothing: click here.
- All Stitch embroidery placement guide: click here.
- Bella Lino's placement guide specifically for linens: click here.
- Monogram Rules (etiquette): click here.
- Unusual circumstances, like hyphenated names or double middle names: click here.
- Monogramming for men: click here.
- Video on thread color for men's shirt cuffs (super short): click here.
- Wedding monogram rules: click here.
Facts Specific to Brother PE-770:
- Bobbin size: Size A, 90 weight
- File types to buy: .pes and .bx if using Embrilliance Essentials software.
- Flash drive: use 4 GB or smallest available. Keep one file at a time on the flash drive, unzipped and out of any folder.
- To reduce wear on the usb port, use a hub.
- The 4x4 frame (in inches) is the same as 100 x 100 (in mm); 5x7 frame is 130 x 180; 5 x 12 Jumbo (repositional) Frame is 130 x 300.
- Don't oil the PE-770; has to be done by an authorized mechanic. Info from Brother on this: click here.
When Stuff Goes Wrong:
My favorite places to purchase embroidery Files:
All vendors have some sort of free files (except those on Etsy) so that you can try them and make sure they are the quality that you expect. Be sure to sign up for email notices of sales and "like" the Facebook pages of your favorites for coupon codes and free downloads on many. Some also have "secret" or "closed" Facebook groups, which you can join for more access to files and coupon codes.
Places I have bought files or downloaded free ones (last updated Jan 8, 2019):
- Ageless (beautiful and old-fashioned. See font in progress and $1 sets)
- Alphalicious - lots of blanket stitch appliques. They are on Etsy and have a site.
- All Things Applique
- Anita Goodesign. I buy on Ebay, but get my info from anitagoodesignonline.com/
- Apex Embroidery Fonts and Designs (3D puffy fonts to use with foam, interesting fonts, lots of fun and sometimes daily freebies) Sister site has SVGs that often match.
- Applique Corner (includes cut work, great fonts, 99 cent font on Friday)
- Applique Junkie (fun and funkie with stuff for kids and calico critters)
- Applique Market (great monograms-- includes some JUMBO sized monograms)
- Applique Momma (styles for kids)
- Applique Place
- Artapli
- Anna Bove (sophisticated)
- Baby Kay (faux smocking)
- Bee Stitchin
- Belliboos
- Bit of Stitch
- Bling Sass Sparkle (inexpensive sophisticated frames and elegant monogram)
- Blue Bunny Hollow
- Boutique Fonts
- Bows and Clothes
- Breezy Lane (all fill but lots of themes)
- Carol Guy on Etsy (pretty frames)
- Creative Appliques
- Creative Medley (lots of ITH)
- Dejah Vue (snap tabs and ITH projects)
- Designs by JuJu (great fonts/monograms)
- Designs by Little Bee (snap tabs, belly bands, stufties)
- DigiStitches
- Digitized Creations (cute ITH stufties)
- Disorderly Threads (fabulous ITH zipper bags)
- Dolls and Daydreams (ITH dolls and stufties)
- Embroidery Boutique (great fonts/monograms)
- Embroidery by TM on Etsy (unusual ITH)
- Embroidery Designs.com (KY stuff)
- Embroidery Garden (in the hoop projects)
- Embroidery Library
- Embroidery Online OESD (all kinds of files including 3D FSL)
- Embroidery Outlet (in the hoop stuffed animals and baby toys)
- Embroitique (cute fonts and files)
- Five Star Fonts
- French Frills now called Sweet and Sassy Designs (hooded towel designs)
- FrouFrou by Heather Sue (characters)
- fruBlomgren (relatively new digitizer from Denmark with unusual and quirky designs)
- GG Designs (in the hoop baby toys)
- GnG on Esty (swirly designs)
- Gracefully Geeky (ITH stuff for kids)
- Hang to Dry - company closed. Some files were sold to Applique and Embroidery Originals on Etsy, owned by Molly Stiffler Bentley who used to work for Applique Corner. From what I have seen, she has kept the file names the same.
- Happytown Applique (appliques for young kids)
- Hooked on Applique (embroidery and applique including Disney inspired)
- Hoopmama (lots for sayings, fun stuff for kids, embroidery and matching svg files)
- Hoopsisters (stunning quilts to stitch in the hoop)
- Itch 2 Stitch (great fonts, monograms, appliques and pick up a free punctuation set)
- Jack N Mack on Etsy (boutique looking designs for young children)
- Jolson's Designs (lots of fonts!)
- Joy Kate Designs (simple applique)
- Julia's Needle Designs (lots of redwork, vintage-looking sets, quilting sets, sewing "girls" sets. Warning her fonts are not BX)
- Just Peachy (kids applique)
- Just Sew with Sandy and Debora (G-tube pad designs)
- Kreative Kiwi (ITH)
- Kreations by Kara (unusual and elaborate)
- Kris Rhodes (quiet book pages)
- Kunterbunt (European company with very cute designs from various artists)
- LindeeG (long-time digitizer and teacher - FSL and other files)
- Loopy Lion (ITH and appliques)
- Loralie (embroidery designs featuring Loralie Graphics. Whimsical ladies)
- Lovesome on Etsy (unusual fonts)
- Lynnie Pinnie ("cute" stuff for young children, great frames and applique files, best boy font ever is Type A Lower Case and only available there)
- MarmieBee on Etsy (lots of "sketch" designs)
- Memories in Thread (reading pillow designs and more)
- Miss Kenzie Mac (characters)
- Miss Meggie (little bit of everything)
- My Craftroom Closet (same company as Show Me Bowtique on Etsy)
- My Petite Fleur (hooded towels and matching stufties)
- My Silly Geese (peekers)
- Nana's Handmade Baby (ITH)
- NonnieNoo (ITH stufties)
- Ofnah (lots of ITH stufties inspired by famous friends)
- Ohana Applique (really cute original stuffed animals, masks, and peekers)
- Oh My Craft Supplies (daily freebies including fonts)
- Oma's Place (great freebies, tiny fonts)
- Orange Elephant on Etsy (original hand-drawn designs)
- Parker on the Porch (fun stuff, planner bands, zipper bags)
- Pickle Pie
- Pixies Rule (pretty stuff for ladies)
- Planet Applique (lots of alpha/font sets, the cutest ITH dolls and stufties)
- Pretty N Stitches (peekers and snowballs)
- Rivermill Embroidery (inexpensive fonts and monograms)
- Secrets of Embroidery (this is a platform with several "stores" by different digitizers. The ones I have bought from are Anandas Divine Designs, Artistic Designs, Embroidery Connections, Kreations by Kara, Louisa Meyer Originals, Oh Sew New, Stitch Soup, and Stitchbox Creations). Lots of diversity and gorgeous designs.
- Smart Needle (I like them for freebies only)
- Sonia Showalter (fine designs with perfect digitizing)
- Southern Baby Classics on Etsy (Boutique designs for kids)
- Southern Stitches (patriotic circle monogram with add-on sets)
- Stitch Away Applique (simple appliques for toddler clothing)
- Stitch Delight (South African company with lots of unusual files, lots of FSL, daily free letters)
- Stitch on Time
- Stitch Salon (freebies)
- Stitchtopia (beautiful fonts with flourishes and alternative letters, one of my favorites!)
- Sweet Pea (Australian company with tons of quilt blocks and bags)
- Thanks for the Adventure on Etsy (lots of Disney inspired stuff, stylized Disney)
- Thelander Designs (awesome baby announcement)
- Threads N Scissors (lots of lace designs)
- Trendy Stitches
- The Bean Stitch (in the hoop key chain shapes, snap tabs)
- Uncle Matt's Crib (some stuff for teenagers, key fobs)
- Urban Threads (funky and off-beat and grown up, sister company to Embroidery Library)
 |
| This project is not linked on this blog. I used Embrilliance Enthusiast to lasso the anchor off of a subway art file from Embroidery Library. I used no show poly mesh on the reverse of the purchased dress, floated over hooped tear-away. |
Tutorials and patterns for stuff to make (traditional sewing) to embroider:
For Babies
- Shaped burp cloth (free pattern and tutorial): click here.
- Baby Bib (free pattern and tutorial): click here.
- How to make a receiving blanket with self-binding (video): click here
- My tutorial on making enclosed burp cloths with fabric ends: click here.
- NICU smock for preemies (free pattern): click here.
- Baby sleep sack: click here.
- Sewing a layette gown using a onesie: click here.
- How to sew a baby onesie ruffle: click here for video 1 and here for video 2.
- Easy leggings: click here.
- Elephant big and binkie holder (free download pattern and complete online tutorial): click here.
- Baby gown (free pattern and tutorial): click here.
For Kids
- How to make a ribbon-edged tutu to go with that toddler t-shirt: click here.
- Alternate method for tutu (fast with multi color trim): click here.
- Alternate method for cutting tulle for tutu (fast method): click here.
- How to make a hooded towel (for use with French Frills or similar files (free tutorial): click here.
- How to make a LINED hood for hooded towels so that the back of the stitching is hidden (video): click here.
- How to make a baby or DOLL hooded towel: click here.
- How to roll a hooded towel with two add-ons (video): click here.
- DeAnn Clingan's fabulous hooded towel tutorial featuring a cotton lining (must join the French Frills Facebook group and find the tutorial in the files section as "Cutting, Lining, Attaching, Folding a Hooded Towel by DeAnn": click here to join the group.
- Tiny chef apron and toy oven mitt --kid-sized stuff! (free pattern): click here.
- Super hero cape for kids (free pattern): click here.
- Hair bow, 5", stacked, boutique-style for center felties (video): click here.
- Hair bow, pinwheel style for mini embroidery designs (video): click here.
- Hair bow, large, boutique-style for mini embroidery designs (video): click here.
- Free fleece hat patterns: click here.
- Playlist of more hair bows: click here.
- Mickey Ears on a headband: click here.
For Home
- Coffee cozy (free pattern and tutorial): click here.
- Pot holder (free pattern and tutorial): click here.
- Lined oven mitt (free pattern with video tutorial): click here.
- French Seam Pillowcases: click here.
- Pleated-bottom kitchen towel (video tutorial): click here.
- Ultimate binding tutorial for wall hangings from Missouri Star Quilt Co (video): click here.
- How to sew prairie points for trim on home dec (kitchen towels, wall hangings, table runners): click here. Click here for prairie points out of multiple fabrics.
- Tea Towel Tutorial (fabric bands and prairie points): click here.
- Mitered corner cloth napkins (free pattern and tutorial from Purl Soho: click here.
Bags and Accessories
- Tote bag (free pattern and tutorial): click here.
- Doll tote bag (free pattern and tutorial): click here.
- FABULOUS Swoon Purse Patterns: click here.
- The Ethel Tote bag from Swoon (free pattern): click here.
- Garden Tote (free tutorial): click here.
- Reversible fabric headband (free how-to video and template): click here.
- Awesome zipper pouch tutorial from Missouri Start Quilt Co. (video): click here.
For Holiday
For Memory-Keeping
- Polo shirt memory pillows: click here.
- Baby bonnet that turns to a wedding keepsake for future: click here.
 |
| This project is not linked on my blog. This is a simple applique I did for my daughter. |
Places to buy blanks:
- ARB: click here.
- Blanks Boutique (BB): click here.
- Discount Embroidery Blanks: click here.
- Michaels Crafts for baseball caps, onesies, and t-shirts.
- Hobby Lobby for onesies and t-shirts.
- Walmart and Target for t-shirts, cloth diapers, kitchen towels, plain aprons, bags, and hoodies.
- Kohl's and Macy's for towels, pillow cases, baby clothes.
- Costco for towels, kitchen linens, beach towels, jackets, blankets.
 |
| This project is not linked on my blog but I simply stitched it with a file from Urban Threads. |
How I Organize my Embroidery Space (virtual and otherwise):
- Keeping fabric organized: http://cuttopieces.blogspot.com/2011/02/fabric-folding-tutorial.html
- Folding fabric to size: http://www.ialwayspickthethimble.com/2015/01/24/sunny-sewing-room-folding-fabrics-size/
- After I buy a file, I organize it in these ways: I save the .pes and .bx files (and sometimes .dst files) by vendor on my external hard drive, and I pin it by type/theme/vendor on my Pinterest boards. (For info on how I use Pinterest as an online catalog of my files, click here. (I used to print a physical image and place them in binders but that soon became too big and cumbersome to maintain an to use. The Pinterest serves as a virtual catalog and really serves my needs well.
- I used to immediately upload all .bx files to Embrilliance after purchase. Now that I have over 1,000 uploaded, it does slow loading the program when I open it each time. I now suggest waiting until a font is needed, especially if you are using Pinterest to catalog so that you can pick files as needed and load as needed.
- When I see a design I want to remember, a file I am not quite ready to buy but don't want to forget, a project that inspires or interests me, or a tutorial I want to keep, I pin it on my machine embroidery Pinterest board that is separate from my boards of the files I own.
- I only keep one file on the thumb drive that I use to transfer files to my machine from my computer. The thumb drive is the car; the external hard drive is the house.
- I store all of my stabilizers together and with their type attached to them. WSS should be stored in an air-tight way (I use ziplock bags) to keep them from drying out and becoming brittle.
- I keep all of my fat quarters folded and stacked so they can be seen without moving them.
- I pre-wash everything that is expected to be washed before I embroider on it. Once washed and dried, I iron! All of my cotton fabrics get starched to make them crisp again. I do pre-wash my poly mesh stabilizer and Cloud Cover/Cover Stitch as I have found a huge amount of shrinkage with these items which were adversely affecting my finished product after a perfect stitch-out. (Obviously, I do not wash other types of stabilizer as the process would lessen their effectiveness as stabilizers!) I prewash cloth diapers used for burp pads, bibs, towels of all kinds, clothing of all kinds, and all of my fabrics. Spray starch always assists a fabric to feel and behave like new with sizing! By "pre-wash" sometimes, I just dip into hot water and then throw into the dryer. I do not use detergent when pre-washing.
Stitching Gallery-- none of these are on a blog post at this time:
 |
| Beach towel from Costco. Font is Stitchtopia Jacob in 3". 5x12 repositional hoop was used. |


 |
| Animals from Urban Threads |


7 comments:
Your blog - what a great find on New Years day!
I love your work. I have a new embroidery machine and want to make baby items.
Joyce
This is EXACTLY what I needed. Thank you so so much!
Melisa
Wow! This is a wealth of information! There should be a way to archive this and "gift" it to any new embroiderer. Thanks for putting this together and sharing the link.
Thank you for your wealth of information ! This will be my favourite guide.
Amazing wealth of information. Thanks so much for sharing.
Post a Comment