For Easter this year, I thought it might be fun to make little patches to go on buckets for some of my Easter gifts. These are my notes on how I make a patch from an applique. You do need to be able to stitch an applique for this information to be valuable to you! If you do not know how to do that and need a little guidance, check out the
tutorial on how to stitch an applique from Itch2Stitch (click here).
Additionally, I have included my notes on taking parts of the digitizing from one file and combining it with another to make fun, new files.
As with all of my tutorials: This is just the way I have found to do this task. You may have a different way that is better for you. This post is done with pictures that feature my PE770 and Embrilliance software.
How To Make A Patch
The key to making a patch is two-fold: (1) making sure the outer edge is stable with a continuous line of intact stitching and, (2) stitching on two layers of
Vilene (strong, non-filmy water soluble stabilizer) so that the base can be dissolved, leaving only the applique itself. The fabrics I like to use ravel, so I use appliques that have a continuous line of satin stitching on the outside. That's pretty traditional for patches. That said, I have seen great "raggy-style" patches and felt patches that only had a bean stitch on the outer edge. On the patches I make, I also like to add a layer of fabric to the back side of the patch, under the hoop. Adding a layer will keep the
E6000 glue (that I will later use) from oozing through. Depending on when the back fabric is added, the wrong side of the stitches can be hidden. I usually do not hide mine unless my patch is going to be a tag.
Step one: Prep the hoop.
I hoop two layers of Vilene.
Step two: Prep the back.
I tape a starched piece of fabric to the back of the hoop. I really don't think most people do this step. I do because I want an extra layer between my embroidery and the glue that I will use later to apply my patch onto a metal bucket.
Step three: the stitch-out.
I like to stitch all the applique fabrics in place at the same time when the design allows for it. Usually this means stitching out of order. It is just easier for me this way. I trim the fabrics as usual for an applique.
I trim the fabric on the back. By putting my fabric on the back this early, the back fabric won't cover my stitches, but it doesn't matter to me because the back will be glued and never seen. (Actually, on my buckets, the ears will overhang but the ears look just fine, even from the wrong side, since I use a fun fabric for the backside.) Once the back is trimmed, I don't worry about it for the rest of the stitch-out.
I continue the stitch-out to completion. I sometimes change the order of stitching for merged files to make sure that certain elements, like the bunny paws, stitch on top of the frame.
I trim the threads from the front and back.
Step four: Remove the vilene.
I trim around the Vilene. The more trimmed away, the less sticky goo!
I try to dip just the edge in hot tap water. It dissolves almost instantly. (Further, I have found that if I dip my fingers into hot or very warm water and touch the edge repeatedly until it dissolves, I can do this with only getting the satin stitch edge wet.)
After it air dries, it is done!
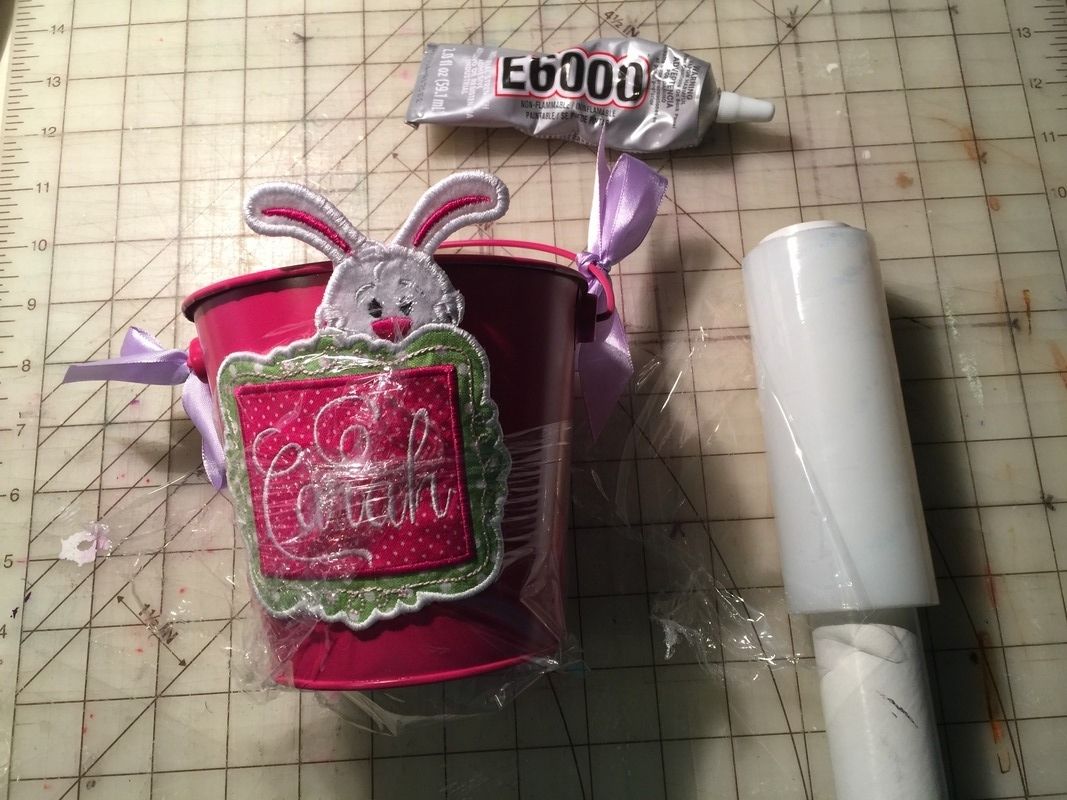
From the back, you can see the difference between placing the back fabric on earlier versus later in the stitch-out. I tend to only put the fabric on later when I am turning my patch into a tag.
 |
These are the backs of two patches, the one on the right is a tag-style patch.
The patch on the left has back fabric that was added at the beginning; the back stitches are not hidden.
The tag on the right has fabric that was added at the end to cover the wrong side of the stitching, and the outer satin stitches were left until the very end. |
 |
For tags: The key to removing the Vilene is to only get water on the very edge of the patches. this is especially true for tag-style patches. If the whole patch gets wet, the Vilene acts like a glue that adheres the back fabric tight to the wrong side of the tag.
For tags, a buttonhole can be added to the stitching or ribbon can be added when the back fabric is stitched. |
Now, I will back up a bit and show how I put the file together that I used to make the patches on this post.
How to Combine Parts of Files Together:
What I loved most with paper crafting, especially years ago when the only game in town was Cricut and we were only able to use their cartridges for artwork, was combining parts of some cuts with others to create unique things. My blog here is filled with tons of that. I loved it most when I was creating characters and vignettes. I haven't done any of that in embroidery, choosing instead to just stitch what is in the file or, in a limited way, digitizing my own. Today, I borrow from those old Cricut days and combine parts of a design to use with other files in my
Embrilliance software.
I fell in love with a new file from
Itch2Stitch called Some Bunny Loves Me. It's that cute peeking bunny that grabbed my attention! You can see on the Objects Pane that the nice thing here is that all the steps for the bunny are completely separate from the heart and the text.
I can select each of those steps and click delete to be left only with the peeking bunny.
I bring in my frame design onto my virtual screen. I select the bunny so I can move it where I want it. This is
Applique Corner Bethany.
I enlarge the grid so I can see the exact placement of the bunny with the frame, tilting the bunny's head to fit the frame design.
Then I can add text and merge other files, like those carrots, to complete the design of the patch. Both the text (
Type A Lower Case) and the carrots (
Carrots Mini) are from Lynnie Pinnie. I usually don't change the thread colors in my software; I usually pick my threads at the machine. I could change it in my Embrilliance software, however, and I do when the colors are distracting to me.
Next I have to think about the order I want things stitched.
- I want the bunny face to be stitched first so that the bottom edge where his neck is (with only tackdown stitches) is hidden behind the frame, but I want the satin stitching around him to be part of the last steps so that his paws aren't hidden. This is where I consider if I want the 'remove hidden stitches' function to be operational. For info on that, click here.
- I want the last steps of the frame to be the outer satin stitch edge when I am doing a tag. For a patch, it often won't matter.
- I can place my back fabric at the beginning but it will not hide the wrong side of my stitches OR I can place it near the very end before the outer satin stitch steps are sewn. If I am placing my back fabric at the end, I must repeat extra tackdown stitches for both the bunny and the outer frame. I will need that so that I can trim the back before the outer satin stitches are placed.
In truth, I just take this file to my machine and manually change the order of steps as needed by tapping the advance and repeat steps buttons on my embroidery machine screen. The list that prints out from my Embrilliance Essentials is my cheat sheet and I just pencil in changes as my guide. The order of stitching, of course, can be changed in the software by dragging stitching steps to their desired locations. For info on how to change stitch order in Embrilliance Essentials, check out a
video by clicking here.
File details for my patches...
Piper and Carah Patches
These are both done with Itch2Stitch
Somebunny Loves Me, Itch2Stitch
Fancy Frame Double Applique, and fonts from Stitchtopia. Both use 4x4 frames but the Piper patch uses a bunny from the 4x4 size and the Carah patch uses a bunny from the 5x7 size.
Piper's name is stitched with
Joy for the "P" and
Hailey for the rest of the name. Carah's name is stitched with
Hailey2 except for the "r" which is from
Hailey1.
Stitchtopia has a number of lovely fonts with alternative letters so that you can get just the swirls and flourishes needed to fill a space.
Phoenix Patch
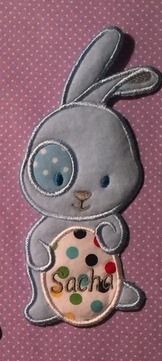
Sacha Patch
This one used an applique from
Hang to Dry Bunnies with Eggs in the 6x10 size. The text is
Jolson's 133 Bonobo font, sized down to fit.
I used the
Enthusiast module of Embrilliance software to lasso off the bunnies on the sides, leaving only the one in the middle.
Nothing was added and I didn't need to finish the back like a tag, so there is no change to the stitch order.
Ella Patch
This is a simple applique from Lynnie Pinnie called
Baby Bunny in the 4x4 size. The font in Stitchtopia
Daphne.
Attach to Buckets
Once all the patches were dry, I glued them onto metal buckets that I found at Walmart in the Easter department, using E6000 plastic adhesive. (E6000 works great for all non-porous objects (like these metal buckets) and is fine for porous-to-non-porous adhesion. They did have chalkboard stickers on them, but they were very easy to peel off without any residue left behind.
To keep the patches in place on the curved buckets while the glue dried, I used
stretch film wrap. This is a non-sticky product, much like the plastic wrap you put on leftover food, a narrow version of Saran Wrap. I get it at Walmart in the office supply department.
I finished the buckets by taking off the ribbons that came tied on the buckets, ironing them, and re-tying them. I filled them with Easter basket fill paper grass.
List of links from this post (These are not affiliate links; they are all direct links. I am not affiliated with any embroidery products or companies. I just share resources I use and like.):
- Embrilliance software: click here.
- How to stitch an applique file (for anyone who does not know, it will make the patch tutorial more helpful!): click here.
- Vilene: click here.
- E6000 plastic adhesive. This link is for Michael's but you can find it at all kinds of hobby and craft stores, big box stores, and on-line: click here.
- Stretch film wrap: click here.
- Video tutorial on the hidden stitches function in Embrilliance: click here.
- Video tutorial on how to change stitch order in the Objects Pane in Embrilliance Essentials: click here.
- Itch2Stitch Some Bunny Loves Me file: click here.
- Itch2Stitch Fancy Frame Double Applique: click here.
- Stitchtopia Joy font: click here.
- Stitchtopia Hailey font: click here.
- Applique Corner #1418 Bethany Frame: click here.
- Lynnie Pinnie Type A Lower Case font: click here.
- Lynnie Pinnie Mini Carrot embroidery: click here.
- Hang to Dry Bunnies with Eggs: click here.
- Embrilliance Enthusiast: click here.
- Jolson's Designs Bonobo #133 font: click here.
- Lynnie Pinnie Baby Bunny applique: click here.
- Stitchtopia Daphne: click here.
- Lynnie Pinnie Scallop Easter Bunny: click here.
Thanks for checking my blog post today! For all my notes, links to my tutorials, and lists of my sources, check out my Embroidery page or
click here.