
**If you are here for the July Soap Challenge, scroll down near the bottom of this post. It is the last soap.**
On my on-going search to make my handmade soaps better, I have discovered some new additives and some new soaping temperatures! I have soaps to share in which I have added one or more additives: coconut milk (for creaminess), salt (for hardness and skin benefit), clay (for exfoliation, detoxification, and for anchoring fragrance), and sugar (for added bubbles)! The results have been fun, although it is like learning how to soap all over again as the additives can affect a dozen things from trace to set up to temperature to color to acceleration, in addition to remembering to add these at different times during the process!
These are some of my attempts. As always, I share everything I have learned but if you are new to soaping and are wanting to get started with making soap, you would be wise to investigate safety with soaping and start with basic soaps. I have links to all kinds of beginner videos and info on my Soaping Page on this blog that you can see by clicking here. I am not telling you what to do here; I am simply sharing what I am doing. We are all responsible for our own attempts and our own safety and good choices! All of my soaps are there, including my very first soaps.
Salt
My first new-to-me additive was sea salt. I found a great bargain on Pink Himalayan Salt at Costco and gave it a go. (I actually used sea salt in a Castile-Brine salt, my #14 soap that can be found on my Soaping page on this blog, but I was just following an established recipe and didn't even understand the purpose of using it until later!) I used information I found on The Wellness Mama site to make my own recipe. I learned to increase the coconut oil for lathering, to increase the superfat to prevent over-stripping, and to use between 50% to 100% salt to soaping oils (in weight). For my 33oz of oils, the amount needed for my Bramble Berry cavity mold, I used 17 oz of pink Himalayan salt. I added the salt after trace. The soap sets up fast once the salt is added and it is advised to use a cavity mold because slicing a salt loaf can be very difficult because the soap will be so hard that it will crumble.
 |
| This is the color of the salt I used. |
 |
| After the soap has cured, you can see that my fragrance oil greatly changed the color. It is a dark brown with the salt giving it a texture. This is my soap #27. |
 |
| I usually slice up a bar of any soap I make so I can have samples to try since they will take less time to cure. Once this soap is cooled, it will crumble when cut as a result of the salt. |
My recipe for this soap: 70% coconut oil, 20% olive oil, 2% castor oil, 8% shea butter, Himalayan salt that is equal in ounces to half the total ounces of oil. 15% superfat. 33% lye concentration. (Always run any recipe through the Soapcalc!)
Fragrance oil: 1 oz Lemon Sugar fragrance from Bulk Apothecary. This has a strong vanilla scent, which I love but it also discolors greatly. See my soap #8 on my Soap Page to see my notes on this. It ruined my yellow soap but I decided "earthy" would be fine for this soap and I love it!
Soaping temperature: I mixed my lye water into my oil mixture when the lye water was 127° and the oils were 117°.
Link to site I used for info for using salt:
Coconut Milk
For the past few weeks, I have read comment after comment and post after post in the soap groups about the luxurious quality that adding milks gives to soap. One of my favorite soapy gurus uses coconut milk, instead of goat or cow milk, in all of her soaps and so that is the direction I took. I like that, unlike animal milks, there is no "smell" and that it doesn't risk discoloration. The soaps I saw that I loved with milks were as white as snow and that is what I want to achieve. They also still have all the beautiful designs and I have done that by chilling the lye water. After some trial and error, I eventually found that I liked using a powered coconut milk and I like adding it at trace or just before trace for soaps that are intricately patterned.
My first effort at using coconut milk was with a liquid product I bought at the grocery in the baking aisle. It was called Culinary Coconut Milk and I am still not sure that this is the best product for this, but I tried it and had mixed results.
 |
| This is my Soap #29. |
For this soap, I used this recipe: 33% coconut oil (76 deg), 8% rice bran oil, 17% avocado oil, 17% shea butter, 5% castor oil, 20% olive oil. 5% superfat. 33% lye concentration. (Always run any recipe through the Soapcalc!) My soapcalc printout called for 7.75 oz water, but I dissolved the lye in only 4 oz water. I added the additional 3.75 oz in the form of coconut milk, which I added to the oils directly. (So I used a bit over 1/2 of the water required in the form of water and used the remaining in the form of the milk to be added to oils.) I added to the oils to avoid color change.
I used a Tall and Skinny loaf mold.
Fragrance Oil: Bramble Berry Tropical Vacation. No colorant was used.
Soaping temperatures: I placed the lye water in an ice water bath and combined the lye water into the oil mixture when the lye water was 70° and the oils were 88°. This accelerated fast due to the milk so I made a note to try cooler temps for designs next time!

 |
| This got to a heavy trace really fast but I think it was because I over-mixed. The cream of the coconut milk worried me and I probably over-did the mixing. |
 |
| You can see that there was partial gelling. Much of this has faded but I sure hated to see this! |
Overall, I was happy with the soap and I learned some new things and got a few new ideas for my next soap. Like all my soaps, I keep lots of notes. As a soaping newbie, the only thing I will recommend to anyone is to also keep good notes including soaping temps, soapcalcs, and resources. Pictures help as well.

Link to site I used for info for using coconut milk:
Clay
My next soap used both coconut milk and clay, as well as infused olive oil for natural colorant. I typically add clay for the benefit of anchoring my fragrance, but it is also considered a natural additive, lightly exfoliating, and it adds a slip to cold process soap.
 |
| This is my Soap #30. |
For this soap, I employed some of the paprika infused olive oil that I have had sitting ever since reading about doing this in Jo Haslauer's ebook on natural colorants. Links to her articles and to her ebook can be found on my Soaping page.

I placed 16 oz of olive oil pure in a jar with 2 oz paprika. I let it set on the shelf for about 17 days, shaking it every day. When I was ready to use it, I just poured off some of the oil on the top, letting the settled paprika stay on the bottom. I only used the colored oil. This colored oil and activated charcoal are the only colorants in the soap.
For this soap, my recipe: 30% olive oil (all of this was the infused, colored oil), 20% lard, 30% coconut oil (76 deg), 10% rice bran oil, 8% cocoa butter, 2% castor oil. 7% superfat. 33% lye concentration. Again, I used just over half of the water amount from the soapcalc to dissolve the lye and the remaining water was swapped with coconut milk that was added to the oils. I added sodium lactate to the cooled lye water. (Always run any recipe through the Soapcalc!)
I used my regular loaf mold.
Fragrance: I wanted to keep this natural so I used 26 grams Bramble Berry Grapefruit Essential Oil. This is the full 1.75 oz bottle. I used the Bramble Berry fragrance calculator to determine amount.
To anchor the fragrance, I mixed it in two tablespoons white kaolin clay at light trace. It has been curing for three weeks at the time that I am writing this, but I have been warned that the fragrance may fade too much. I will know for sure if the clay helped prevent that at all in another month.
Soaping temps: Oil was 87° and lye water was 64° (I used an ice water bath to get lye temps low).

To get the color variations, I added a base of just the orange soap batter. Then I added 1/4 teaspoon of activated charcoal to the remaining batter. I mixed and poured in another layer. I added an additional 1/4 teaspoon, mixed it, and poured a layer. I continued this process until all the batter was used up. Then I used a hanger swirl for the design. Having the temperatures so low meant that I had time to swirl even with the additives of the coconut milk, clay, and charcoal!
After the soap was in the mold and air bubbles were tapped out, I placed it in the freezer for an hour and them moved it to the refrigerator. I was trying to keep it from getting too hot, partially gelling, and overheating my scent out. I did still get a faint partial gel ring but the pattern of the soap hides it well.
I simply love this soap! I photographed it in front of a sunny window and it glows! The final soap has been beveled on the edges. You can also see that, even though I added the darkest soap last, I used that for the bottom on the final soap.
My next soap also used clay for anchoring the fragrance.
 |
| This is my Soap #31 (Starry Night) |
This soap was done on a whim after reading on one of the Facebook soap groups that someone swirled her soaps by pouring in a base color, then standing on a chair and dropping her colors in so they break the surface hard. She was able to achieve curls! No curls here but it was a fun mess. Not so sure I will be doing that again, but I was glad I tried it once. I will be going back to the hanger tool for my future swirls.
Recipe for this soap: 34.85% olive oil, 30% lard, 25.15% coconut oil (76 deg), 3.94% avocado oil, 6.06% rice bran oil. (The percents are weird because I actually entered for the amount of oils I had as I used up the end of a couple of bottles and the soapcalc did the math for me. I insist on keeping the percents so that is what I am sharing). 5% superfat. 31% lye concentration. (Always run any recipe through the Soapcalc!) I added sodium lactate to the cooled lye water.
I used my Tall and Skinny loaf mold.
Fragrance: 2 oz wt Bramble Berry Spearmint Eucalyptus fragrance oil added to 2 tablespoons white kaolin clay.
Soaping temps: Lye water 74° and oils 80°.
Colorants: Bramble Berry Fizzy Lemonade, Neon Blue Raspberry, Ultramarine Blue, and Titanium Dioxide, each mixed with 1 tablespoon of canola oil.
I poured in the dark blue then poured in (hard by dropping!) all the other colors, repeating until they are all used up. It was a mess!
Links to sites I used for info on clays:
- http://www.lovinsoap.com/2016/07/clay-cold-process-soap/
- https://www.soapqueen.com/bath-and-body-tutorials/tips-and-tricks/how-to-prevent-scent-fading-in-soap/
Sugar
My next soaps were done for the July Soap Challenge. We learned to do a fluid pour, similar to the acrylic fluid pour, with the rule that the soap batter had to be poured into the mold, we had to use a straw with our breath or gravity to move the colors, and we had to use a slab mold. So...off to Amazon I went to order a slab mold! Once it arrived, I measured it to figure out how many ounces of oils I needed so I could plug my recipe in the soapcalc.
In addition to using coconut milk and clay, I used powdered sugar for the first time with these. Sugar is supposed to add bubbles to soap. It is added to the water before the lye is dissolved so I will admit that it took a couple of soaps before I remembered to do this!
My first attempt was also the first time I used powdered coconut milk instead of the bottled liquid kind. Thoughtlessly, I just dumped the unmixed, powdered milk into the oils. Folks, that is just dumb and I will tell you that it took me forever to get all those lumps out--worse than a new cook's gravy! Lesson #1 was that I should have dispersed it in water before adding it.
My recipe for this soap: 30% coconut oil, 5% cocoa butter, 40% olive oil, 6% hemp oil, 15% rice bran oil, 4% castor oil. 5% superfat. 31% lye concentration. (Always run any recipe through the Soapcalc!) 1 teaspoon powdered sugar per lb of oils added to water before adding lye. Sodium lactate added to cooled lye water. 1 tablespoon powdered coconut milk per pound of oils added at trace (would have been smarter to mix with water first!)
Fragrance: 1.1 oz Bramble Berry Energy fragrance oil added to 1 tablespoon white kaolin clay. Added after emulsification. This is less than Bramble Berry's fragrance calculator suggested but I based my quantity of fragrance on what I used on a previous soap.
Soaping temps: Lye 68° and oils 84°.
Colorants: 1 teaspoon each Bramble Berry Electric Bubble Gum, Neon Blue Raspberry, Tangerine Wow, and Fizzy Lemonade. Each were mixed with 2 teaspoons of canola. (It really should have been 1 tablespoon). To the whole batch before adding colors, I added 1 teaspoon of titanium dioxide mixed with the whole batch of fixed oils. I just wanted the colors to be as bright as possible.
I started the process by pouring colors into each cavity, layering.

Right after colors were layered, I used the straw to blow the surface to add pattern.


I continued the process, pouring, layering, and moving the color by blowing through the straw, just sort of playing.


The final soap reminded me of a patterned fabric. This is the wet soap.


It was so soft that when I turned it over to cut it (there are indentations from the mold for cutting on the bottom), it actually smeared the front! Yikes! (But look how cool the bottom looks!)

I let the cut bars set for a few days to harden before beveling and planing. I hated loosing so much soap but the smeary surface had to go!
 |
| This is my Soap #32 (Tie Dye). |
I was armed with new knowledge and some ideas for improvement for my second attempt. This attempt will be the soap I submit for the July Soap Challenge:
 |
| This is my Soap #33 (Pineapple Flame fluid pour). |
For this soap, I still used the coconut milk, powdered sugar, and clay, but I corrected the amount of sodium lactate I added, I gelled the soap by laying it on a heating pad and insulated it, I put it in the freezer before cutting it. Although it was a bit softer than I am used to, it was fully set and much easier to unmold.
My recipe for this soap was also altered a bit to add more saturated oils to help with hardness: 20% coconut oil, 20% lard, 5% cocoa butter, 6% hemp oil, 14% rice bran oil, 5% castor oil, 30% olive oil. 5% superfat. 31% lye concentration. (Always run any recipe through the Soapcalc!) 1 teaspoon powdered sugar per pound of oils was added to water before adding lye to water. Sodium lactate was added to cooled lye water. 1 tablespoon of powdered coconut milk per pound oils MIXED with 1 tablespoon water was added at trace.
Soaping temps: 60° lye and 92° oils. (Ice water bath was used to get lye temp low).
Fragrance: Bramble Berry Pineapple Cilantro fragrance oil was mixed with 2 tablespoons kaolin clay and added at trace.
Colorants: Each of these Bramble Berry colorants were mixed with 1 tablespoon canola: activated charcoal, titanium dioxide, Tangerine Wow, Fizzy Lemonade.
I used my new slab mold again for this soap.
This was my process:
I poured a base first. Then I poured all the layers, forming concentric shapes. I wanted to be sure each bar would have the design.

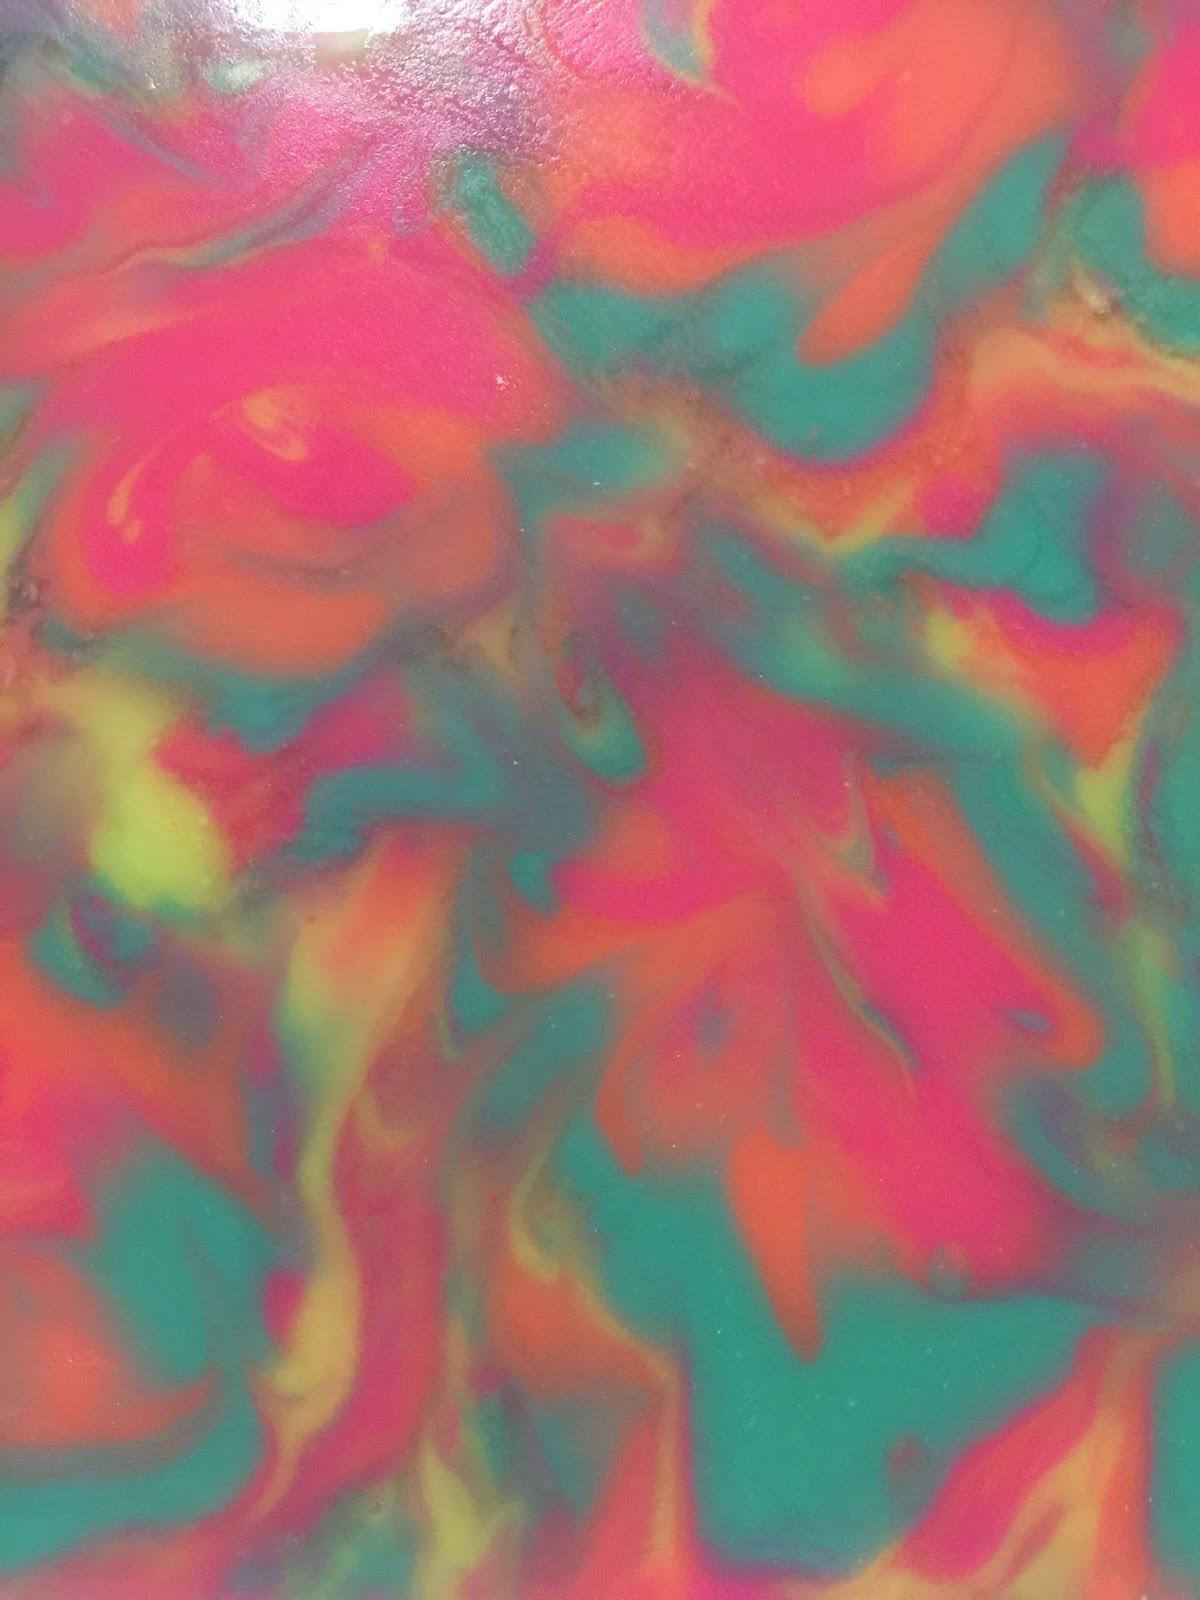
Then I used the straw to blow the color. At this point, it looked like fire! I wish I had left it at this point, but like a kid, I kept playing!

In the end, I had another pattern that reminded me of fabric! This is my wet soap.


Then I forced gell by setting it on a heating pad. Ok- true confession: I fell asleep and it stayed on the heating pad all night. I ran down the stairs the next morning to find that the soap was set and the colors were super dark. I popped it in the freezer to cool it. Out of the freezer, the colors were back. That was odd.
I flipped it over to cut it.

It kind of matches my roman shades over the soaping table.

Because the soap was not level as it set on the heating pad, some bars are thicker than others. That meant I would have to plane a bit to even these up. I was disappointed in that.

I did let these dry a bit for a couple of days before planing and beveling. They smell delightful!
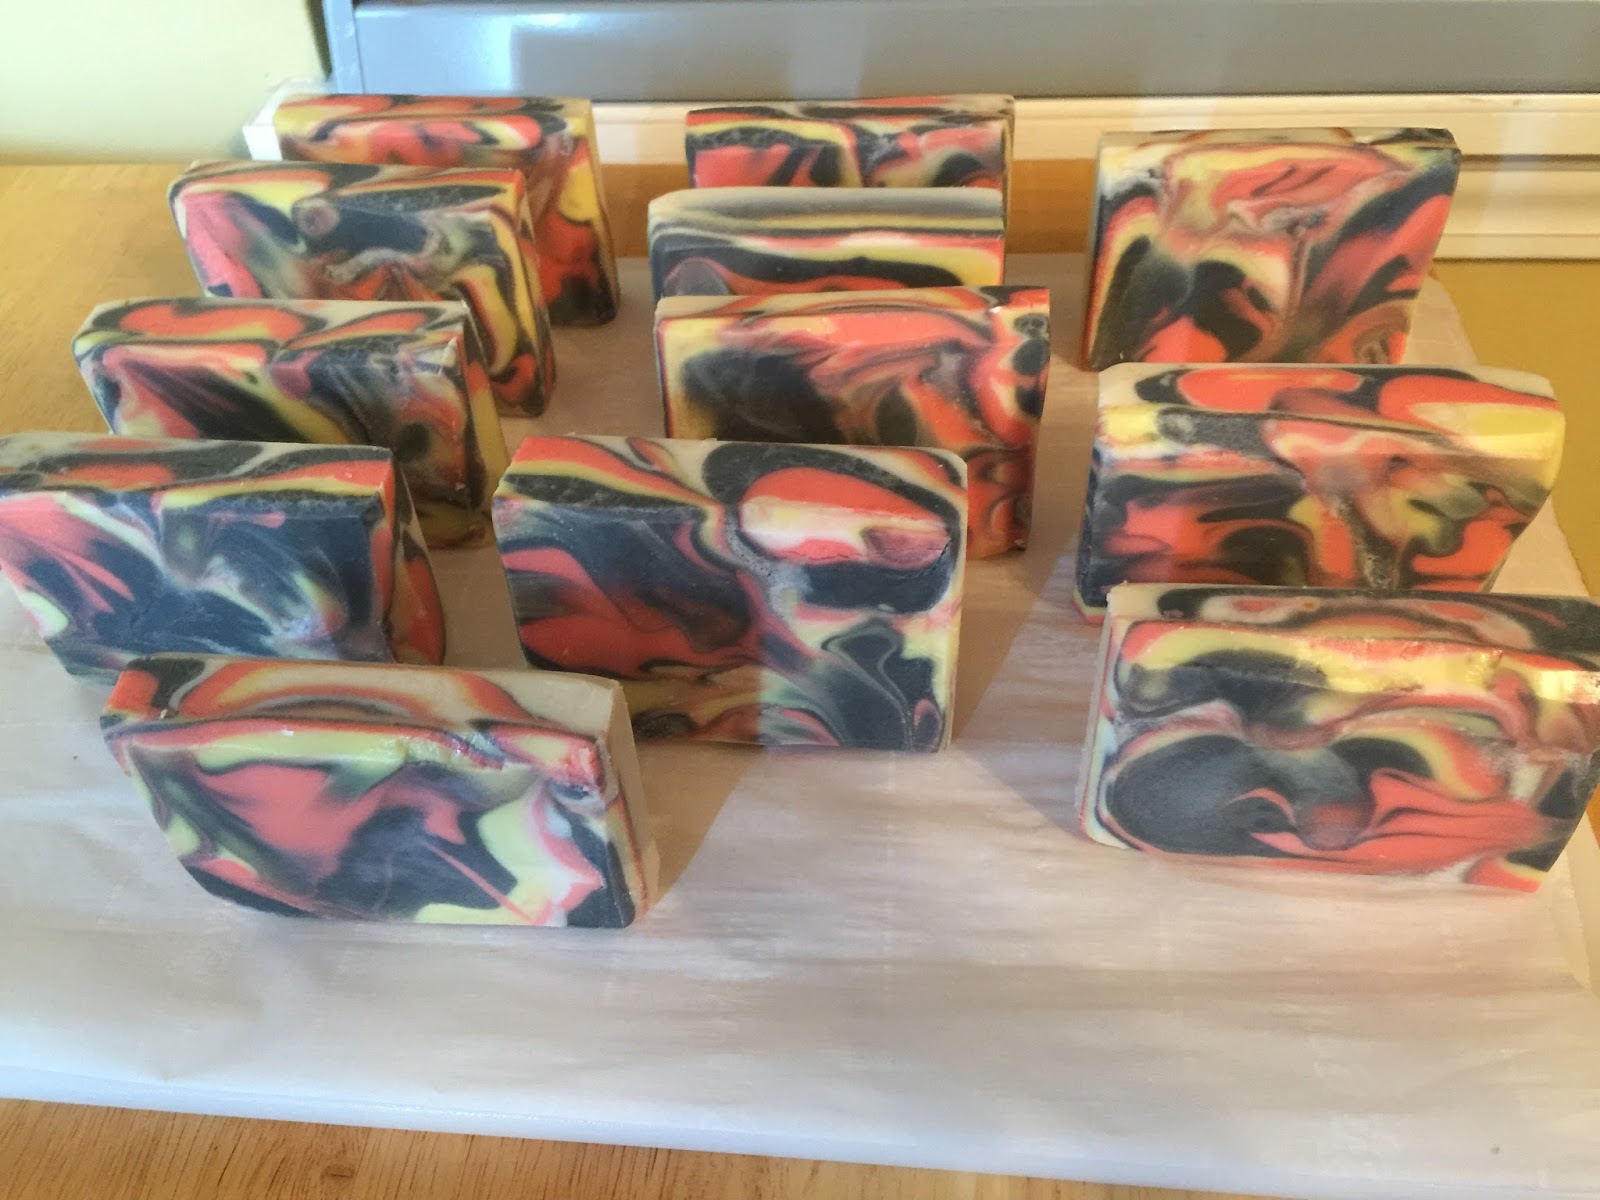
In the end, I love the finished soaps. I do think these will require a longer cure time. I tried out a sliver that was planed off and I love the feel and the lather! I am thrilled with the effect of the additives. This was quite a process to figure it all out.

Links to resources on additives:
- For an interesting look at the lather generated by different additives, including powdered sugar, kaolin clay, and powdered coconut milk: http://www.modernsoapmaking.com/updated-lather-lovers-additive-testing/
- What additives cause a soft bar of soap: https://www.soapqueen.com/bath-and-body-tutorials/tips-and-tricks/cold-process-soap-soft/
- Additive chart: http://www.lovinsoap.com/soapmaking-additive-chart/
Thank you for checking my blog today. To see all my previous soaps from the very beginning, with my resources, links to videos and all my notes as I figured stuff out, check out my Soaping page on this blog, or click here.