Friday, December 22, 2017

Official Cookie Tester Gift Set


Just a quick post to share a gift set I made for a niece.  The child-sized apron and chef hat were from my stash but originally purchased at Hobby Lobby. 

For the apron, I used a file from Embroidery Boutique.
For the name on the chef hat, I used a font from Designs by JuJu called She Persisted.


The little gingerbread man was made in-the-hoop in my embroidery machine.  The file was from Embroidery Garden.  This was the fasted thing and so, so easy!  I will be making this for lots of kids next year.

I'm marching on with my Christmas crafting.  Hope your sewing room is buzzing along.  To see all my embroidery projects, check out my embroidery page on this blog

Thursday, December 21, 2017

Home Printed Fabric for Zipper Pouches


At the last minute I found a fantastic video intended for owners of the Cricut Maker that instructs crafters how to use a photo as a pattern fill to make a pouch.  Of all the Cricuts I have, a Maker is not one of them, but you don't actually need a Maker (or any die cutter) to make a pouch!  Anyone can cut rectangles with a ruler and a rotary cutter and maybe even faster than a Maker.  But using the free Cricut Design Space software to draw a pattern piece, fill it in with a photo, edit it for size or even to repeat it, that was a FABULOUS find!  Once all the design work is done, you simply click the button to send it to your printer and print on inkjet printable fabric.  Then, you have your pattern piece that you can cut anyway you want, including with your Cricut...or like me, with a rotary cutter.


This is the video for using Design Space to create a pattern piece and import a photo to create a pattern fill:  https://youtu.be/K5Ntg-8WYqI

This is the printable inkjet fabric I used:


I have made tons of pouches, even some with my embroidery machine, but I love a tutorial I found that makes fabric ends on the zipper and that has to be done on a sewing machine.

This is tutorial for sewing a lined zipper pouch with fabric zipper ends:  http://jedicraftgirl.blogspot.com/2013/06/my-favorite-zipper-pouch-tutorial.html


These two tutorials were great inspiration for my gift card holder project that I did for my sister-in-law.  I used a photo I found on her Facebook page.  I sized mine to hold the packaging for the gift card too.  For that, my cut shape was 6" high and 8" wide.  The bottom cut out squares are 1.25" but I cut those manually instead of including them in the design work.  Once the bag is sewn, the finished dimensions are 6" for the zipper top; the base is 5" x 2.25"; the height is 4.25" and it stands up on its own.

For the front, I chose to edit a single photo image.  For the back, I edited to repeat the image.

Unlike the sewing tutorial, I do machine quilt my outer fabrics. I use cotton batting.


And to know what I would do differently next time:  You can see that the faces look off center both vertically and horizontally.  One problem is that the child on the left as her foot up and it throws the centering off as the fabric raps around due to the bottom gusset seams.  That same issue turns the lower part of the photo under the bag.  For a pouch without that gusset, the centering would work.  But I like a pouch that stands on its own so for the future, I would take note of where the image is placed as a result of the sewing and nudge the image in the editing in Design Space.  There are controls for altering the vertical and horizontal placement.  This is the front.


I wasn't sure how I would like the repeating pattern but I loved it on the finished bag.  This is the back.


The cool thing with this project, is that in Design Space, you can add text and other images!


I took better care to think of the pattern placement on my next experiment.

This was such a fun way to combine my sewing and my crafting!  I hope you are enjoying your holiday gift sewing!


Sunday, December 17, 2017

Rolled Reindeer Washcloths for Soap Gifting


While in one of my Facebook groups that is completely unrelated to soap, I found a link for how to make these adorable washcloth deer.  Here's the link:  https://youtu.be/KzY0-Esa6vs

I found my washcloths at Walmart for 47 cents and used the tiny hair elastics from Dollar Tree that I had on had from that gnome project.  Unlike the video, I didn't glue anything because I wanted it to be usable so I found adhesive googly eyes so they could just peel off and I tucked in the nose instead of gluing it. 


I put it with my soaps #36, #37, #44, and #45 from my soap page on my blog.  These were made over the summer or fall and are all fully cured.  I changed the names on a couple to relate to the gift recipient (for example, #36 is scented with ginger ale fragrance oil, but that also smells like Ale 8, one of my recipient's favorite soft drinks.  That was labeled as Ale 8 soap!) These are the general formulas and all of my soap information can be found on my Soaping page on my blog.  These are NOT intended to be complete instructions with safety measures; these are intended for persons already advised on basic soap making and already fully understanding lye safety.  I am not telling you how to make soap, I am simply giving you my formulas for what I used to make these soaps.

Soap #36:  Red Bottom Marble
30% olive oil, 20% lard, 30% coconut oil, 10% rice bran oil, 8% cocoa butter, 2% castor oil.  33% lye concentration, 5% super fat.  Temps:  75° lye, 95° oils.  Powdered sugar added to water before combining with lye.  Sodium lactate added to cooled lye water.  Fragrance:  2T kaolin clay mixed with Bramble Berry Ginger Ale fragance oil.  Colorants:  Red layer-oil from oil mix combined with 1/2 t of each color from the Mad Micas True Red Color Set. Black and white swirl- activated charcoal and titanium dioxide mixed with 1T oil mix.  Red layer was poured into slab mold bottom.  Black and white batter was added concentrically, using up all batter.  It was swirled using a skewer.  This fragrance is fantastic and is staying put during cure.

Soap #37
30% olive oil, 20% lard, 30% coconut oil, 10% rice bran oil, 8% cocoa butter, 2% castor oil.  33% lye concentration, 5% super fat.  Temps:  75° lye, 95° oils.  Powdered sugar added to water before combining with lye.  Sodium lactate added to cooled lye water.  Fragrance:  one sample each (.5oz or so each) Litsea Cubeba and Grapefruit essential oils from Bramble Berry.  Two previously made embeds were inserted.  Colorants:  From Bramble Berry, zinc oxide, ultramarine blue pigment, and cellini blue mica mixed oils from the pot.  Regular loaf mold used.  


Soap #44:  Mechanic's or Gardener's Soap
34% coconut oil (76 degree), 16% shea butter, 5% cocoa butter, 40% olive oil, 5% castor oil
Mixed with lye when oils were 114 degrees and lye water solution was 80 degrees.  Soaped warm and got to medium trace with stick blender to go fast.  
No color was added.  
Additives:  (for 32oz oil weight batch)  2 T cranberry seeds, 22g grapefruit EO, 5g peppermint EO, 6g spearmint EO, 12g 10x orange EO, sodium lactate, 2T clay (mixed with EOs).  
This is for hand washing only because the seeds are really rough but they work great for scrubbing.


Soap #45:  Snowflake Soap
25% coconut oil (76 degree), 30% lard, 15% shea butter, 5% cocoa butter, 20% olive oil, 5% castor oil
Mixed with lye when oils were 106 degrees and lye water solution was 80 degrees.
Additives:  (for 33 oz oil weight batch) 2 T coconut milk powder (used 1 oz from soap calc's water quantity that I reserved from that which was to be mixed with lye), 2 t powdered sugar added to water pre-lye, 2 t sodium lactate, 2 t titanium dioxide mixed with 1T oil from the oil mixture, 1 oz fragrance oil mixed with 2 T kaolin clay.  This ended up not being pure white due to clay, cocoa butter, and FO.  More like the color of a sand dollar-- will have to remember that when using my sand dollar mold!  


Happy holiday crafting!  Hoping your gift-giving crafty workspace is humming along as we near Christmas!

Thursday, December 7, 2017

My Daughter's Christmas Craft: Fuzzy Sock Gnomes


My kiddo likes to make special gifts each year.  Past years have been pine cone birds, glitter-filled personalized ornaments, and personalized ITH hand sanitizer cases.  This year, we found a fantastic video for making gnomes from rice and fuzzy socks and that is her crafty gift project this year.  You can find the video tutorial we used on Facebook here:

I found $1 fuzzy socks at Walgreens and at Dollar Tree.  We used care not to grab the ones with rubberized non-skid dots.  


We did make a change from her tutorial in that we did not use hollowed out Styrofoam cones; we rolled up card stock cones instead and trimmed them down to 5-1/2" because I have tons of card stock.  We also used fake fur for the beards because I have tons of that stuff too! 


We used white socks from Walmart, but next time we will look for pale pink or tan.  As it is, the white socks and the beard blend too much so we used a dobber and a pink stamp pad to color the nose.  One thing we learned after our first ones:  make the nose really, really big!  

What I love most about this project is that my 13-year-old daughter and I had such a fun time learning this and making some samples together.  We laughed so hard at one point that we were in tears.  That kind of time with a teenager is precious and rare.


Happy Christmas crafting with your family!  

Monday, December 4, 2017

Embroidery Samples on High Pile Fabrics

This is just a quick post to share my notes on embroidering on super plush blankets.  I do lots of throws and baby blankets at Christmas-time but I had one to do that had very deep pile and I wanted to figure out how best to deal with it.  My samples really helped me figure it out for this and future projects, and I thought others might find this helpful too. 

I did some tests on high pile blanket fabric.

On both of these, I hooped tear-away and floated the fabric.  I covered both with water soluble stabilizer (WSS) topping and I used a basting box.  The one on the bottom was also stitched with the knockdown stitch from Embrilliance Enthusiast.  I even trimmed the pile on the top one, hoping to make it work, but the stitch quality was so much better when using the knockdown stitch.


Knockdown stitching simply looks like underlay stitching to me.  Typically, the knockdown stitching is matched to the fabric (blanket, towel, robe, etc.) so it doesn't stand out visually.  It just pushes the pile down.  The WSS holds the pile down temporarily.

I posted this photo on a message board and a couple of people told me that the WSS was unnecessary so I did a third sample-- one with only the knockdown, without the WSS.  In the photo below, the top sample was stitched only with knockdown stitching.  The bottom sample was stitched with knockdown AND WSS:


The best results for me happened when I used both knockdown stitching and WSS. 


Items Noted in this Post:

  • Water soluble stabilizer topping - I get mine from World Weidner.  I keep mine in plastic to keep it from drying out. This is the plastic-looking, filmy kind, not the fibrous kind.  
  • Basting Box - this is a temporary stitching that is done with long stitches for easy removal that holds the floated item in place and keeps even tension on the fabric around the stitch area.  Most embroidery machines have a built in basting box, and you can get basting box files from digitizers like Embroidery Garden, but I use the one in my Embrilliance software. In Embrilliance, it is located under the Utility tab. For more info:  https://sewbubbles.wordpress.com/2014/03/16/adding-a-basting-box-to-a-design-why-how/
  • Knockdown Stitch - similar looking to underlay.  It holds down pile so that stitching can lay flat and so that the stitching won't get hidden by the pile after the WSS is removed. Itch2Stitch and Applique Corner both offer drop pile shapes (circles, rectangles, hearts, etc.) but the knockdown in my Embrilliance Enthusiast conforms to the stitch area and can be adjusted so that it is the least obtrusive visually.  For more information:  http://embrilliance.com/products/enthusiast
I hope these samples are helpful to you. Happy holiday stitching!  

Thursday, November 30, 2017

Personalized Ballet Bears


For the first time, my 13-year-old daughter's ballet teacher asked her to assist with the kindergarten class and she has loved it. She comes out of there with a smile from ear to ear and stories about how cute the little dancers are.  This weekend is the annual Christmas Tea at the ballet school.  She wanted something to give each of her little dancers.  She had her second knee surgery of the calendar year about three weeks ago, so she has missed her little class and is so excited to have something to give them.

I needed an idea that wouldn't mess up my Christmas budget.  I started by going to the Dollar Tree.  I had hoped to find girl elves that I could personalize with heat transfer vinyl and my heat press, but a happy accident happened:  they had no elves.  They had bears!  I had hoped for all polar bears, but I was happy to find what I did and noticed that their cheap little raggedy scarves were barely attached.  That sold me.  I knew I could take off those scarves and make these into ballet bears for the little students.


I picked up a 25 yard spool of sparkle tulle and a 5 yard spool of 5/8" wide grosgrain ribbon at the craft store.  I use 3 yards of tulle for each bear and just under 30" of ribbon that I trim down after I tie it on the neck for each bow.  The GREAT news is that this time of year is the best time to get that for half off so that put my supply budget at $4.  That meant I could make six personalized gifts for a total $10.


For each 3 yard length of tulle, I folded it in half, making it 3" wide.  I put the fold side under the presser foot of my sewing machine and zigzagged gimp cord on top.  (Perle cotton and buttonhole twist can also be used for this.) This is the method I use to gather stuff.


It makes it really easy to gather quickly--- just make certain that the stitching clears the cord and never catches it!  I leave a short tail at the beginning and leave a short tail at the end.  The stitching doesn't even have to be perfect.  The tutu is so tightly gathered that uneven cord application will never be noticed because the cord never shows.


After stitching, I hold the cord and draw up the tulle, keeping it from twisting.


I put a tutu on each bear, using the gimp cord to tie it on.  I make several knots and trim the excess length of cord right off.  It is so full and fluffy, it stays put with no other stitching needed.

Next I am ready to stitch on my ribbon.  I think there is something really special about personalized stuff.  It is my favorite thing to take something inexpensive and transform it into something no one can buy off the shelf.  I love that the tools in my craft studio afford me that.

I opened up my Embrilliance embroidery software.  Using the list of names the ballet school owner texted me, I used a free BX font that was created by Lisa Shaw.  I originally picked it up off the CME Magazine website, but Lisa has it on her blog and that makes it easier..  One thing I know for sure:  stitching on ribbon without a basting box is a disaster... but with a basting box, it is perfect every time.  I highlighted the first name and, in the software, I clicked the utility tab and chose "Baste Design."  I continued all down the virtual hoop. That put a basting box around each word, just as I need it to keep even tension on the stitch area of each ribbon.


I printed out my design (that's just done by clicking the 'file' on the toolbar and clicking 'print').  That allowed me to put my ribbon over each word to make sure the basting box would fit inside the width of the ribbon.  For the names with the "g" and "y",  had to adjust the height of the name.  This font resizes and adjusts just fine.  I simply removed the basting box for the specific name and then used the handlebars to squish the text so it would be less tall. I highlighted the name and gave it its basting box back.  The program automatically sizes the basting box to the adjusted design size.

Next, I printed my design again because I needed the corrected copy and I went to my light box.


I hooped tearaway and marked my cross-hairs on my hoop using a pencil.  I extended the cross-hairs on my printout to make it easy to match up over the light box.  I used tape to hold the ribbon in place.  I used about 30" of ribbon for each name even though I knew 22" would be the final length.  I wanted a little wiggle room even on the end by the name.  It is much easier to trim down than to keep having to re-adjust the bow!  I pinned the ribbon out of the way and stitched.  (Little note from me on this-- make certain that your first needle prick on each basting box is going in the ribbon.  Stop your machine and move the ribbon a teeny bit if you need to because having the basting box around each name is just that important!)


Then I simply removed the basting boxes and tore the ribbon free from the stabilizer.  I tied a bow on each bear and trimmed the ends.  They each seem to have a little personality.  I guess that is the silver lining of cheap bears:  the lack of quality control means they have unintended expressions.  Ha!


This one has an attitude!  I think he's a boy and hates his outfit but don't tell Lydia.


Right now, my Dollar Tree also had Nutcracker storybooks so I also got one of those for each student.  We find out at the Christmas Tea what ballet the students will be performing in June.  We did the Wizard of Oz last year, Sleeping Beauty before that, Alice in Wonderland before that.  It is different every year and this will be the 10th one my daughter dances in and hopefully her knee will finally be healed and healthy and for that we are so excited. 

Mentioned on this post:


Thank you for checking my blog post!  Happy holiday crafting!

Thursday, October 19, 2017

Halloween Treat Bag - Lined Drawstring Bag with Embroidery Charm


In putting together some soap shares, I wanted to make Halloween candy treat bags to go with them.  I was inspired with skeleton earrings digitized by Sonia Showalter and thought they would be perfect for charms.

I opened the file in my Embrilliance embroidery software and added as many skeletons as I could easily fit in the virtual 5x7 hoop.  I used the color sort feature so that the black loops and the area that will make the eyes are stitched first on all of the bodies, then the white stitches are all done.  That would allow the embroidery machine to handle this part of the project while I made the bags.  My machine stitched three hoops of skeletons.


I hooped two layers of vilene stabilizer.  This is a heavy water soluble type of stabilizer.  After stitching, I trimmed close to the stitching and ran each skeleton under hot tap water, dissolving the stabilizer, leaving me with these free-standing-lace-style charms!   Leaving in some of the starchy stabilizer meant that they are kind of stiff and have a little character!  (Allow them to dry completely before using.)


These are very stitch-heavy, as you can imagine they would need to be!  The good thing is that while the machine stitched these, I was able to use my sewing machine to make the bags.

I started with stacking my fabric and using my rotary cutter and mat to cut bag pieces that are 7.5" wide by 6.5" tall.  I cut two for each outer bag and two for each bag lining.


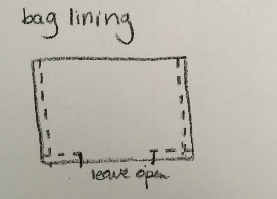
I sewed two bag fronts, right sides together, sewing all the way down one side, across the bottom, and down the second side, leaving open a space on one side.  I did that by stitching down 1/2", backstitching, leaving a 3/4" gap, backstitching, and sewing down the side.  (see diagram above) When I turn this right-side-out, I see a gap in the seam.  This is required for the ribbon casing later in the project!


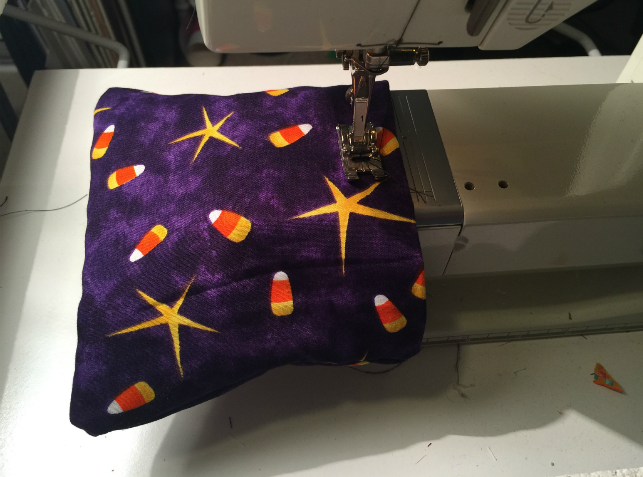
Now, at this point, I must say something:  in the picture above, you can see that I serged the edges of the fabric pieces.  There was a time in this project when I thought I would make an unlined bag so in true workroom style, I prepped all the pieces, but after I tried one, I really didn't like it!  I decided that a lined bag would be better looking and take only three extra steps so it was a no-brainer!  Un-serged edges are much easier to work with in the casing so don't serge the edges!

Next,  I sewed the lining.


I did that by placing two lining pieces, right sides together, and sewing both sides and the bottom, leaving a nice, big opening on the bottom.  (see diagram above) Leaving this opening in the bottom is required so that the bag can be turned!

I clipped the points off the corners of both the outer sewn bag pieces and the lining bag pieces.  This will help later when I square the bag so it sits up by iteself!


I turned the outer bag right-side-out but kept the lining right-side-in and put the outer bag inside the lining.  


I stitched the upper edge with a 1/2" seam, matching side seams.


Using the opening in the bottom of the lining, I pulled out the bag, ending with both fabrics right-side-out and looking like a long rectangle.


I stitch the lining closed by folding in the seam allowance and top stitching.  It will be in the bottom inside the bag so it really doesn't need to be perfect!


I tuck the lining down into the bag and find the upper edge seam, rolling in my fingers to get the seam on the very top edge.


I stitch my casing by stitching 3/4" from the top edge.


To make the bag one that will sit on its own on the table, I square off the corners.  I do this by turning the bag inside out, lining up the seams (peek inside to see), and stitching 1" from the point.


Now, when I turn the bag back so that it is right-side-out, the corners are gone and the bag sets on the table open (easy for getting candy out!)


Next, I measure 17" of ribbon and stick a safety pin in one end to make a bodkin with which to feed ribbon into the casing.  This is the drawstring.


I feed it into the hole that was left in the seam.


I pull the safety pin through, keeping the ribbon flat, and feeding it until I get back to the opening and pull the ribbon through so both ends are out.


I pull the ends to even it up and tie in a knot close to the end of the tails.


I set my sewing machine for a wide zigzag and zero length to sew on the skeleton charms below the casing.


Ta-da!  Making these essembly-line style, meant that I got 15 done while my embroidery machine made the charms!  This is much, much faster than doing an in-the-hoop style bag (and I don't have any size restrictions)!


These were filled with packaged candy.


I combined these with soaps (calorie-free Halloween treats!)  that I made a couple of months ago in order to have them completely cured.  There were eight soaps used (three were combined with each treat bag).  All the soap recipes can be found on my soap page (or click here) and are soaps #29, #31, #32, #33, #37, #39, #41, and #42.

I wrapped the soaps with food-safe paper and used decorative washi tape to keep together.  I made ingredient labels this time for each soap and wrapped with bakers twine for decorative purposes.  I included a homemade soap info sheet to explain a bit about my soaps.  I don't sell my soaps, so the labels and info sheet are just for educating my gift recipients.


My super simple tags were made using the Tim Holtz stamping platform and Close to My Heart #S1608 Purr-fect Halloween Stamp of the Month set. (It's an oldie from my stash).


List of links and items mentioned in this post:


Happy Halloween crafting!

But wait! There's more! Click 'older posts' above!

But wait!  There's more!  Click 'older posts' above!