Sunday, December 21, 2014

Handmade Spa Gifts


I love getting and giving handmade gifts.  This gift includes two hand-mixed sugar scrubs and a hand-loomed washcloth made with luxurious yarn.


Sugar scrubs are so easy to make.  They are great for hands, feet, elbows.  The recipe for my lemon scrub can be found on an earlier post on my blog  by clicking here.  The mint sugar scrub was made with a sample included with my lemon oil in the spring.


Mint Sugar Scrub 
1-1/4 cups granulated sugar
8 Tablespoons liquid coconut oil (found in the baking aisle at the grocery)
Sample packet of Young Living Essential Oils - Peppermint

Mix by hand in a glass mixing bowl.  Transfer to a clean glass jar for storage.

I like jars with flat tops because I think these scrubs are better stored upside-down so that the most moisture is on the top when you open the jars to use them. I used the font on Cricut Cherry Limeade to label them.

I love the smell of this oil so I have since ordered a bottle of it!  The great thing about both the Young Living lemon and peppermint essential oils is that they are safe for ingesting so you can add them to water or cook with them as well so that you can make lots of different kinds of things with them from spa products to cookies!  I get my oils from Bobbi Jo at  bobbijo@thelemondroppers.com.


To go with the scrubs I made, I added a hand-made item. Last winter, I figured out how to loom simple wash cloths using Bernat Baby Blanket yarn. I have used this yarn before to loom knit doll blankets. Click here to see that previous post.  As a wash cloth, it is super soft and completely non-abrasive. The scrubs are plenty abrasive on their own and the washcloth works great to remove the excess oil and sugars from the skin.  With my very sensitive skin, I like it for rinsing my face after using my Clarisonic in the shower.  My 10-year-old loves using one for bathing.  

To make the washcloth, I used the yellow long loom from my old Knifty Knitter set.  I used 18 pegs and one side only to do flat panel looming, although you could use a section of a round loom instead to do the flat panel.  I used Bernat Baby Blanket - 6 Super Bulky yarn and followed this process:

Crochet Cast On (click here for a video if you don't know how)
16 rows e-wrap (click here for video if you don't know how) or until it finishes at about 7-1/2"
Bind Off (click here for a video if you don't know how)
At the very end of binding binding off, crochet a chain and knit it off to make a loop for hanging.

You can't get much simpler than that! 

To wrap the gift, I added a simple image from Cricut Jolly Holidays sized to 7" height to a purchased gift bag.


Quick Links found in this post:
My recipe for Lemon Sugar Scrub - click here 
Cricut Cherry Limeade Cartridge - click here
Crochet Cast On for Knitting Loom Video - click here
E-wrapping (loom knitting) Video - click here
Binding off Video - click here
Source for Oils - Bobbi Jo's email bobbijo@thelemondroppers.com
I purchased the jars and yarn I used at Walmart.

Our first family Christmas celebration is today at my mother-in-law's house!  Christmas is here for our family and will continue through the 25th.  Hoping you are finding joy this season!

Saturday, December 20, 2014

Piper's Owl Pinecones- Kid Crafted Christmas Gifts


Again this year, my kiddo, Piper, has made gifts for classmates for Christmas.  I thought I would share her project here with you!

I have been enjoying Lia Griffith's woodland felt creatures on her blog.  When I saw her pinecone owls, I shared it with my ten-year-old daughter and she instantly fell in love with them, deciding that this would be a perfect crafty gift project for her to make.  You can find the project complete with pdf pattern and step-by-step photo instructions on Lia's blog by clicking here.

The cool thing about Lia Griffith's blog is that she so often shares her files for free!  I did use the snipping tool on the pdf patterns and uploaded them to Cricut Design Space, thinking Piper would prefer a crafty shortcut, but she emphatically told me she would be hand-cutting her felt owl features.  I was shocked but I love her love and appreciation of all things hand-made!  (I told her at one point in this process that I loved that she was making hand-made gifts and how much I loved hand-made stuff myself.  To that, she responded:  Everyone does!  


She packaged them in clear treat bags and made tiny tags for each student.


At the end, she made one for herself too.


To see Piper's ornament gift last year with her tutorial on making boxed glitter ornaments, click here. Are you crafting with your kiddos this Christmas?  

Thank you for checking out my post today!

Wednesday, December 10, 2014

3D Camera Box and Album Gift!

I have been so excited about this project for a couple of weeks!  Every Christmas, I give albums of photos (taken throughout the year) to my mom and my in-laws.  This year I am also giving one to my aunt.  These are people who aren't interested in Instagram and never download pictures I post from Facebook.  They, like me, LOVE real photos and they love my kiddo so providing photos for them every Christmas has become a fun tradition.  It started one year when the finances were lean and I needed extra gifts for everyone to supplement the ones I bought for them.  They were a hit and I have continued the yearly albums even as times and our family's economics have changed.

This year, I have my most favorite presentation for my albums:  3D camera boxes!!!!  These are from SVGcuts and you can click here to see the file!


I made them in different colors for each recipient.


They are each personalized.  I did that using a Chomas Creations pen adapter, a Gellyroll pen, and a handwriting style font.


They open to reveal an album!


The albums coordinate with the camera boxes!


The camera is an svg file, part of a collection by SVGcuts.  You can cut svgs with a number of electronic die cutting machines.  I used a Cricut Explore to cut these.  In addition to this project there are several other cards and boxes in this collection.  The albums were simply made using my trimmer, an Xacto Knife, and a Zutter binding machine.

My idea, the minute I saw this file in the spring, was to use it as a box for a photo album.  I had hoped that 4x6 prints would fit perfectly, but I did find that I needed to cut down the height in order for the lid to close as designed.  I suppose I could have played around with the sizing of the file to enable the use of 4x6 photos but I chose to trim the photos instead.  There is plenty of room in the box to accommodate the 6" length, but I found that cutting each picture's height to 3-11/16 was the perfect size.  This was easily done with my trimmer.


My covers were made with art board from Michaels.  I cut it with an Xacto Knife.  Honestly, I cut the covers the same 3-11/16" tall as the photos and 6" in length.  With the o-wires I used with my Zutter binding machine, the album finishes at 3-11/16" x 6-1/2".  As you can see, this box will accommodate many more photos and other binding options.


If you are looking for a cheap and effortless way to have piles of printed pictures from the ones you take on your phone, you need to check out Groovebook!


This is a service that was newly bought by Shutterfly, but I started receiving them about a year before the company was featured on Shark Tank.  Basically, for $2.99 a month, you get to select 100 pics from your phone.  They print them and put them in a little book with the date of the pics above them (next to the photo, not printed on them) and MAIL them to you!  The shipping is included in the $2.99.  Everyone who has a Groovebook subscription has a code to allow others to have a free month of Groovebook to see if you like it.  If you want to try it for free, this is my code:  HERBST-MCCONNELL8,  You have to download the app on your phone to get started (just search "groovebook" in the app store) and enter the code at checkout.  I have enough pictures by October to make albums for my mom, my mother-in-law, my husband, my kiddo, my aunt, and myself!

I had so much fun with this project!  These are the papers I used if you were wondering.  I bought the American Crafts pad from Target.  I bought the Paper Studio pad from Hobby Lobby.  Both were bought in November of this year, so they should be pretty easy to find.  I bought them for my Christmas Journal, but I have been using them on gifts, gift wraps, tags, and more!


Thank you for checking my blog post today!  I have been wanting to share this project for a week or so and I am so happy to be able to share it now!


Sunday, December 7, 2014

More Christmas Gift Wraps!


Happy December!  Shopping is almost done here, Journal Your Christmas is in full swing, and gift wrapping is getting pretty out-of-hand!  My last post was all about using 3D files and the writing feature on the Cricut Explore to make dimensional tags.  I have been having so much fun with my gift wraps that I wanted to share a few more of them!  Links to SVG files and any other info on each is captioned with the photos, for anyone wanting to make any of them.  Apologies for this abbreviated style of blogging today; so many things still to do to get ready for the up-coming week and on-going Christmas activities!

This is an SVG that can be found by clicking here.  This is one of my favorite svg collections in the SVGcuts library!  Everything in this file has been so simple to put together!  The tag is from Cricut Picturesque.  I used the Explore to write on the tag using a Pilot Precise V5 pen. 

This is an svg from Snapdragon Snippets.  It can be found by clicking here.  This was the first time that I had used a file from this company or this designer (Crafty SVG Designs).  I will tell you that it was a bit of a challenge.  There was a link to a tutorial, but it was not specific to this design, just to one in this same general style and the svg had no sizing info.  This is what I did to get this size:  while keeping it grouped, I pulled it to size until the inside window was 4".  I had the grid lines turned on in Design Space to do this.  Then I ungrouped it and highlighted each piece with scoring and clicked 'Attach.' Note that the large box back and sides are scored by use of dashed lines.  I kept it just like that so that the score marks would be cut.  The small inserts with single ballerinas have one long, continuous score line on each side.  I changed those to "score" in Design Space and used the score tool.  (Not changing it will make your machine cut the tabs right off!)  Next, I copied the single leotard and tutu and pasted it for all the ballerinas.  Note that the ballerinas are not all the same size.  I zoomed in and pulled the costumes over to the dancers and adjusted as needed to make the costumes larger to fit.  I think I had to do that for two of them.  I changed the color of the costumes so that DS would put them on separate mats since I wanted them cut from glitter paper. Because my pale pink paper was 8.5x11 instead of 12x12, I changed the colors on some of the cuts so that they would pull to three different mats (one for single dancers, one for two internal tabbed layers, and the third for the final tabbed layer).  Despite it all, I was pleased with this and would make it again.  This is actually a box card, so I did add a strip that was placed on the bottom, perpendicular to the layers.  This locked the shadow box in place and gave me a surface to glue to the package.


The barn is an SVG that can be found by clicking here.  This is from the same SVGcuts collection as the church box above!  This time, instead of cutting the box from the file, I used the optional bottom piece and made it like a little 3D stand-alone building.  This gave me a surface to glue onto my package.  The wreath is from Cricut Paper Trimmings but a quick search in DS for "wreath" will afford you many, many options.  I sized it by dragging the wreath over the barn front in DS and used the handlebar to size it appropriately.  I hid all layers except for the wreath base and just drew them in since the cut was so tiny.  The cut with Santa and flying reindeer was from Cricut Christmas.  I hid the moon layers.  I simply glued the bottom rail of the sleigh to the barn roof from the back.  Super fast to put together!
These are all from Cricut Christmas Kitsch.  I actually cut these in my Expression.  I just used the Fit to Page feature and cut these.  I think they were each 11.5 in height.  

I featured the first light-up gingerbread house I did in my last post, but they are so cute that soon I will have a settlement of these under the tree.  There are three house designs in this SVGcuts collection.  To see info on this file, click here.  
For all of my gift baskets, I am making dimensional holly from Cricut 3D Floral Home Decor.  There are a few holly designs.  I have been putting together two sizes and combining with the paper fir twig.  After I heat wrap my baskets, I have been adhering the holly with pop dots on the outside with a tag. 

With all of those fir branches I have been cutting, the negative space has started looking beautiful to me.  I started using them as a stencil.  Gold Krylon spray paint has been fun to use with the stencils on brown paper.  These simple wrappings have been really fun to make.  My 10-year-old daughter told me these were some of her favorite packages.
These are the simplest of all 3D embellies!  These are trees from the Cricut cartridge, Winter Woodland, cut at 5.5" and 6" tall on my Expression.  The snowflakes are from a Martha Stewart punch.


These are all packages from my last post.  For details about any of them, check them out by clicking here.
Quick Links and Notes:
  • Church Box -- click here
  • Ballet Box -- click here
  • Barn Box -- click here (Santa is from Cricut cart Christmas)
  • Gingerbread Boxes -- click here
  • Santa, Snowman, and Rudolph bags designs -- Cricut cart called Christmas Kitsch
  • 3D Holly and Fir Twig -- Cricut cart called 3D Floral Home Decor
  • 3D Trees -- Cricut cart called Winter Woodland

Saturday, November 29, 2014

3D Tags for Christmas Packages!


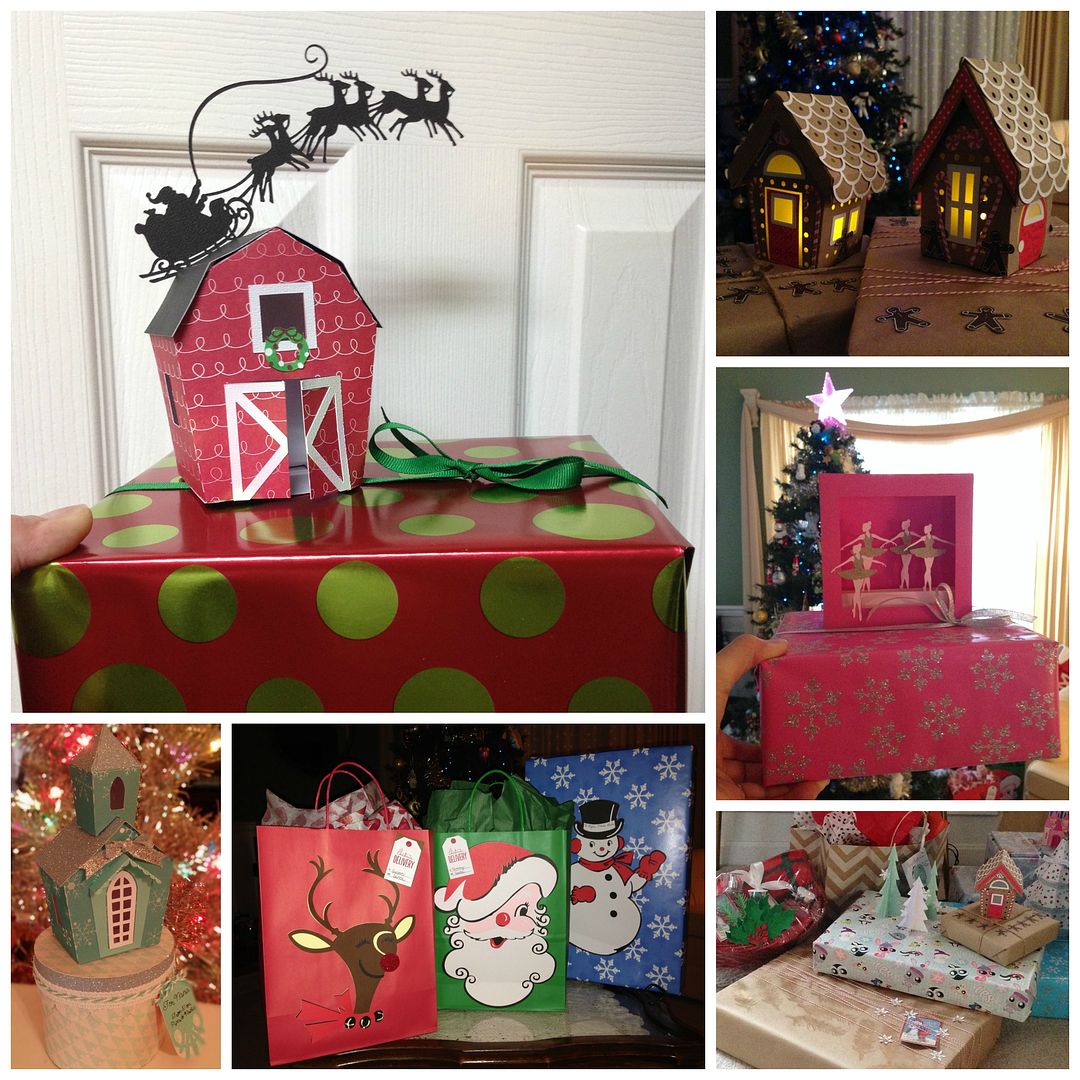
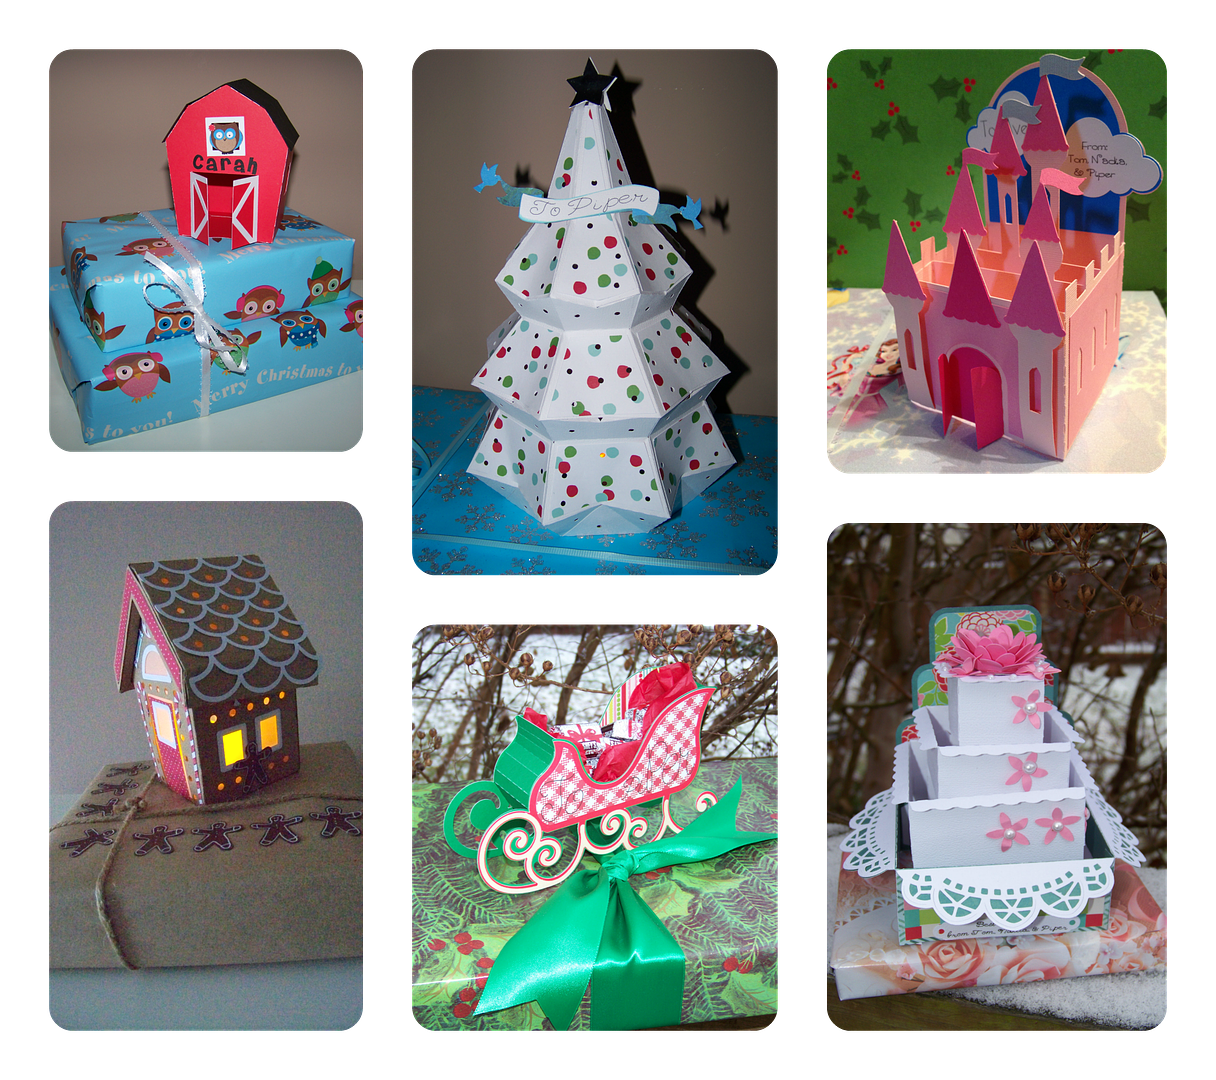
I have been having fun with the idea of 3-dimensional gift tags for some of my packages this Christmas.  Some have very few pieces; others are more detailed.  I am hoping that all of them add a little magic to my gifts.
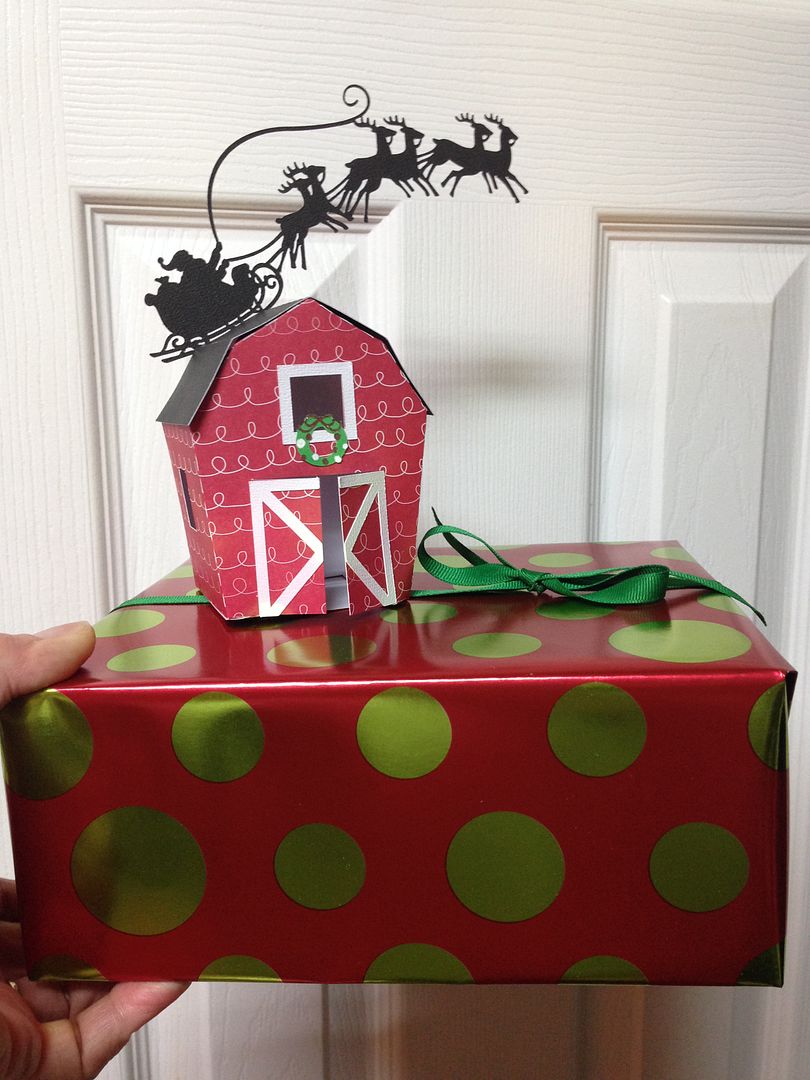
This 
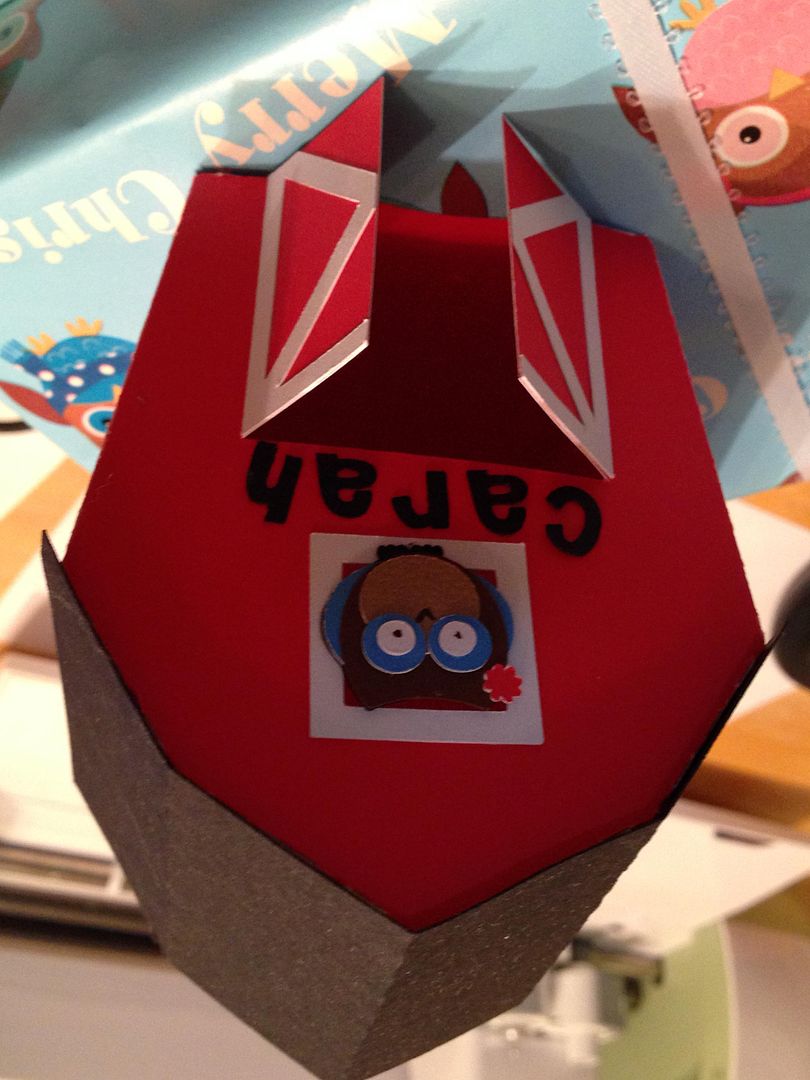
barn is one of the easiest!  It is from the Santa's Village svg collection from SVGcuts.


I wanted something fun and dimensional and non-traditional for my little niece.  She is also the kind to tear into her gifts with gusto, so I wanted this to be easy and fast to put together (because I know it won't last).  I love this little barn for all of those reasons!  And a cool feature of this file is that, although the designer made this to be adhered directly to the box she has designed, she also includes a piece in the extras file so that you can add a bottom to the barn!  This feature means that you can easily glue it to your package! Click here to see this barn file at SVGcuts.


To make it relate to the Christmas owl wrapping paper, I added an owl svg I had.  Honestly, there are tons of owls on Cricut carts, and Christmas ones at that, but this one is from Too Cute by Jessica, from the So Sweet Owls collection.  Click here to see that file.

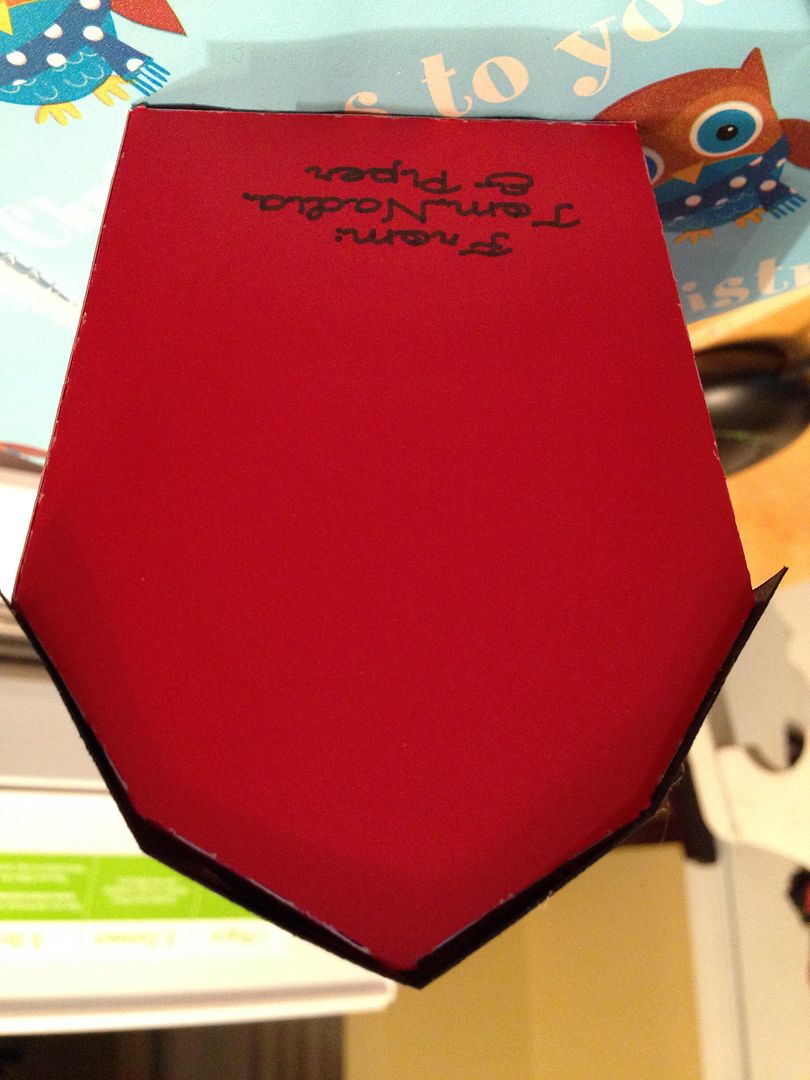
Since this is a 3D gift tag, the recipient's name was cut using a Cricut font on the front.  I used the "Has a Writing Style" feature with an American Crafts Precision Pen for the "from" on the back of the barn.


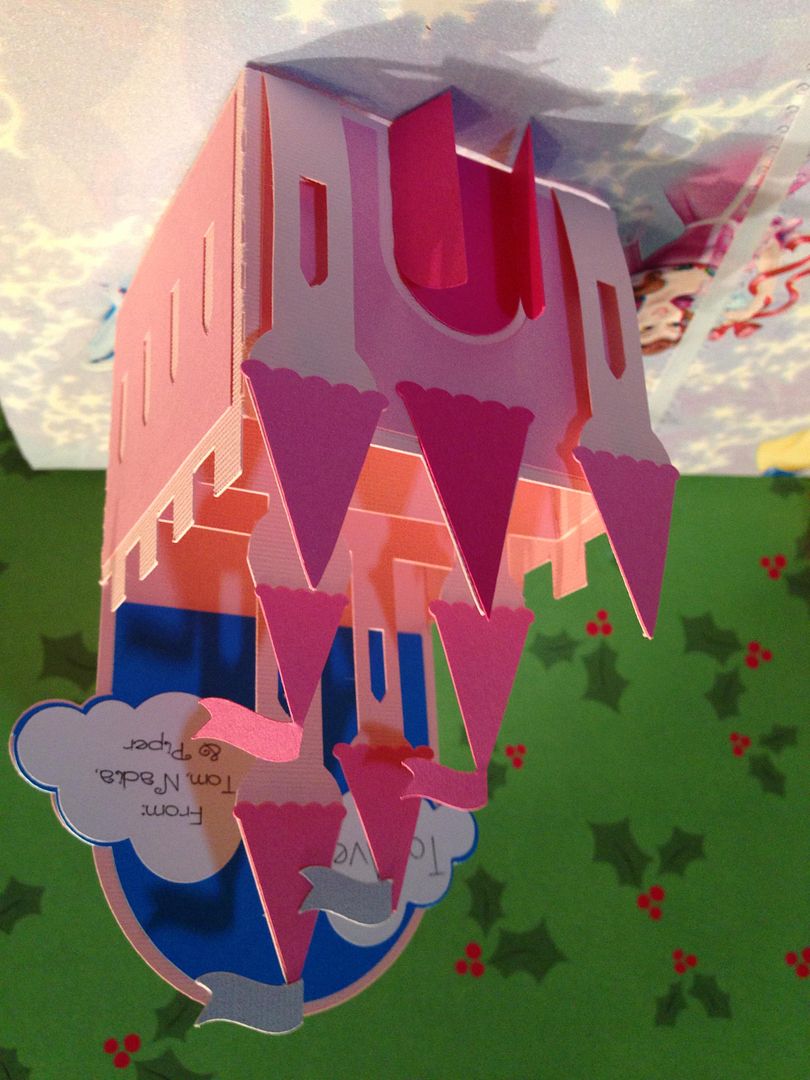
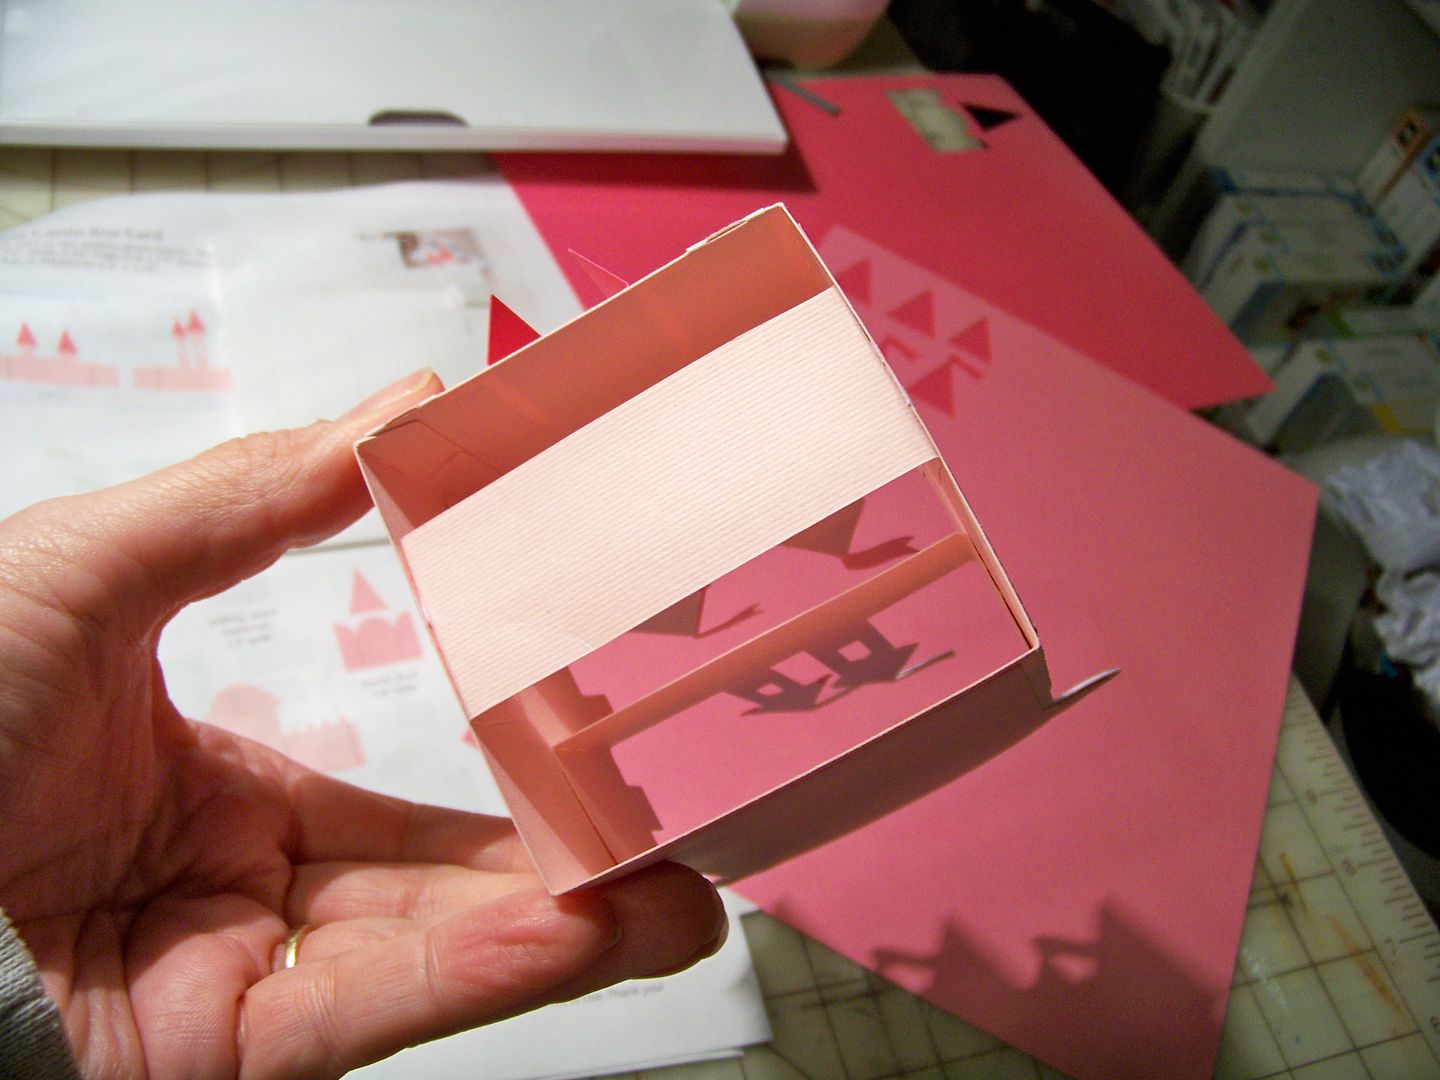
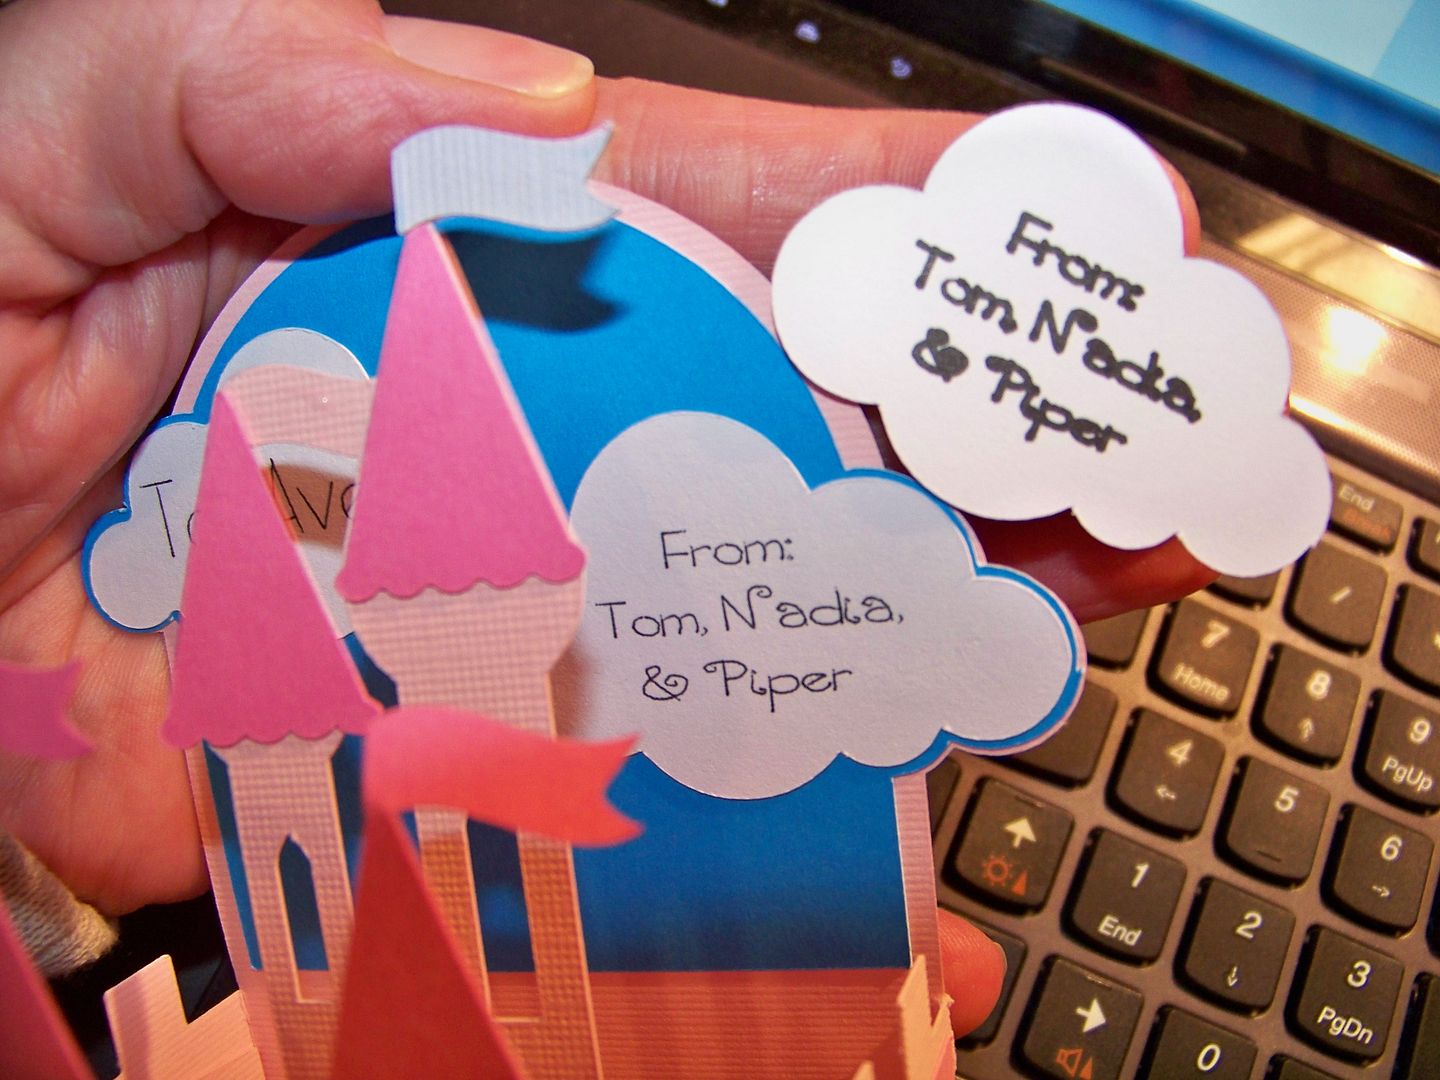
The next one I tried was made using a box card from SVGcuts for a different niece.  I had not gotten on the box card bandwagon, but I always take advantage of the free collection offers whenever SVGcuts comes out with a new design, so I have them all, including this one from the Box Cards Kit.


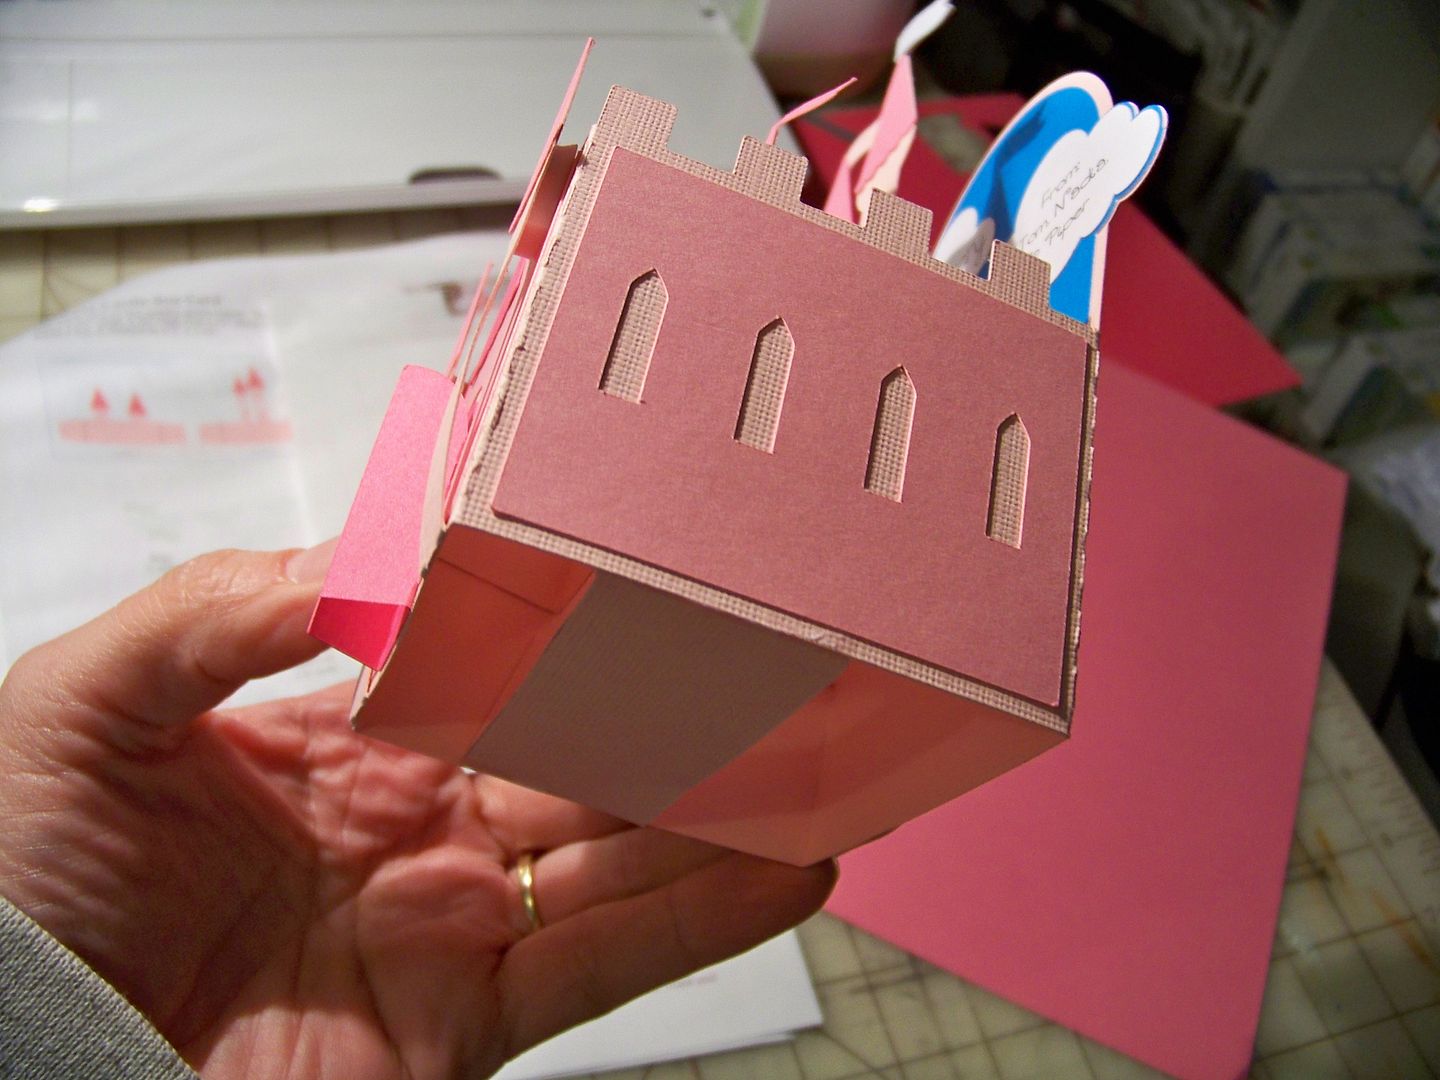
What makes box cards great for use as a 3D tag is that they go together so fast, with all the layers figured out.  They are perfectly dimensional and have great themes!  This castle box card was made to go with princess wrapping paper.  I wanted something quick and effortless because this one is for a toddler's gift!  You know this one will be destroyed in no time!

Because box cards are made to collapse to fit into an envelope, I do add a "locking" strip in the bottom.  This also gives me a place to add glue to so that I can adhere it directly onto the wrapping paper.


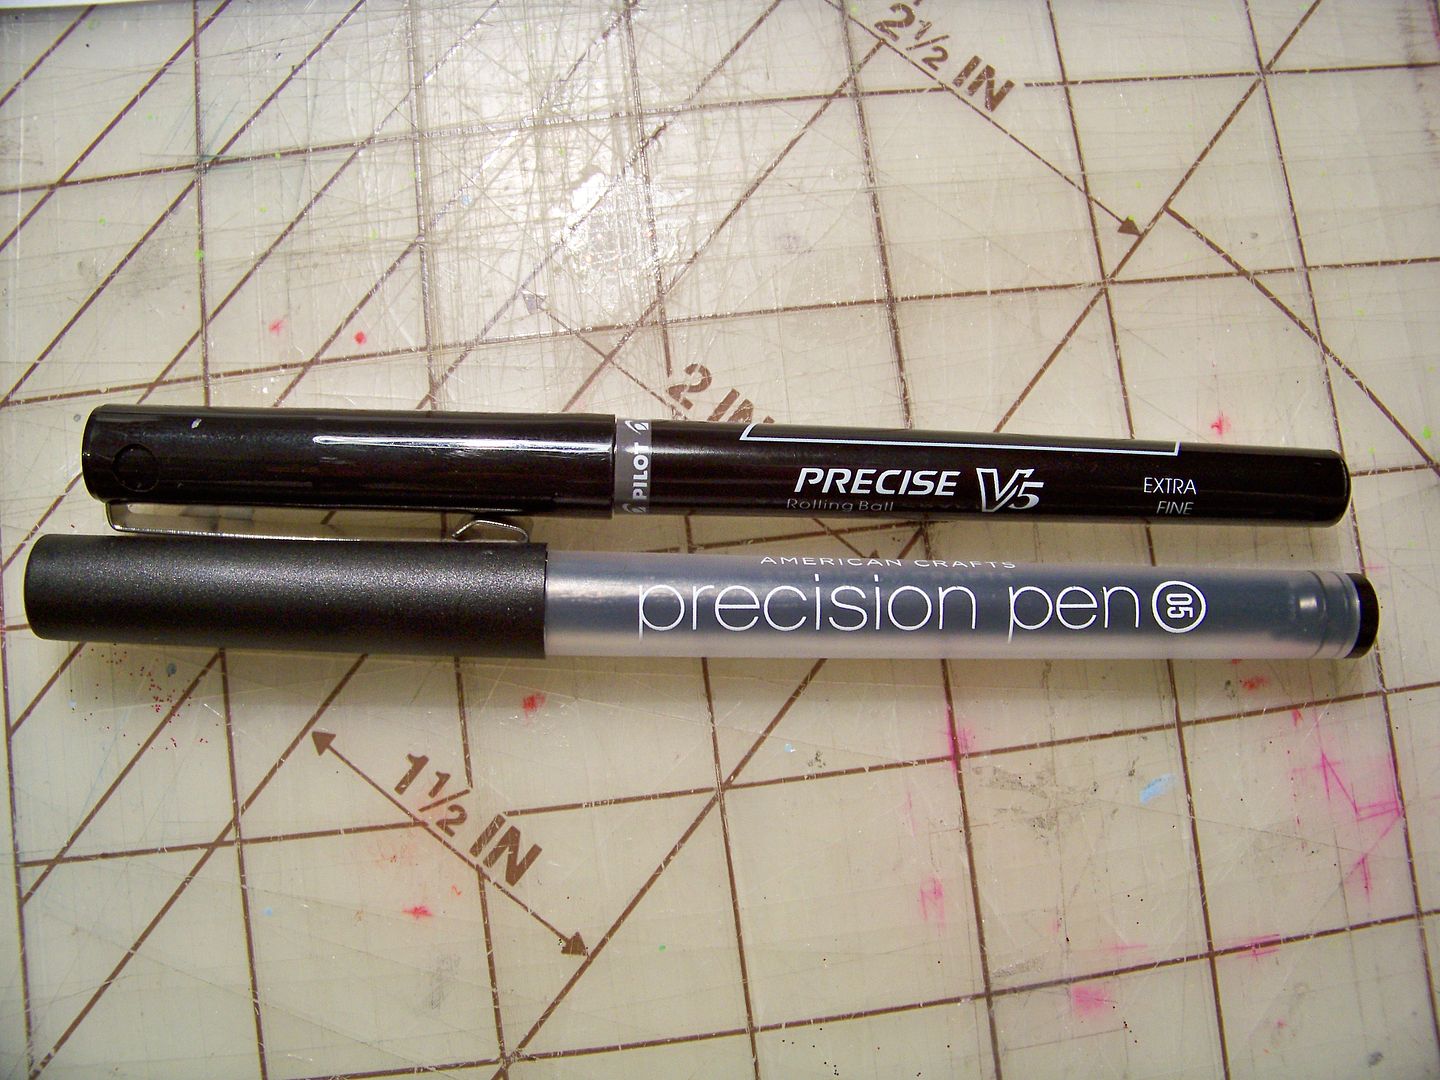
And to make this a tag, I added text to the clouds using the writing feature on the Cricut Explore.  This is a good time to mention that the kind of pen you use for these really matters.  I used a Precision pen at first and it was just too thick so I remade the clouds using a Pilot Precise V5.  To see my post with all kinds of pen options for the Explore, click here.

The Pilot Precise V5 pen creates a much better finished tag with this tiny writing.


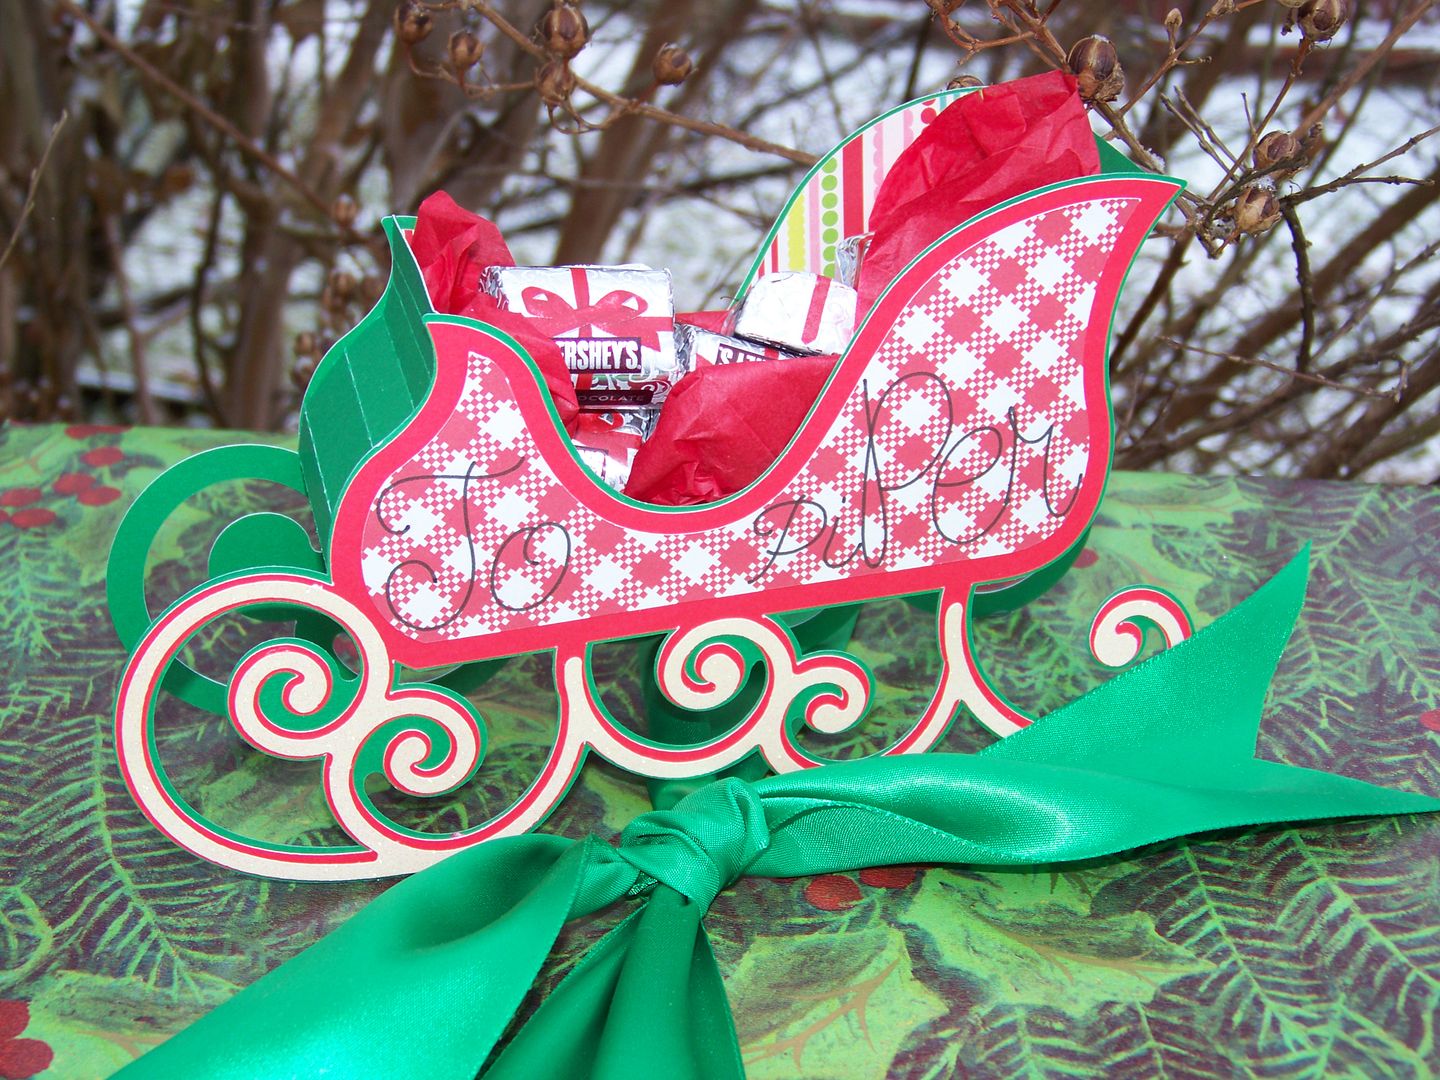
The next one I did was for a gift that was opened a couple of days ago!


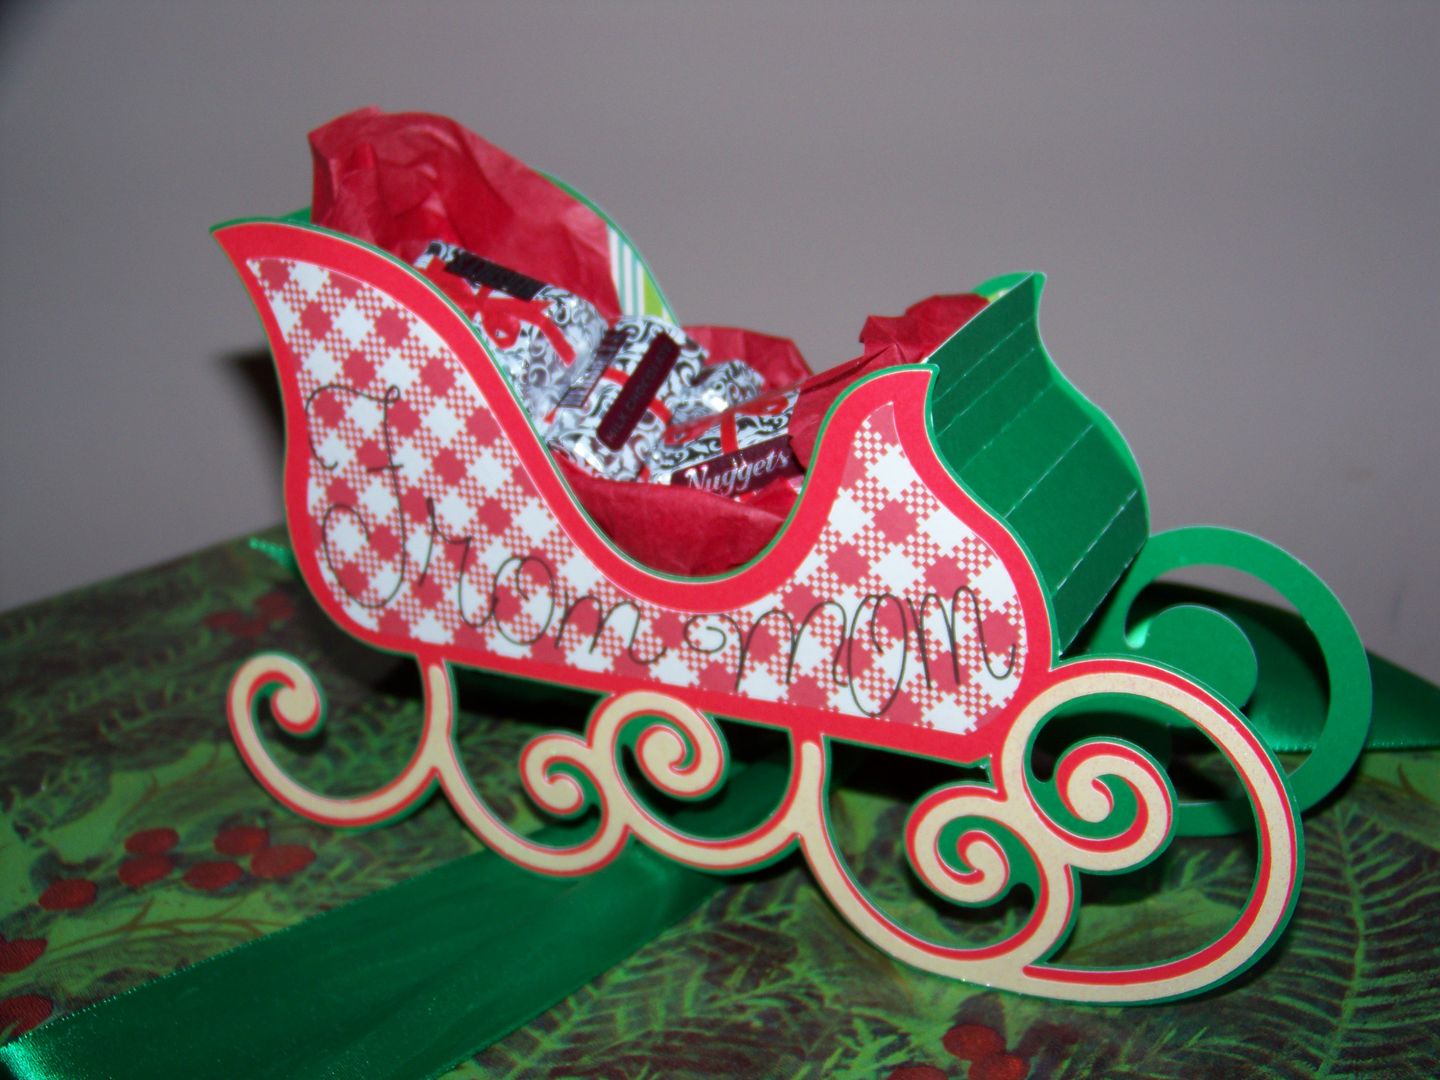
I wanted something super fast because it was going to be opened shortly after being decorated.  It was the wrap for the annual Christmas ornament gift that I give my kiddo.  She opens this 'first gift of the season' while she watches the Macy's Thanksgiving Day Parade.  I chose a 3D sled and used the writing feature and a Precision Pen to write the "to" on one side and the "from" on the other, adding text one letter at a time in order to adjust the size of each letter.


This was particularly fast because it is basically layered sides and a shaped middle that connects them!  And it holds stuff!  Like Hershey's Nuggets!  Click here to find this file for the sled on Santa's Visit on SVGcuts.


I did put a small puddle of glue under each of four areas of the sled that make contact with the package.  My daughter, who keeps all of these for use with her toys, carefully peeled it off of the package before tearing into it.  I probably could have just as easily looped the ribbon through the sled rails.


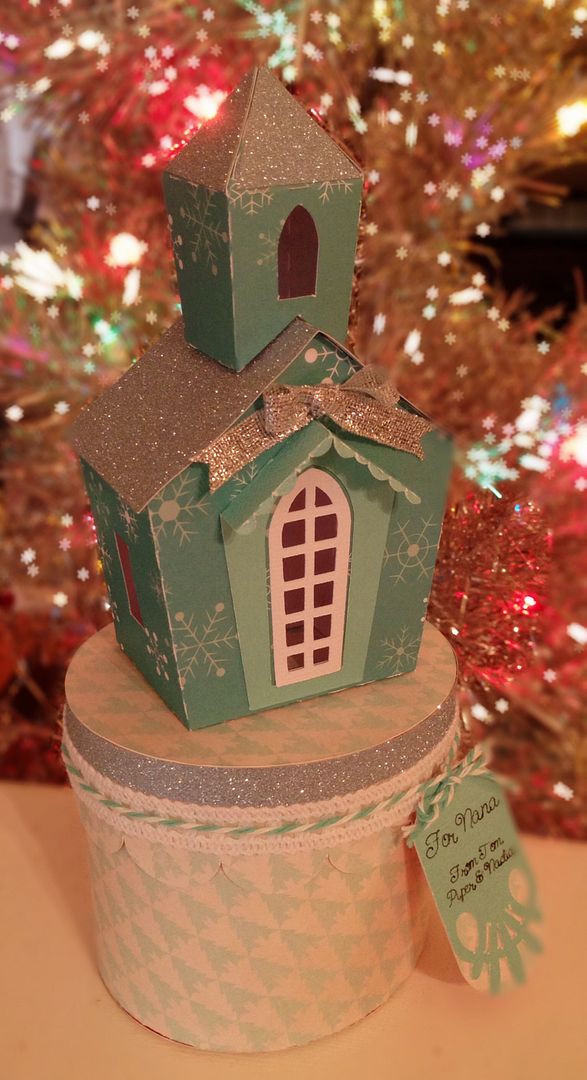
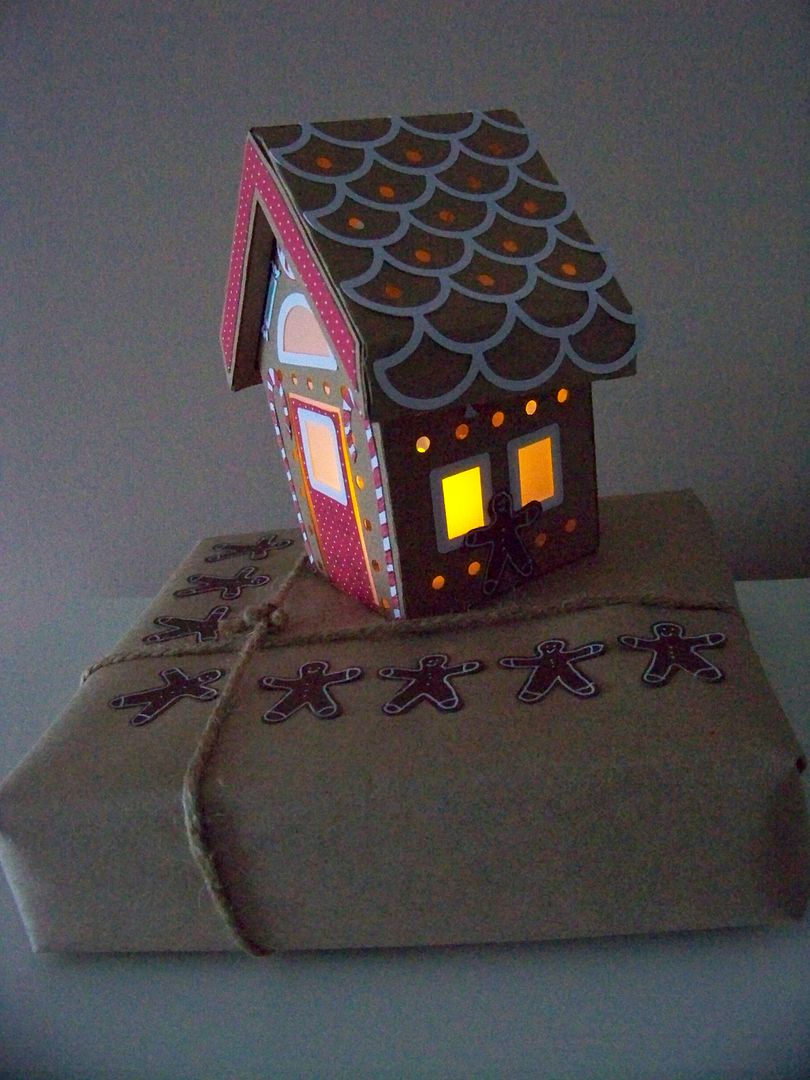
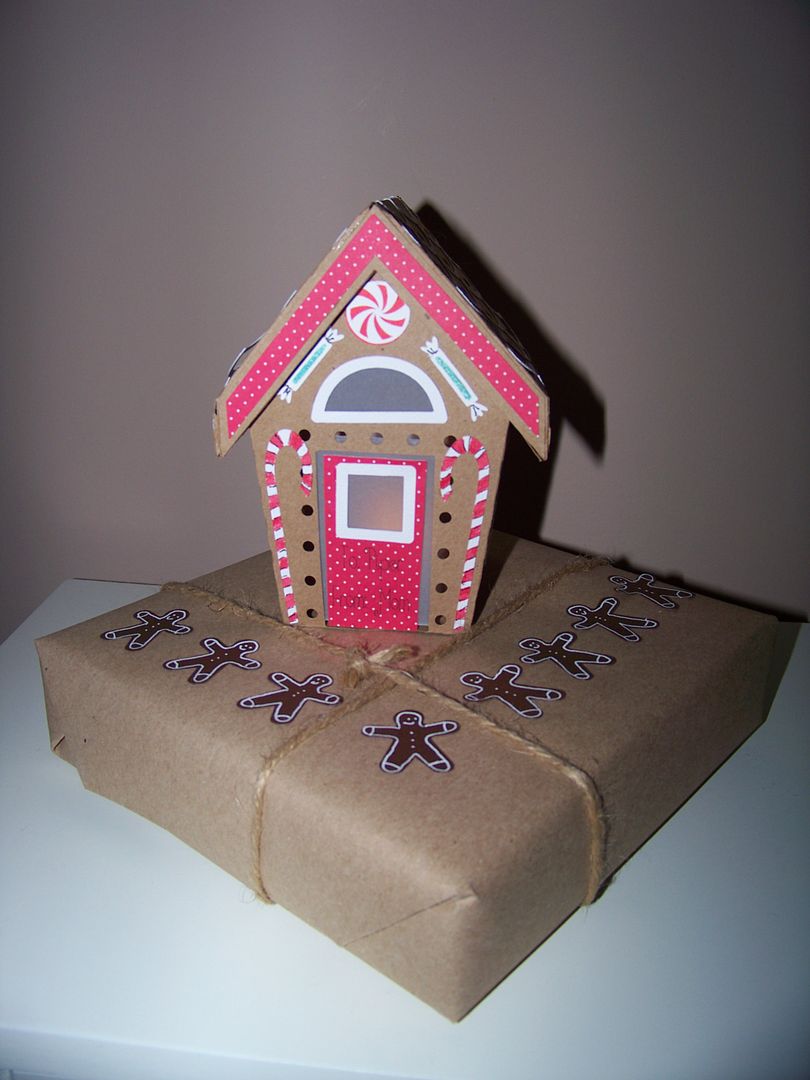
Because my kiddo likes to keep my 3D projects, I made her a special one.  This gingerbread house was especially fun because it lights up!


This was one of the very first SVGcuts files that I bought earlier this spring when I got my Explore.  I used it for a tree house project.  You can see that previous post by clicking here.

This is part of the Gingerbread Chalet Village and I love this perfect little house with the well-fitting roof/lid!  A small electronic, flickering tea light makes it fun!  My daughter actually gasped when she saw this lit up!  This one was definitely more work than the others, but with that response, it was worth it!  I used Cricut images for the candies and gingerbread men.  A search in Design Space on "candy" and "gingerbread men" gave me plenty of options!  I used white pen to add details to the embellishments instead of teeny-tiny layered cuts.


I used brown mailing paper to wrap the gift and kraft paper to cut the little house.  Vellum makes the magic in the windows and around the door.  Like the others, I glued the house right onto the paper, but I imagine my kiddo will cut the paper around it to save the little house.

The response was so exciting that I made another light-up 3D gift tag on another of her presents.


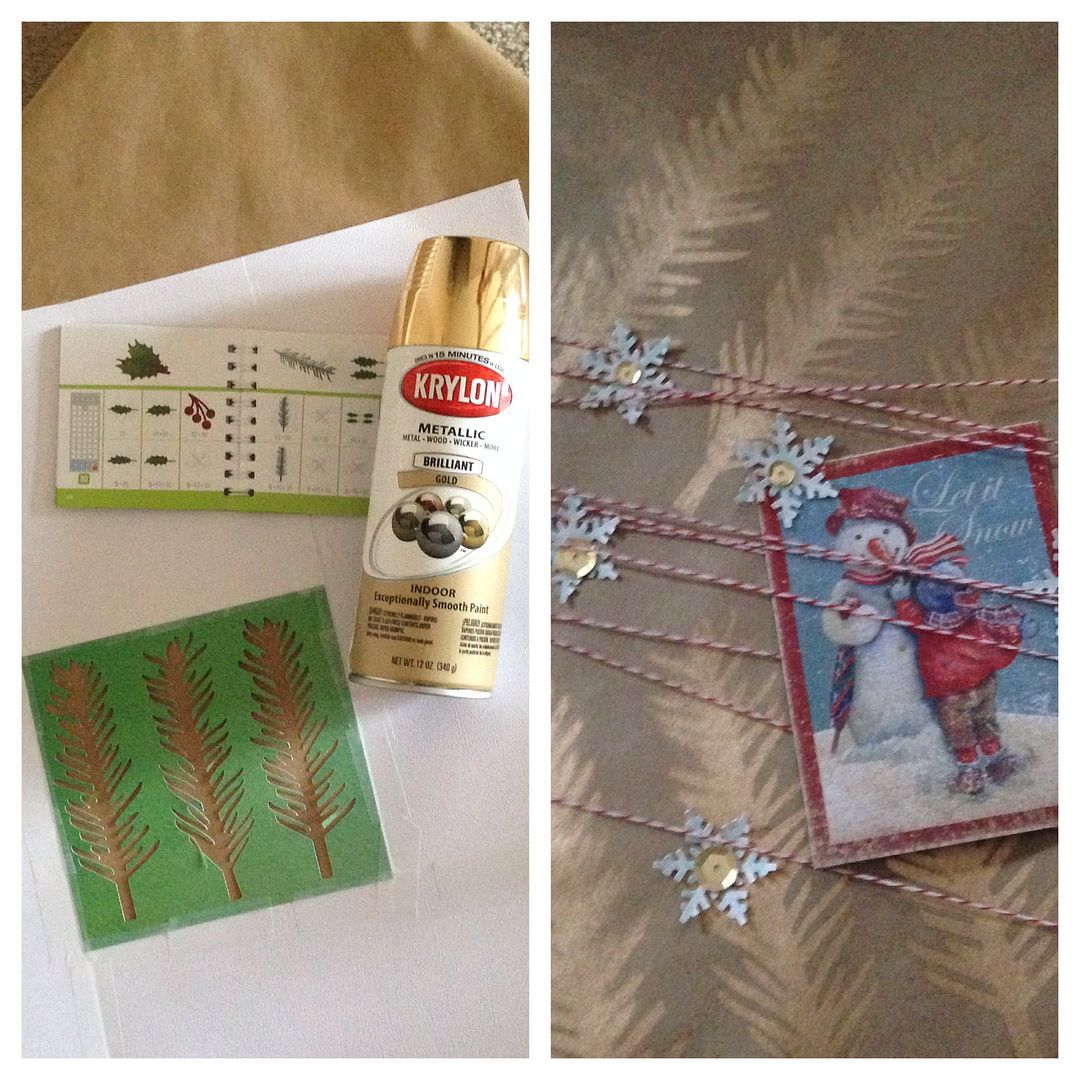
This was my Thanksgiving morning crafting:  The tree on the NEW Santa's Surprises collection!  This one is still FREE until DECEMBER 5th if you type in coupon code FREEGIFT when you place an order for $9.98 in other files!

I used the writing feature with the Pilot Precise V5 pen on the banner from Cricut Rock Princess to create the "to" on this tag.

The lid on this one is not tight fitting so a scrap of paper to make a paper hinge helps the lid to stay in place.  I did not glue on the bottom piece; I used the tabs and glued them to the gift wrap directly. Another tea light makes this tree light up!


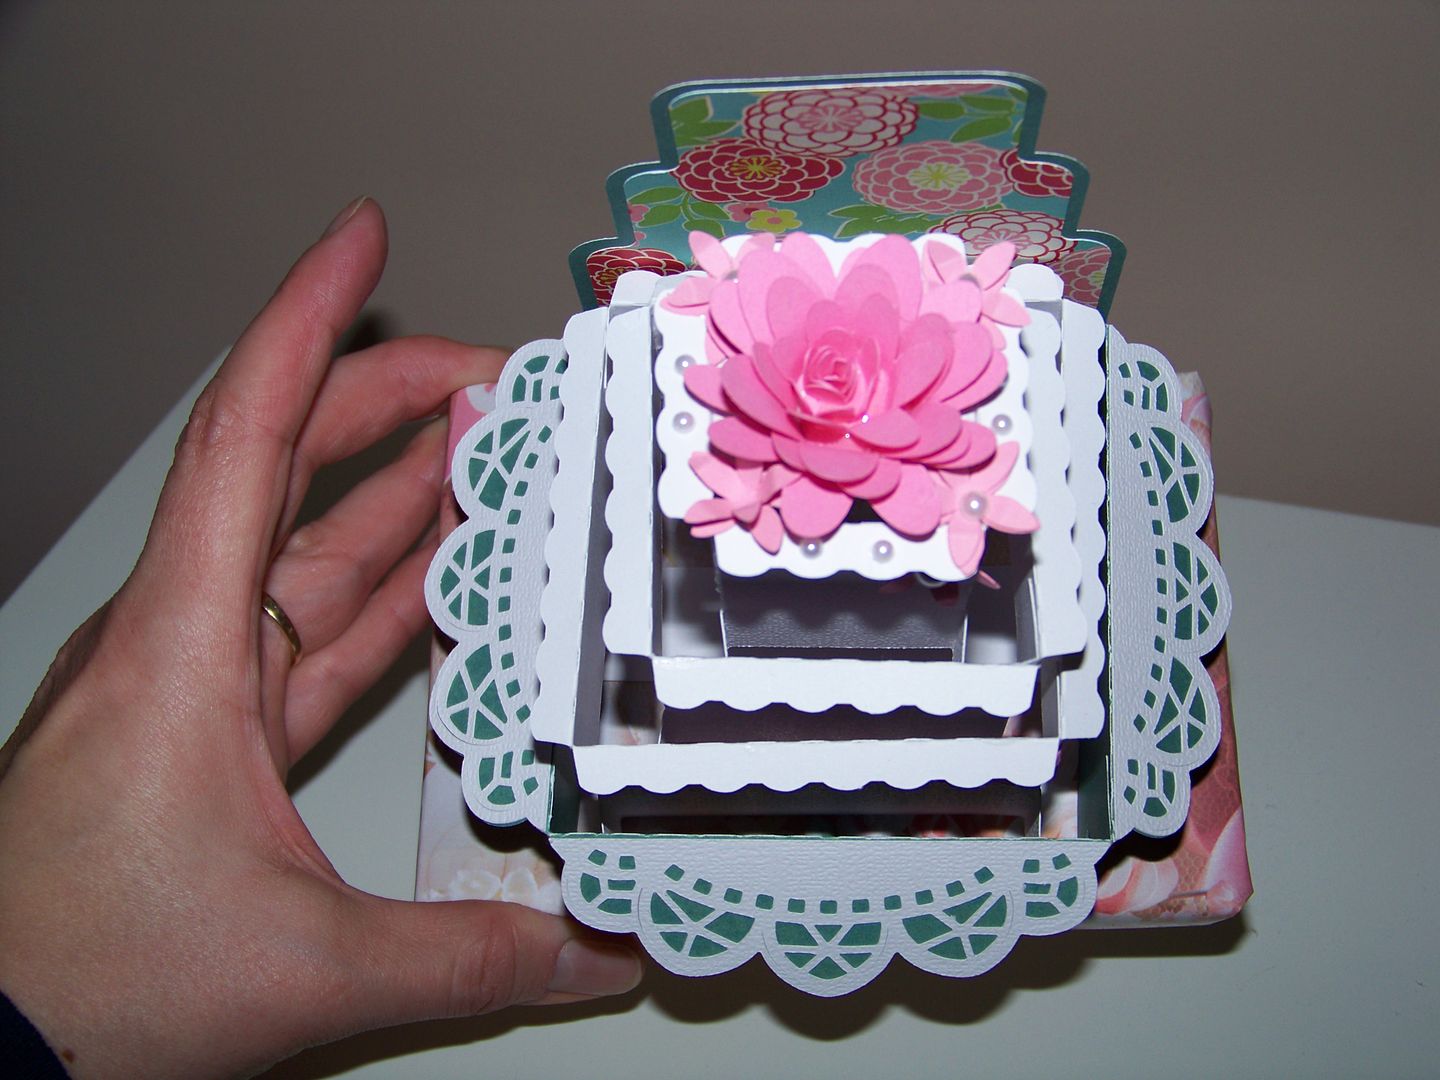
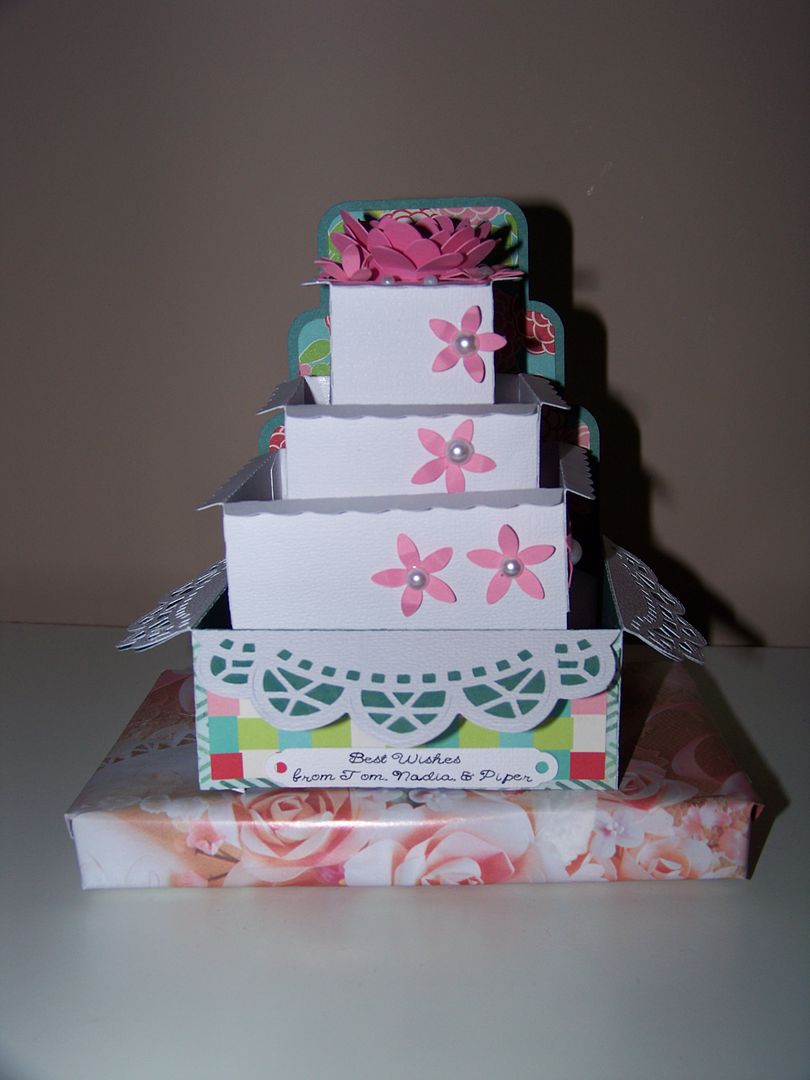
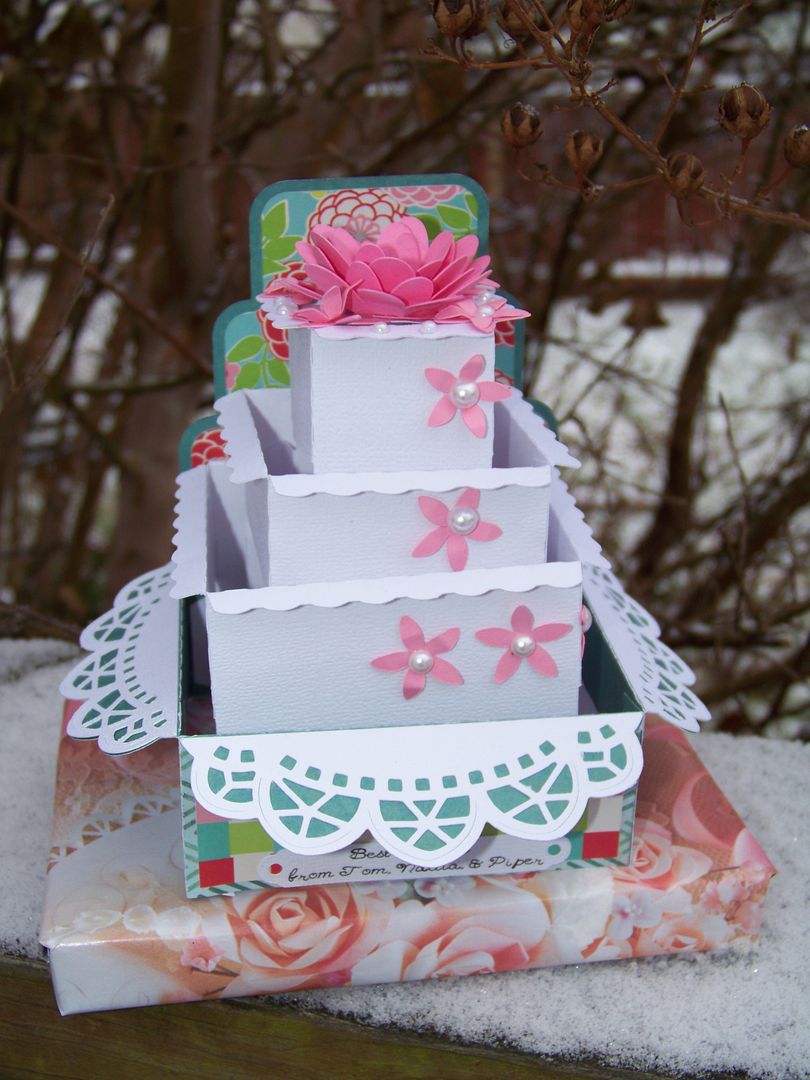
While I was making these 3-D tags/package embellies, I had a wedding gift to wrap and used this idea on that gift too.  I used the box card on Autumn Box Cards to make a wedding cake!


I used the writing feature on the placard at the bottom....


And I used a locking strip to keep it straight and prevent it from collapsing as it is designed to do. It also allowed me to glue it in place on the package!  I used some Cricut flowers that I had left-over from a previous project.

For a simple gift (an ornament and a gift card), I think this box card dressed it up and made it special!


I had so much fun with all of these!  I have been excited to incorporate 3D buildings and boxes in my gift-giving since I got my Explore and started experimenting with svgs!  Thank you for checking my blog post today!  I can't wait to show you wait I have been working on today!

Quick Links:

3D Barn on Santa's Village - click here.
Owl on the Barn - click here.
Castle Box Card - click here.
3D Sled - click here.
Gingerbread House - click here.
3D Christmas Tree - click here.  FREE until 12-5-14 with code FREEGIFT and $9.98 purchase.
Wedding Cake Box Card - click here.
My List of Pen Options for use in the Cricut Explore - click here.

But wait! There's more! Click 'older posts' above!

But wait!  There's more!  Click 'older posts' above!