
As much as I loved these images, and really loved that they were so different and wanted to find a way to use them, I was drawing a blank until Marianne recently posted her version of the mugrug, an in-the-hoop embroidery project. Hers was cloud-shaped and it came with a bird! Or is it an egg? I knew instantly that I would finally stitch out her designs on a stack of her mugrugs, which I really needed for my family room coffee table.
I imported the plain mugrug that I purchased from the fruBlomgren shop, which she calls the "neutral" one.
I had decided on four designs that I wanted to use. This one is the angel. Although she does have a flat angel file, I purchased Angelina, a design that she shows stuffed. To use this design, I had to simply delete the last step, the outline that is normally used to sew the front, embroidered fabric to the plain back. I also used the lasso tool in Embrilliance Enthusiast to remove some of the stitches of her cloud so that she would fit into the shape.
The key to inserting the design into the mugrug form is to look at the the Objects pane, select the angel design, and slip it in between the applique material sewing step and the next to last step that tacks down the back piece of fabric. I do that by selecting the angel and dragging her to the right spot.
 |
| You can see from the Objects pane above that the machine will stitch (1:1) the cloud shape to show the applique position, then it will stitch again (1:2) to tack down the fabric, then it will stitch (2) the angel design, then it will stitch (3:1) the cloud shape again, then it will end with the (3:2) satin stitch all around in the shape of the cloud. |

On designs like this with a number of short color changes, I like to use Embrilliance's Stitch Simulator and take a few notes so that my print out is a true guide and I know exactly what each little icon is.

I selected a palette of threads. I wanted to make these mugrugs look like they are all part of a set. I tried to do that by keeping the size and shape the same, keeping the base fabric and outside thread the same, and by using the same palette of colors within the different designs whenever possible.

To illustrate the general way that these were made...
The machine stitched the placement (1st outline of the cloud). I placed my fabric and allowed the machine to repeat that design (the 2nd stitching of the cloud design) to tack down the fabric.

Once it was done, I removed the hoop from the machine (NOT unhooping the fabric!) and trimmed close to the stitching, like you do for an applique or for making a patch.

I returned the hoop to the machine and allowed the decorative design to stitch out completely.

There were a couple of long stitches that were the result of my lassoing off part of her cloud in Enthusiast. I made sure to snip those because I wanted no threads below my eventual satin stitch that will be the outline of the mugrug.

I removed the hoop from the machine while keeping the fabric hooped....

...I flipped the hoop over to the backside.

I placed my second piece of fabric base right on top and pinned it in place from the front.


Then, the cloud shape was stitched a 3rd time. This time to hold the back fabric in place. The back fabric covers all the backside stitches.

I removed the hoop again (and again NOT unhooping the fabric!) and trimmed close to the stitching.

The hoop was placed back on the machine and this time the cloud outline was stitched using a heavy satin stitch. This is the outline of the mugrug.


 |
| I could have used matching bobbin thread so that the back of the outlining satin stitch was a bit prettier. I slacked on that! |

 |
| This is Frau Blau and Ede from fluBlomgren. Free tiny text font can be found at http://www.cmemag.com/articles/Free-Tiny-Text-Font. (I triple stitched the lettering so it wouldn't get lost in the pile.) Her expression is hilarious to me. The cat doesn't seem too happy either. I added "Frau Blau is blue....today" to play on her name, Mrs. Blue, and because I just love that look on her face. There is an option to have the face filled in. I was trying to make it fast, but I would have preferred that for the set as a whole. Next time! |
 |
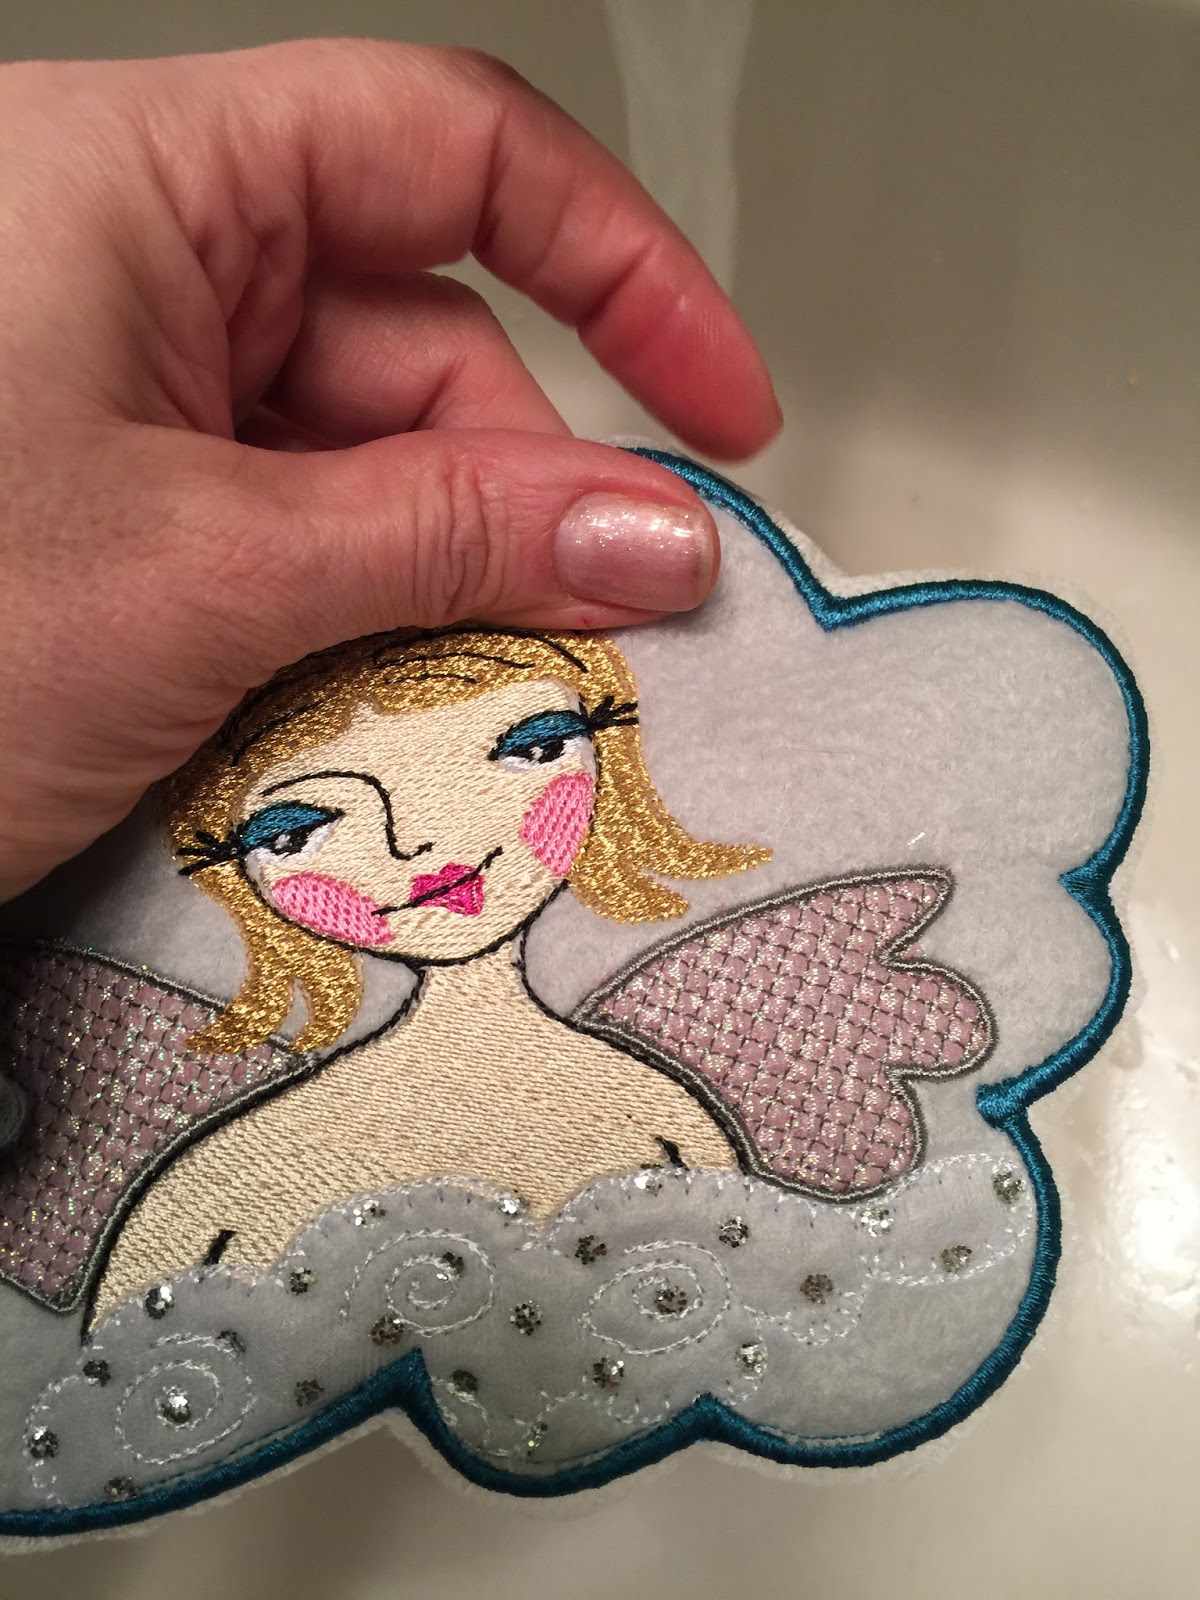
| This is Angelina angel from fluBlomgren. I used metallic organza for the wings and glitter dot for the cloud. The hair is metallic gold thread from Robison Anton. It was so much fun for me to use these kinds of fabrics. So often, applique is all cotton. I like that this project allowed me to think outside the cotton print box! |
 |
| This bird is on the file with the mugrug itself. I simply copied and pasted it and used the mirror image key in Embrilliance so they would face each other. I did make the one on the right a little shorter. |
 |
| This mermaid is simply my favorite. I have a little mermaid collection and used to try to find unusual ones or kitschy ones or whimsical ones whenever we went to the beach for a vacation. She fits all three descriptions. In the information about the file on Etsy, we are told that mermaid in German is meerfrau so her name, Frau Meer is a little play on that. This is fruBlomgren's Frau Meer. She is also in a separate file sitting on a rock. That one is on my wishlist. I don't know if it's the "Mimi makeup" or the blue "parts" but I just love this character. |

List of Links on this Blog Post:
- fruBlomgren embroidery design shop on Etsy: click here.
- KittieKatStudio gallery of paper, paper mache, and clay original works on Etsy: click here.
- fruBlomgren's cloud-shaped mugrug with applique bird: click here.
- fruBlomgren's Angelina angel: click here.
- fruBlomgren's Frau Blau and Ede: click here.
- Free Tiny Text font by Lisa Shaw: click here.
- fruBlomgren's Frau Meer: click here.
Thank you for checking my blog post today. To see all my Embroidery projects, resources, tutorials, and links, check out my Embroidery Page on this blog, or click here.
3 comments:
I understand this! Wow! And I am TOTALLY in love with your whimsical and beautiful project. Puhlease don't let anyone spill one drop of anything on these - Or you'll have to send them to me. Lol. I love these. The metallic thread is gorgeous. Look at you, Go girl.
That is so impressive! I attempted at one time to do machine embroidery with little success. I enjoyed reading the process and admire your work! So glad I signed up for your posts.
OMG, Nadia, those are absolutely stunning!!!! TFS! :-)
Post a Comment