I was requested to create a tutorial explaining how to stitch a key fob using Embrilliance Essentials for someone new to the software. There are some basic, extra steps in this tutorial that I don't normally include in my regular posts.
This tutorial explains:
- how to download and import an embroidery file
- how to install BX format fonts
- how to combine lettering with an in-the-hoop file and change the stitch order
- how to use the stitch simulator to check changes
- how to turn off the 'remove hidden stitches' function
- how to finish the project on the embroidery machine and add hardware
I thought it might be fun to start with a simple key fob shape that can be customized. My favorite site for this kind of digitized file is The Bean Stitch! They always stitch out perfectly! The term "bean stitch" typically means a 3-pass running stitch (three stitches between two points) and that is the outline on these fobs. The style of stitching makes this kind of fob super fast to create! The fabric is trimmed just outside the bean stitch so it is important to pick a fabric that won't fray (unless you are creating a "raggy" style fob, patch, or project).
These are a few snap tabs stitched from The Bean Stitch files that my tween daughter requested at the beginning of the school year for her backpack and lunchbox. The ones below are done with plain and glitter vinyl from Mikri.
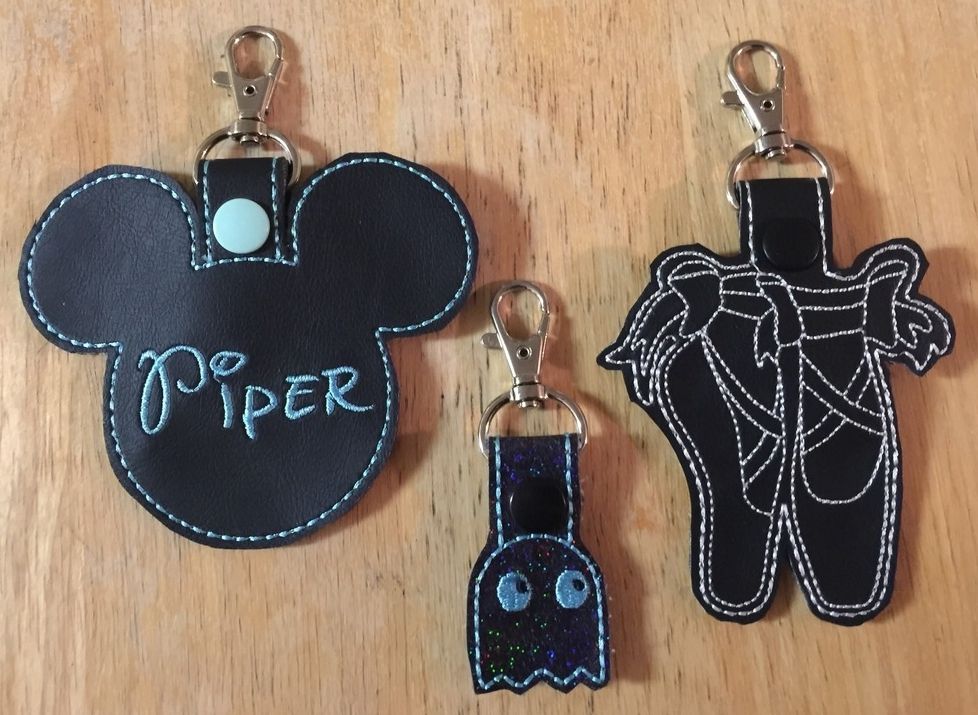 |
| Mickey: click here Pacman Ghost: click here Pointe shoes: click here. |
There is a free circular fob file in The Bean Stitchers (which is a closed Facebook fan group for the The Bean Stitch company). I decided to use this file for my tutorial to make it easy for anyone to stitch along with me. This is their photo from the download.

Because this is a closed group, you will have to request to join and be approved to get the file. Here's a link to get there to join: www.facebook.com/groups/beanstitchers/ I did contact the group's admin, Angela Hromanik, to ask if it was okay to send readers there for this file and she graciously welcomes everyone to join! When you are approved, you will have access to all the files there, as well as notice of sales and new designs! It is a great place!
 |
| This is the Facebook page for The Bean Stitchers. |

Once you click on it, it will download. Click the download tab that appears at the bottom of the screen (this is Windows 7).

Then save it wherever you want it in your computer. You will need to remember where it is! While I am there, I also download and saved the tiny hearts file for this project.

Step Two: Open up the file in Embrilliance
Next, I open my Embrilliance software. I click the Merge Stitch File button. (There are several ways to bring in a file. To see all the other ways, check out this video--click here.)

I find my file (the PlainJane one), select the specific one I want by clicking the image, click import, and it appears on my screen.


To make it easier for me to add my design to it, I click on the fob in the object pane to select it, then I click and hold on the blue dot next to the upper handlebar and rotate the fob.

I think it is easier to work with it on the screen like this.

Step Three: Install a BX font into Embrilliance
Next, I want to add my monogram. I have decided to use a file I just bought from Stitchtopia. This is the new Modern Monogram Set and includes sizes from .75" to 2.5". (Be sure to also follow Stitchtopia on Facebook so that you can get notice of sales and new fonts!) If you prefer, you can use one of the included fonts in Embrilliance if you are following along and want to do this without spending money...but for the benefit of explaining how to install a BX format font file, I am using this one from Stitchtopia. One very cool thing about Stitchtopia: when you have to select your file format, you can pick any format and the company will include the BX version for free! That is why you will see both PES and BX formats on my screenshot below.
There are several ways to install a BX file. One way that I just discovered is to drop it from the download screen! After I purchase the file, I get a link on the order details to click. Just like on the free file above, I click the download box and I get a pop-up screen like this one that shows all that I get in that download. I select one of the bx files (different sizes come in different files) and double click it. BECAUSE MY EMBRILLIANCE PROGRAM IS OPEN, it drops right there!!! (Only the BX fonts work this way. You will know them because they have that little arrow and a needle to the left of the name and their file type will say "Embroidery installer file" instead of PES or JPG or other file types.) I still ALSO save this download, both the bx and the PES format that I receive.

Once the BX file is installed, I get this message. It shows that the .75" size I selected is now in Embrilliance for me to use.

Once I put the font onto my virtual screen in Embrilliance, I realized that I needed a larger file size from my download. Although it is true that we can easily re-size in Embrilliance Essentials, it is best to use the closest size that the digitizer provides. The size I need is actually included in the download. To bring in another size, I will illustrate a DIFFERENT way to install a BX file into Embrilliance.
From the Embrilliance screen, I click on the Merge Design button.(It looks like a cog and is the third icon from the right).

That will bring up the Library. What you have on your screen for your library may differ. It will not matter! I click on the Import Catalog (bx) button.

I find my file where I saved it. I double click the size I want. For this project, I use the 1.5" file.

Once it installs, I get the message that tells me that this size has now been installed.

I have illustrated two ways to install a BX file. There are other ways as well. To learn everything you ever wanted to know about BX fonts, their installation, and why they are awesome, check out this video-- click here.
Step Four: Add lettering to my imported file
I am ready to add my monogram to my fob. To do this, I click the Create Letters button.

A sample ABC pops on the screen but I am able to change the letters in the Properties box. When I click the SET button, those new letters appear on my virtual hoop. When I change the font to the one I want, my letters change to that style on my hoop. You can see I entered "nHs". I liked the fun of combining upper and lower case letters for this monogram. I have a whole blog post on doing monograms in Embrilliance. It was written when I had only used the program for a month so it is definitely done from a "newbie's" point of view. To find that post, click here.

Only BX fonts are done this way in Embrilliance. If you are using a non-BX font (such as a PES file), you will import them one letter at a time the same way we imported the PlainJane key fob.
I can use the "space" slider to make the letters closer together or farther apart. I keep them as they are. I can use my curser to grab a green square in the middle of a letter to move just that letter where I want it.
Note about adding lettering files: be sure to install your bx font before you click the Create Letters button. If you click it first, the font you just installed won't show up in the list. To get it to show up, delete the text that came up when you clicked it and simply click it again after the font is installed. When you scroll through your list of installed bx fonts, it will be there this time.
Step Five: Merging additional files
Now I want to add that tiny heart that I downloaded earlier from The Bean Stitchers. I repeat the process that I used in Step Two.

The program places it in the center, but I can select it on the Objects Pane (or click on it on the virtual hoop) and move it wherever I like.

I decide to select it, copy it, and paste it. There are a few ways to copy and paste, but I just use the Windows shortcut of holding the Control button and the C button to copy and the Control button and the V button to paste it. You will see that it looks like it didn't work because you can still only see one heart. If you look at the Objects pane, however, you will see that that there are in fact two hearts so you know they are on top of one another!

I just check that one of them is selected in the pane and I drag it where I want it. I select the other one and drag it.

Step Six: Change the stitch order
So now all of our elements are in place, but there is one more concern. When using a key fob file, there is always a back piece that is sewn last that finishes the fob and hides the back of the stitching. Usually the only stitching you see from the back of a finished fob is the bean stitched outline. I can also see that in the PDF instructions that are provided with the download. That means that I must move the lettering and hearts so that they don't stitch last.

When I click on the + sign for the first element (PlainJane Snapbean TBS), all the steps are revealed and the + turns into a minus. Between this info and the PDF instructions that come with the download, I can see that 1:1 is the placement stitch. 1:2 is the tackdown stitch. 1:3 is the final bean stitch. I need the lettering and the hearts to be stitched before the final bean stitch.
I do that my selecting the letters on the Object pane and dragging them where I want them.

Then I do each heart the very same way: select by clicking on it in the object pane and then dragging to the place I want it on the list.

Moving the order doesn't appear to change anything on the fob design, but it will change the stitch order. I can now see that this project will stitch the placement stitch, then the tackdown, then the lettering, then two hearts. It will finish with the bean stitch at the end. If I am in doubt, I can check it on the Stitch Simulator.

Before I am finished with the file, I like to open a new tab and bring in the PES file--you have to save first. To save, it is File, Save As (just like in Word or any office program) and it will save the BE file and your machine's format file. (PES is the format my machine reads; logically, you will be saving in your machine's format and that is the file you will want to open). We have been using the BE file this entire time. I like to see how the PES will stitch out because the simulator can catch problems BEFORE it stitches on my stabilizer and vinyl. In my case, my stitch simulator virtual stitch out reminded me to turn off the 'remove hidden stitches' function in Embrilliance! This is why:
This is how the first step is supposed to stitch. Looking only at a simulation of the BE file, it looks right.

But with the 'remove hidden stitches' function on, and I use the PES file in the simulator, this is what I see instead:

To turn off the 'remove hidden stitches' feature, I go to Preferences, then Files, then uncheck the 'remove overlaps' box. The 'remove hidden stitches' function is one of my favorite features of Embrilliance but because we can use it only when it is beneficial, we have even more control over files we merge and stitch! To learn more about this feature, click here for a video.

Now, I can check again the PES file in the simulator and see that it stitches just as I want it to.
Step Seven: The stitch out
I save my file (if any changes were made after I saved in step six). I place a copy of the file on my embroidery machine. (Remember that Embrilliance saves two files: a BE file, which is the working file, as well as the embroidery file in the format needed for my specific machine. In the case of my machine, that is a PES file. It is the PES that I send to my machine).

I print out a copy of my file which will give me a full-size paper copy and a list of color steps to follow as I go. (Print the file by clicking file and then print, just like in Word and other office programs). I also like to print out the PDF instructions on most in-the-hoop projects.
I make sure that my bobbin thread matches my top thread. For this reason, most of my fobs have a bean stitch that is black or white since that is what I have on hand in my pre-wound bobbins. You can always wind a custom color bobbin if desired. (I have been known on black vinyl to use a black bobbin and a colored top thread, but usually on fobs the threads match front and back on the bean stitch.) I make sure that I have a sharp (not ballpoint) needle in my machine.
I hoop tearaway stabilizer based on color of the vinyl's backing (white for light colors or black for dark colors). I will be able to see the backing on the edge of the finished fob.
The vinyl I use is marine vinyl. It is firm and stable with a tight knit backing. I know that this vinyl will be able to withstand the pull from the thread on my monogram.
I stitch the placement stitch (step 1). I can cut my vinyl to a piece just a little bigger than this shape and lay it on the hoop after step 1 is complete.

I stitch the tackdown stitch (step 2). The file will show these steps as different colors. That is so that the machine will stop. I keep the same color thread in my machine for everything except the hearts.

I stitch my lettering and the hearts (steps 3 and 4). Then I remove the hoop from the machine.

I flip my hoop over and place a second piece of vinyl over the stitching and secure with tape on the edges. This is the back of the fob. It will hide the back of my lettering and hearts.


I stitch step 5. To start stitching, I HOLD THE THREAD TAIL. This will prevent that glob of thread that sometimes happens at the start of stitching under the hoop.

After it is stitched, I remove my hoop, remove the fabric from the hoop, and trim around my design.
Step Eight: Adding snaps and hardware to finish
I apply a size 20 Kam snap to the fob so that the tab will fold over and hold in place. For info on Kam snaps, click here. I buy my Kam snaps from Mikri World, but there are a number of places on line to buy them. I like the standard and the long prong versions and find that now that I have a wooden block holder for my Kam pliers, I get much better results from the standard prong snaps. I learned about the blocks from Tari Darger and ordered this from her Etsy store as a substitute for the expensive Kam press that was out of my budget.

With the snap set, I can add a swivel clip or a split ring key holder to make the fob usable for keys or to clip onto a bag. They sell the perfect size swivel clip at The Bean Stitch website.


I hope this was helpful for getting started with Embrilliance and this type of project. For anyone interested in digitizing their own fobs, I also have a post on that-- click here.

Thank you for checking my blog post today!
List of Links from this Post (none of these are affiliate links; they are all direct links):
- The Bean Stitch website for purchasing files: click here.
- Mickey fob file from The Bean Stitch: click here.
- Pacman Ghost fob file from The Bean Stitch: click here.
- Pointe Shoe fob file from The Bean Stitch: click here.
- The Bean Stitchers closed Facebook group for free files: click here. You must request to join and wait to be accepted but that usually doesn't take long.
- Briton Leap video on how to bring a file into Embrilliance: click here.
- Stitchtopia Modern Monogram file: click here.
- Stitchtopia on Facebook: click here.
- All about BX fonts video: click here.
- My post on Monogramming in Embrilliance Essentials: click here.
- Remove Hidden Stitches video: click here.
- Video on making snap tabs and how to install Kam snaps: click here.
- Wooden block holder for Kam pliers: click here.
- Mikri World for source for Kam snaps, hardware, and marine vinyl: click here.
- Hardware for the keyfob: click here.
- The Bean Stitch video tutorial on how to download files from their website: click here.
- My post on digitizing custom snap tabs: click here.
You can find most of these links all the time on my Embroidery page (that's where I go to find them!) along with my embroidery gallery and links to all my tutorials. You can find it by clicking on the Embroidery tab on the top of my blog or just click here.