Monday, March 13, 2017

Bunny Birth Announcement and Baby Gift Set


Thirteen years ago, when my baby was born, I remembered something that a customer (a mom of eight) had told me back when I worked at a fabric store.  She said that giving birth wasn't exactly fun so she always waited to learn the gender of her kids at their birth.  That it was the "fun" of the day for her.  I took that advice. And she was right; the wait and the work made finding out that I had a precious little girl even more exciting!

Not until recently did I realize how annoying that decision must have been for the people at my two baby showers!  Ha!  So, when my husband's cousin announced her pregnancy and that she too would be waiting to learn the gender, I knew she would be getting my {personalized} baby gift after her baby was born.  I remember how I felt with all those neutral colored and themed clothes and baby items... I went on a pink shopping trip the first time I headed out the door with my new little girl.  I bought the girliest stuff you have ever seen!  Those were the days before having a die cutter and having an embroidery machine.  If my child were born today, everything would have her name or monogram on it.  So that was on my list for Baby Margaret!

I started with a Nate Berkus lovey from Target that I embroidered using a file from Itch2Stitch, Magnolia Sky.   I float the item over hooped tearaway and top with WSS.  I pin the item in place and stitch a basting box to hold it in place.  The basting box, as always, also has a secondary function:  it helps me to make sure that the text will be centered and placed just as I envisioned it.  The basting box is removed before the WSS and tearaway.  For a great article all about basting box usage (in case you were wondering), check out the blog post by Lisa Shaw.


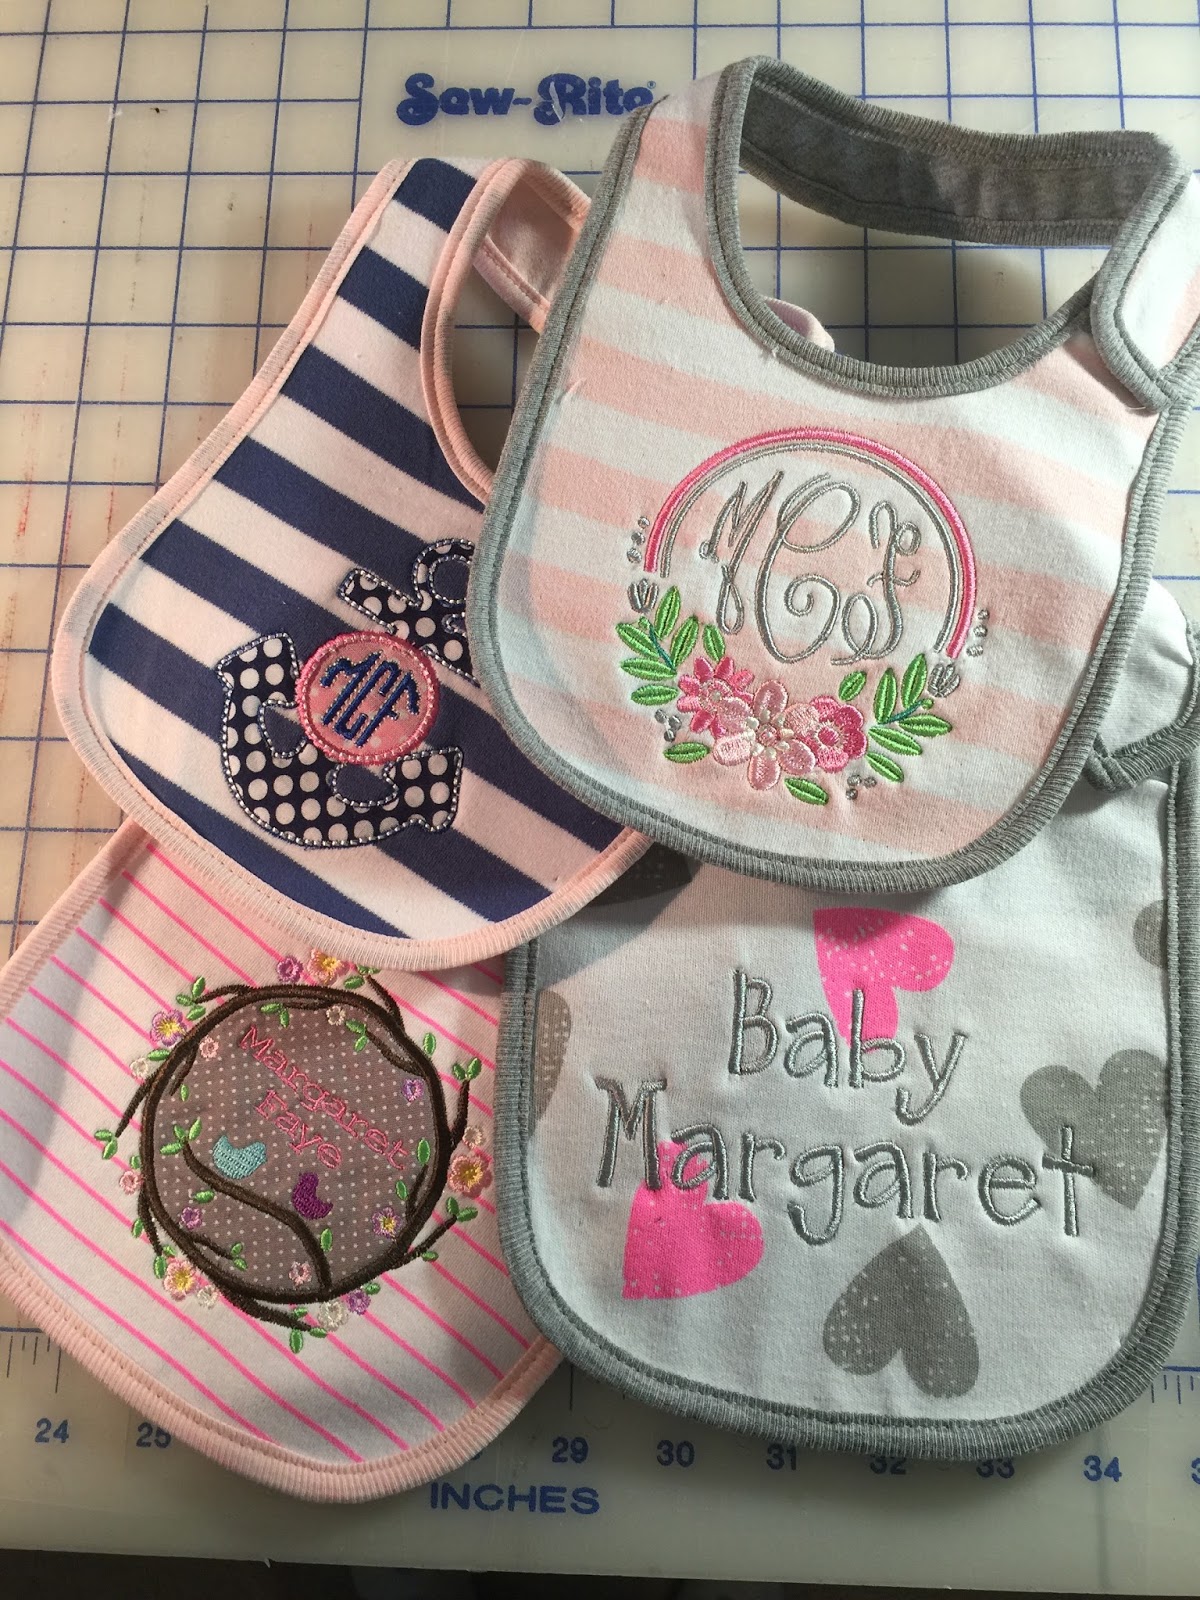
I picked up a pack on PUL lined baby bibs.  (Avoid the plastic lined ones at all costs!!)

This one was embroidered using Itch2Stitch's Frame and 8ClawsAndAPaw Infinity monogram (the 8 Claws website has been taken down at the time of writing this, but they are setting up a store on Etsy if you are wanting to search for this monogram font).


This bib was embroidered with Lynnie Pinnie's frame and Applique Corner's Rodney font.  I particularly adore this frame.  This is one of the very first embroidery files I bought the first few months after I received my embroidery machine!  I have loved it for a long time and am so happy that I finally have a project for it!


What to do with a bib with a big print?  Just add text!
This is Itch2Stitch Barnyard.


 This bib has an applique anchor monogram frame and scalloped circular monogram, both from Hang to Dry.


I really needed a tiny monogram for this (the 4x4 size was chosen for the anchor so the monogram space is really small.  This is my pinky next to the monogram.)  My favorite thing is the tiny outline around the monogram letters.  I loved that detail.


Next, I worked on the birth announcement bunny.  This is a bunny I found at Kroger. I tried the appliqued bunny ears last year for Easter and my last blog post (click here) shared all my notes on how to embroider on bunny ears.  I show how to do it through the closed ear as well as by opening the ear, embroidering, then sewing the ear back.  That second method is how I treated this bunny project.  I anticipate that this bunny will be kept for a long time so spending a few extra minutes is time well spent on this keepsake!

I used my Embrilliance software, using the block font that is built in and included with Embrilliance Essentials.  I lassoed off the dotted lines from an Applique Corner birth announcement using Embrilliance Enthusiast just for those divisions.  (Using the dot from a font, repeated over and over would have resulted in the very same effect however. I had to make my birth announcement "fit" bunny ears!)  I printed the design to make sure I liked the size and to plan the placement.


I placed the baby's name on a coordinating baby blanket.  This is Circo brand from Target. This was particularly thick and without a way to open it up, I was forced to allow the wrong side of my stitching to show, a real pet peeve of mine on keepsake blankets.  ...But I liked the look of the set so I used it.  Like the lovey embroidered first, this is also Itch2Stitch Magnolia Sky.


  I was really happy with the set!


List of links noted in this blog post:

  • Itch2Stitch Magnolia Sky font:  click here.
  • Lisa Shaw's blog post all about basting boxes:  click here.
  • Itch2Stitch's floral frame:  click here.
  • Lynnie Pinnie's flower and birdie frame:  click here.
  • Applique Corner Rodney font:  click here.
  • Itch2Stitch Barnyard font:  click here.
  • Hang to Dry anchor frame:  click here.
  • Hang to Dry scalloped circular mini monogram:  click here.
  • How to embroider bunny ears (both methods) on this blog:  click here.
  • Embrilliance Essentials embroidery software:  click here.
  • Embrilliance Enthusiast editing module:  click here.
Thank you for checking my blog post today!  I think the new mom will like this set; I know I would have loved stuff with my little girl's name on it and some pink and purple to go with all the yellow and green and cream stuff that I received at my gender-neutral showers!  

To see all my project notes, tutorials, links for resources, you are invited to check out my Embroidery Page on this blog:  click here.

Sunday, February 12, 2017

Personalized Embroidered Easter Bunnies - Two Methods


Last year, I finally embroidered names on stuffed Easter bunnies for some of the kids in my family after seeing the posts on the embroidery pages the year before.  I kept my notes to share here for doing this both ways:  (1) by sewing straight through the ear and (2) by opening the ear, embroidering, and stitching closed.  Both methods have merit and are quick and easy to do!  I was so late to the party last year that I decided to post this nice and early this year to be helpful to someone wanting to try this for the first time!

Method 1:  Stitching Straight Through the Ear
The first time I did this, I simply stitched through the ear, allowing the wrong side of the stitching to show on the back of the ear.  The deep pile of the fake fur will somewhat hide the stitching on the wrong side and matching the bobbin thread to the fabric color will also hide the wrong side of the stitching a bit.

First, I measured the ear to know the approximate size of the space where the name will go.


I picked out a font (this is Stitchtopia's Daphne) and used the virtual hoop grid to make sure the name fit the measurement I took.  I printed it using my Embrilliance embroidery software in order to see what it would look like at the size I picked.


I pinned the bunny ear onto hooped tearaway that I marked with crosshairs to show the center.  I matched the center of the ear making sure it matched the paper printout's cross hairs.  I pinned the ear in place.


 I placed the hoop on the machine and added a piece of water soluble stabilizer (WSS) before stitching.  WSS is the filmy topper-style of stabilizer to keep the stitches from sinking into the pile.


Once the stitching was complete, I removed the hoop, removed the tearaway, and the WSS.  I wanted to be sure the ear would hang to best show the name so I folded the ear open and put in one stitch to keep the inside of the embroidered ear visible. I didn't want it to flop over.


I put the finished bunny in a metal bucket with an embroidered patch I adhered.  Directions for doing that are on my blog.  Click here.  


Method 2:  Opening the Ear to Hide the Backside of the Stitching
I was fine with the finished bunny I did above but really always prefer for the backside of my stitching to be hidden.  I was promised that it was much quicker to do than my imagination allowed me to believe so I tried it once and was hooked.  I will always do my bunny ears this way, in fact! These are my notes on doing one ear at-a-time as well as multiple ears on a single hoop.

First, like above, I printed the name from my Embrilliance Essentials software.  This font is from Itch2Stitch Magnolia Sky.  I used a pen to extend the crosshairs to go all the way to the edge of the basting box to aid in lining up later.  Adding a basting box makes it easier to hold the WSS in place. The corners of the box may stitch right off the edge onto the tearaway, but that will not be a problem at all.


I trim the the name so I can see it with the edges of the ear.  I also make of habit of marking left and right just to be sure it all goes as designed.


I use a seam ripper to open the ear, centering it based on the crosshairs on the printout, matching with the crosshairs I draw on the hooped tearaway.  (A ruler can help to match them up perfectly).


I remove the paper printout and pin the ear in place.


I place the hoop on the machine, add a piece of WSS, and stitch.


Once stitched, I remove the hoop and then remove the basting box.  I tore off the tearaway and pulled off the WSS.  A rubber-tipped tool (even an eraser will do) to help remove the WSS without adding water.


Next, I pinned the ear back together right sides together and used my regular sewing machine to stitch all but about 1" closest to the bunny's head.  I turned the ear through the hole to make it right side out.


 And the cool thing:  all the embroidery's wrong side is enclosed and the backside of the bunny ear is untouched...


...and the embroidery is pretty on the inside of the bunny ear!

 
To do more than one ear on a single hooping:
The key to this is the printout from the Embrilliance software to know exactly where to pin the ears!

I added the names to the screen, adding a basting box to each and printed off the design.  I actually made the names upside down (just to make it easier to get the bunnies on the left side of the machine.


I opened up the ears and found the centers of each.


I put a little tag on each bunny with the direction of the lettering and so that I wouldn't mix up which was which for each name.


I hooped with tearaway and marked the crosshairs on the tearaway.  I placed my printout under the hoop, matching crosshairs.


I used my lightbox to place the ears on the hoop, matching the crosshairs on the ear to the center of each name.  I made sure the name was not inside the seam allowance!


I added WSS and began the stitching.


Again, it was an easy process pinning the right sides together on each ear and stitching while leaving a hole to turn.  After turning the ears right side out, I had my finished bunnies.


I hope that these notes are helpful as you experiment on bunnies for the kids in your life!  I love how this turned inexpensive bunnies from Walmart and Kroger into custom toys!  To see my other embroidery projects, check out my Embroidery page, or click here.


Links to products mentioned in this post:
  • Stitchtopia Daphne font:  click here.
  • Embrilliance Essentials embroidery software:  click here.
  • Tutorial on making customized patches for Easter baskets and anything else:  click here.
  • Itch2Stitch Magnolia Sky font:  click here.


Monday, January 2, 2017

2016 Christmas Journal Completed (with tips for doing them fast!)


Happy New Year!  2016 was crazy and super busy but I have to admit it would not have been Christmas for me without doing my Christmas Journal, which I just finished.  I have been on a bit of a journey to make things easier and faster.  Last year, after Christmas, I went through all of our boxes of decorations and tossed the things we never use, labeled everything left, and made sure that all the boxes were properly filled and sealed.  That really helped this time around when I didn't feel like making the effort to decorate.  I will say that I probably would not have decorated except that I have a kid and she was adamant that the house would be in shape, decorated, and ready to go before her annual Christmas party she hostesses for her friends.  To make it seem doable, I bought a new tree-- prelit and only three pieces. What a nice change from the old tree that required every branch to be hung in place on a 6-part base before several strings of lights had to be painstakingly added.  Even my inner cheapness felt that the purchase was worth it. The 7' tree that I put in my daughter's room had been replaced the year before with a similar style so I knew with the ease of that one, that our big family tree would have to be replaced.

My need to make Christmas easier and less time consuming got filtered into my Christmas Journal as well.  I have been doing these since 2012.  I love Shimelle's Journal Your Christmas for this, not because I do all of her prompts every year, but because she reminds me daily to think of the Christmas season and what makes it special.  Her JYC is a program where you pay once and then get the daily prompts and tips (and even a forum to connect with other JRC-ers) every year after that too! They just start December 1 of each year unless you tell her to stop (which I can't imagine doing!) They continue until January 6 but I typically end my journal on the 25th to keep it from getting too fat. The journals became instantly important to me the first year I did one because it helped me to focus on the meaning of the season, what was important to me, what we were doing right then, my memories of Christmases past and wishes for Christmases in the future, and ways in which we change each year. My daughter who is 12 loves looking at past years' journals. I love that they are important to her too.


These are my previous journals that are here on my blog:

Since starting them, I have found that I don't have to journal every single day, although I like them best when I have time to do that.  I always try to include one photo of myself, a suggestion that I learned from another on-line scrapping class that reminded me that I was never in any of my albums! Now, I make sure that there is at least a selfie of me and it has been fun to see how I change too and to know that I am in these memories as well as my fabulous family.  This is the kind of thing that I think will be important for the future.  I include a one page calendar so that the month is easy to see at a glance and to help with organizing when I get behind on doing pages for the book.  (I get them every year from a blog called A Stitch In Time.)  I include a CD of all the photos I took the whole season, not just the ones that made the journal.  (That is my expectation that someone will want to see the photos I decided not to include!)  I stick our ever-dwindling stack of received Christmas cards in the journal so that I can remember those and keep them.

This year, to make my Christmas Journal fast to do, I didn't worry about doing an entry for every day.  I just focused on what I wanted to include.  I take photos of everything all the time with my phone so there's always something to use.  I bought a small binder and protective pages from Staples instead of making my own pages and binding it myself.  I bought numbers, dimensional stickers, and envelopes from Michael's instead of making my own.  I bought one coordinated Christmas paper pack so I wouldn't have to worry about making sure it went together.

I used my embroidery machine to create a one-color (mostly) merged design using my embroidery software, Embrilliance.  I was able to set it up and go do other things with only one small and fast color change near the end. In this way, my cover sort of made itself.


The embroidery files I used for my cover were:  tree - Urban Threads, 2016 - Stitchtopia, tiny font used for the text Christmas Journal - Lisa Shaw's free Tiny font.

I printed out my embroidery design and used it with my lightbox to cut a paper border from the cover.


I pre-made a bunch of identical tags for journaling.  I used my Cricut Expression without software. For you dinosaurs like me that occasionally enjoy using your Cricut like a punch (cartridges and no software), my tags were from the discontinued Holiday Frames and Tags (a Creative Memories cart that you collectors like me will have) on page 42.


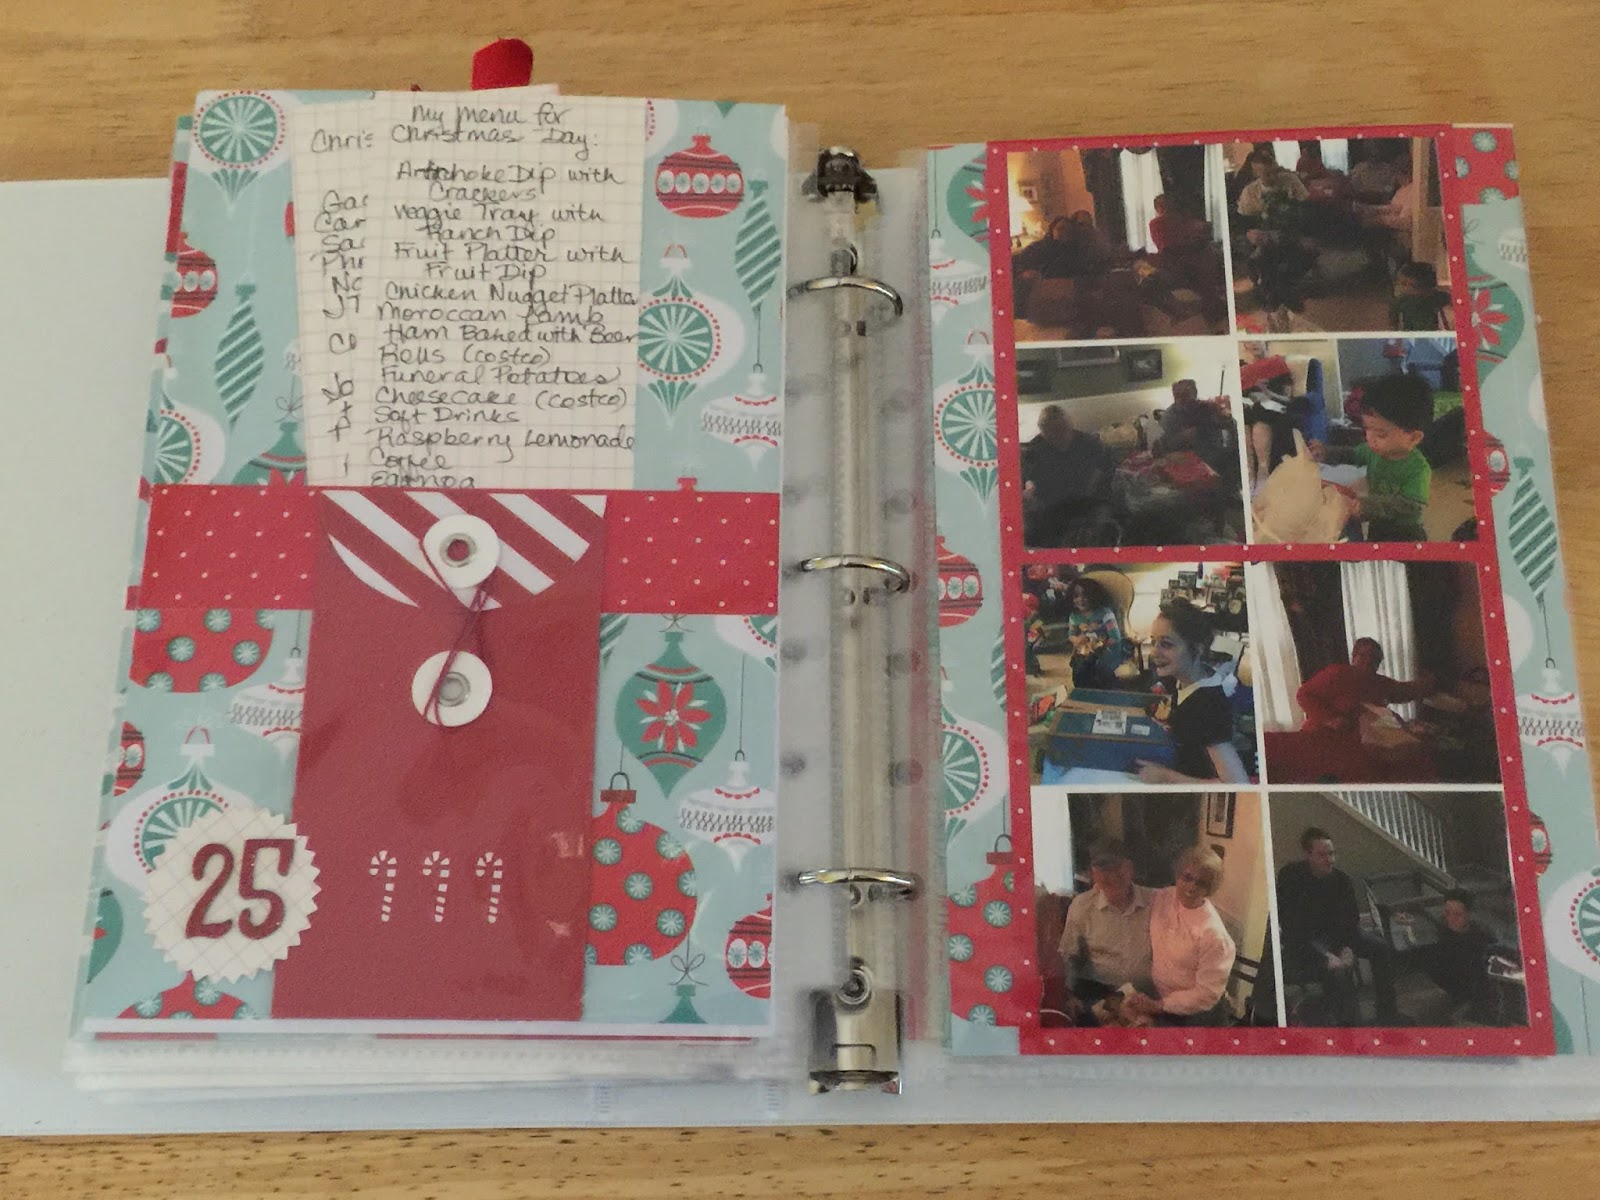
These are the inside pages of my 2016 Christmas Journal.

This year's calendar went right in the front.  I picked one from the free Stitch In Time printables that matched my paper pad.

On days that were true to the date, I added numbers.  I only did this for a few of my pages this year. I made journaling pockets for my tags using the photos. Using ribbon on the tags makes them easy to remove from the sheet protectors.

We did all our Angel Tree buying and stitching before December on Black Friday but it is an important thing to us that really makes it feel like Christmas so I include it.


For the first time ever, a cultural icon was included.  My daughter and I listen to the OCR of Hamilton or the Mixtape almost daily so it seemed appropriate to include. I used fan art that I found on line and saved as a screenshot on my phone.

I always make sure that I include one picture of myself so that I am part of the narrative (you Hamilton fans will get appreciate the choice of words there.)

I didn't do my own manifesto this year, and I didn't put it up front.  I found something to take its place though that I thought was fitting.  Another time saver for me and probably more meaningful.

This season was also overshadowed with political stuff for me.  I allowed it in my journal this year.  Another first.  I think ignoring what is most on your mind and in your heart is a mistake.  Including it will make it more poignant when looking back once this becomes a "past journal."  Some of the journaling is a bit hidden, as it is on other pages as well.      

Our date night for our anniversary was cut short due to a sick kiddo we had to pick up so I put our wedding photo in a phone app to make it different from the original.  I wanted to commemorate it even though I hadn't taken any photos of the evening.


My daughter got braces on this day.  I didn't journal it.  The picture said it all to me.

I used photo collages using phone apps to allow me to get lots of photos on single pages.  In past years, I have cut them apart just to have tiny photos in my journal, especially when my pages were tiny.  I had all my photos printed at Walgreen's every few days this year.  I just worked picking them up into my errand-running.  

I always like to add a page about Santa-- what my daughter wanted, what she got, what it looked like.  She "knows" now but I still have fun with this.  

I didn't add recipes this year but did still find ways to "hide" thoughts that I wanted to keep a little out of the way.  

Instead of a letter to my future self, I answered these questions posted by someone I follow on Facebook:
What did you create this year that you’re most proud of?
What did you invest in that’s most aligned with your destiny?
How can you respond to your setbacks & losses from this year so as to use them to fuel your vision for 2017?
What is no longer serving you? What are the patterns, relationships, structures, old beliefs or anything else in the way of your destiny?
Who do you need to forgive and what do you need to let go of to be free to shine your light in even greater ways?
What can you commit to in 2017 that will most support you to becoming the [person] you came here to be?
What is the most powerful intention you can set for 2017 that’s most aligned with the greatness of your soul and the needs of the world?

Christmas cards received this year (like this one from my mom) are in the back.

I embroidered my cover using fabric and thread to match the papers inside.  To the embroidery, I added a paper frame and added the same paper on the spine.
And now,  I did attempt a little video to show all my journals along with tips to make them fast. This is why I don't do videos very often.  Ha! You will notice my cover for this year's journal had an upgrade after I made the video.


Quick List of Links from This Blog Post (none of these are affilitate links):

I hope you will try your hand at a Christmas Journal or, even better, that you are preparing to thumb through your completed (or soon to be completed) journal!  Best wishes for a creative, happy, and peace-filled 2017.  

But wait! There's more! Click 'older posts' above!

But wait!  There's more!  Click 'older posts' above!