Welcome to the Holly Jolly Blog Hop! I hope you have enjoyed all the wonderful crafty inspiration! This is the last stop so thank you for making your way here!
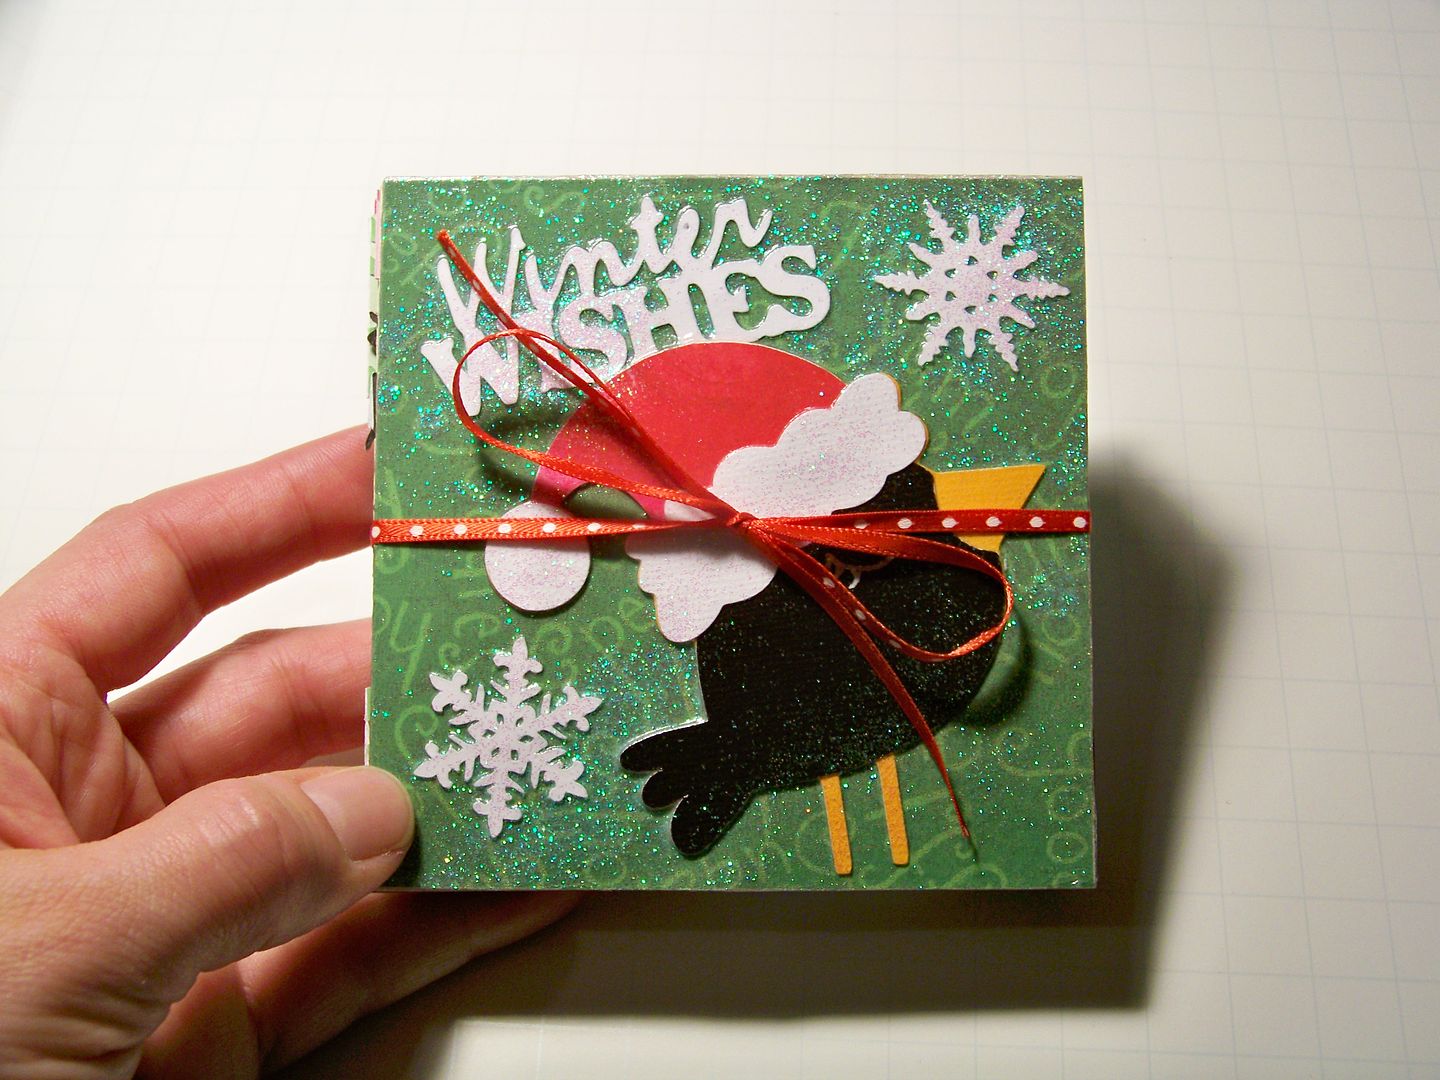
My project is a book in the style of an accordion mini album with a twist! This book features five pages with windows that pop out for dimensional scenes! I saw this kind of mini book about a month ago and I figured out how to make it. I created a Christmas one using my Cricut! I have made a complete tutorial that I made as I was learning how to do this! First, take a look at the Christmas book I made...


This is the back cover...

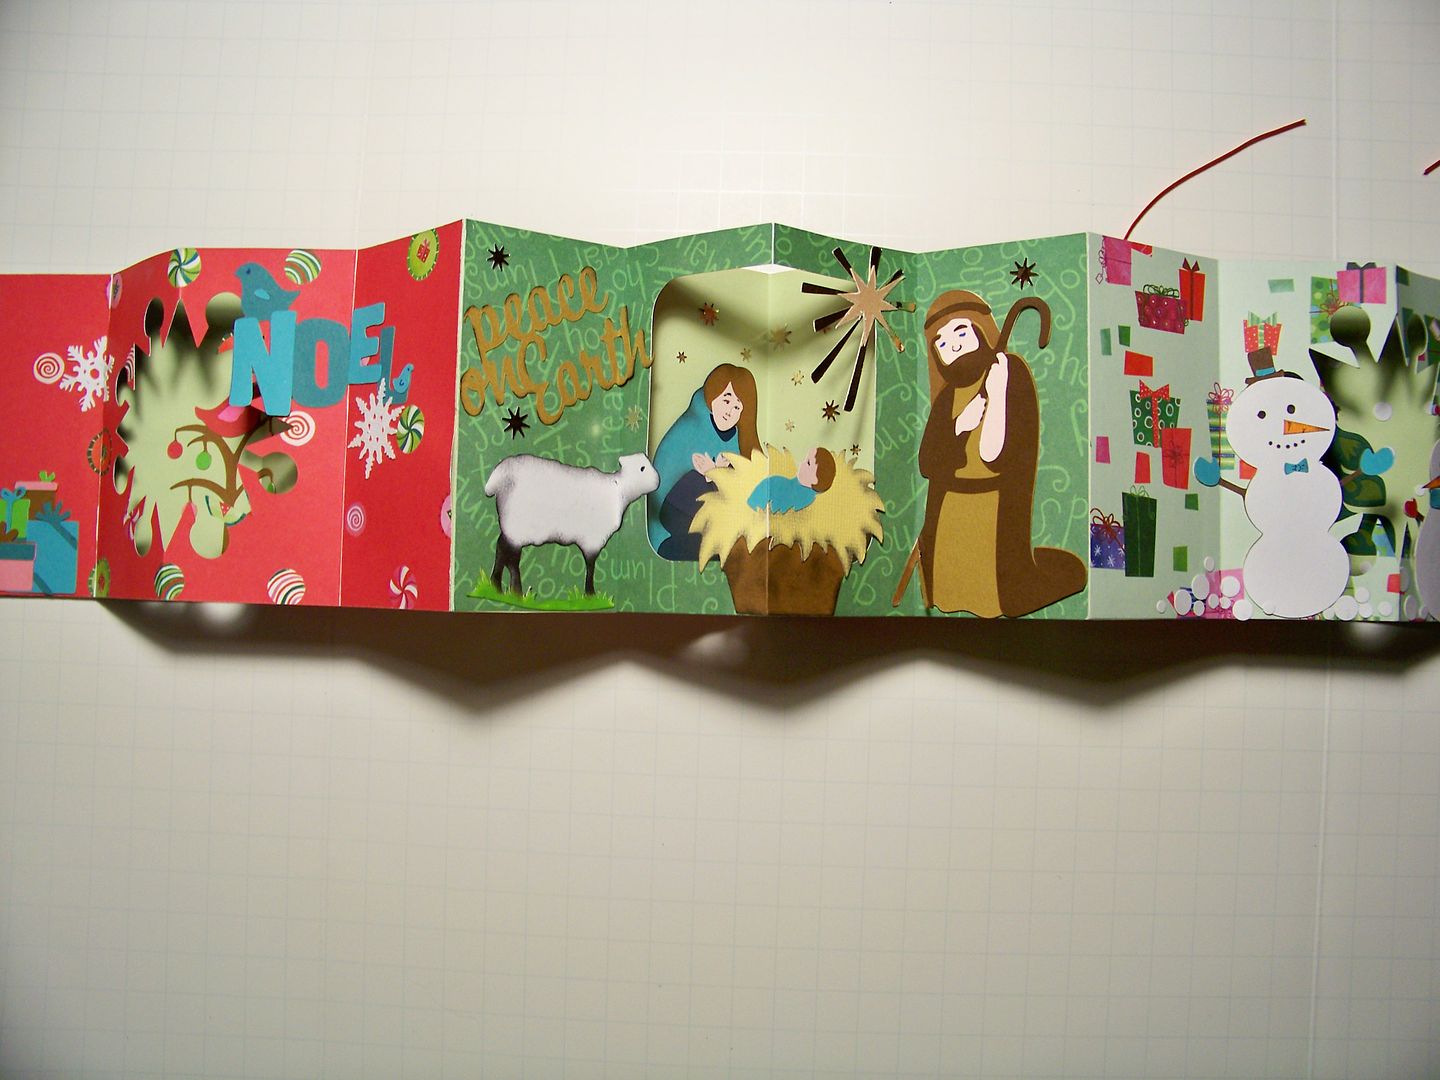
When you stretch it out, it looks like this...
Flipped over, the back looks like this-- the covers end up being part of the overall design on this side...

As I created my Christmas book, I realized that this project is a perfect one to pull out a paper stack and one cartridge and instantly have coordinating cuts and papers! I would love to do a book of nothing but cuts from the Art Deco cartridge for instance! It would also be a perfect project to use Imagine printed and cut shapes to avoid the layering! I learned so much doing this project-- and it was a REAL challenge for me to avoid adding texture and dimension to my die cuts!! This would be easy to mail and perfect for a little mantel decor or tablescape. And guess what? I used my stash for this entire project! (Thanks, MamaC!) OK... on to the tutorial...
Before I made my Christmas book, I made a mock-up book to figure it out. That is what I have used here to illustrate the process!
Note: For both the mock-up and for my finished book, I used my Cricut Expression. Measurements can be slightly different for the Imagine and the E2.
Step 1: Cut a strip that is 24" x 4". This is your base. Score this at every 4", flipping after each score so that you alternate which side you do the scoring on. I use an Xacto knife to score with to get a very clean, unbulky fold. Once scored, fold it accordion style. (The insides of your scenes will be this paper unless you choose to cut 4" x 4" squares -scored like the base- to adhere over the base. For my finished book, I decided to keep the base color behind my windows for continuity since my scenes were all so different.)

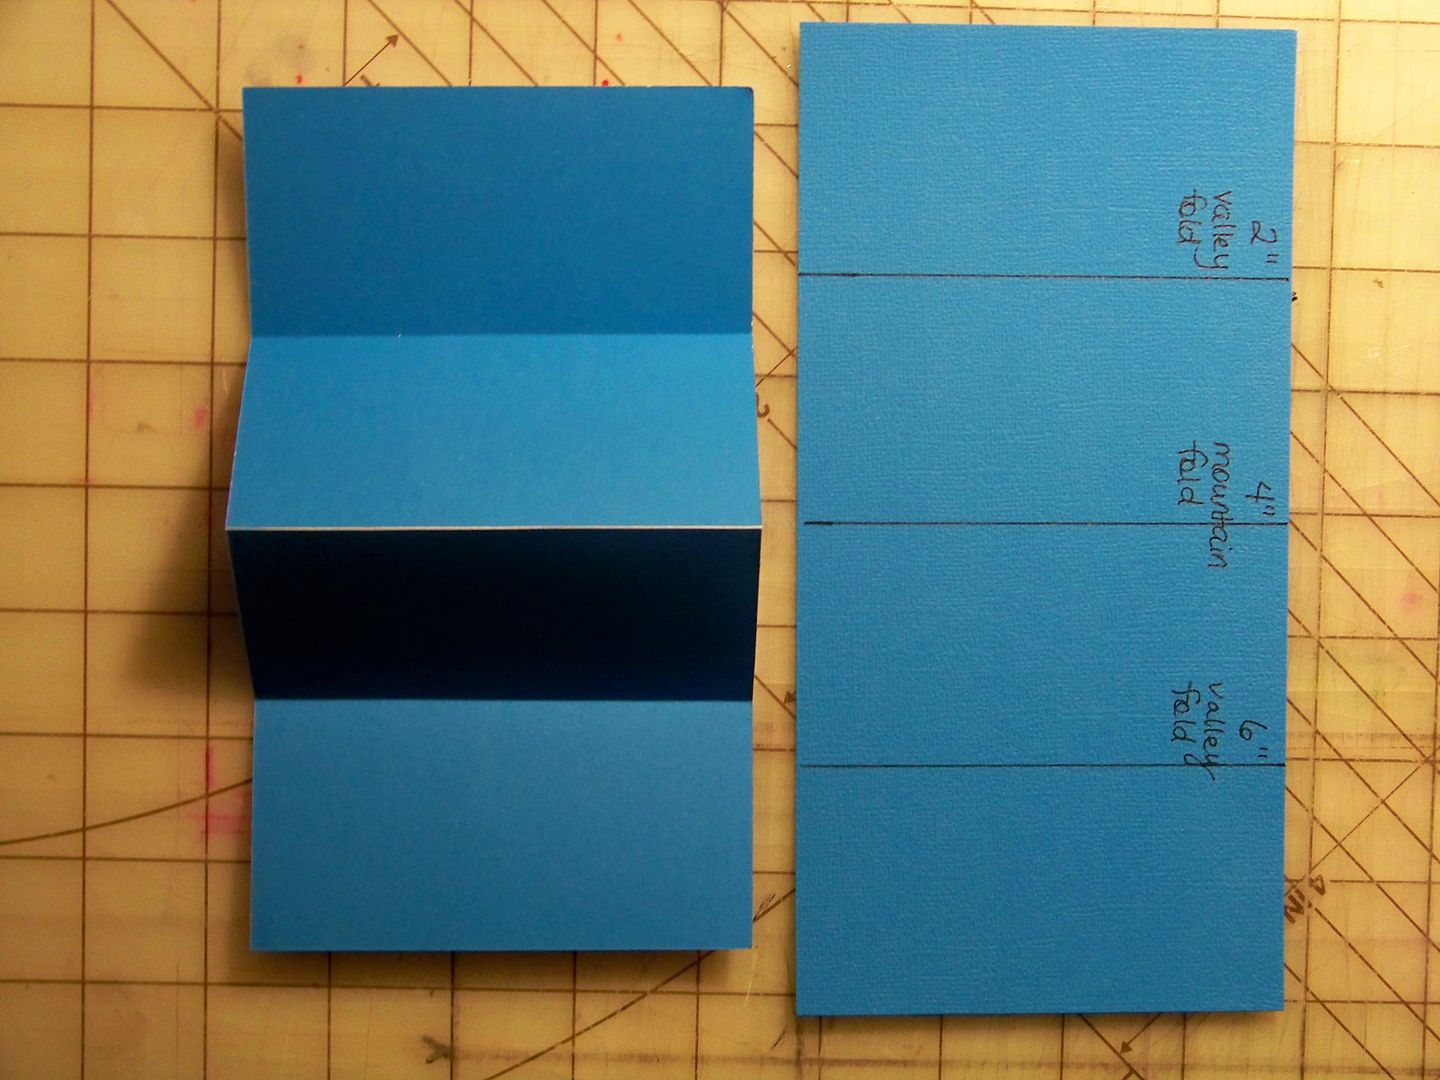
Step 2: Cut five 8" x 4" papers. These will be the pages that fold toward you and will create windows! Score these in the following manner: Create a valley fold at 2", a mountain fold at 4", a valley fold at 6". (For me, using my Xacto knife to score, I flip the book over and cut in my score line on the back at 2", then I flip it back over so the right side is up and score at 4". Then I turn it back over and score at 6".)
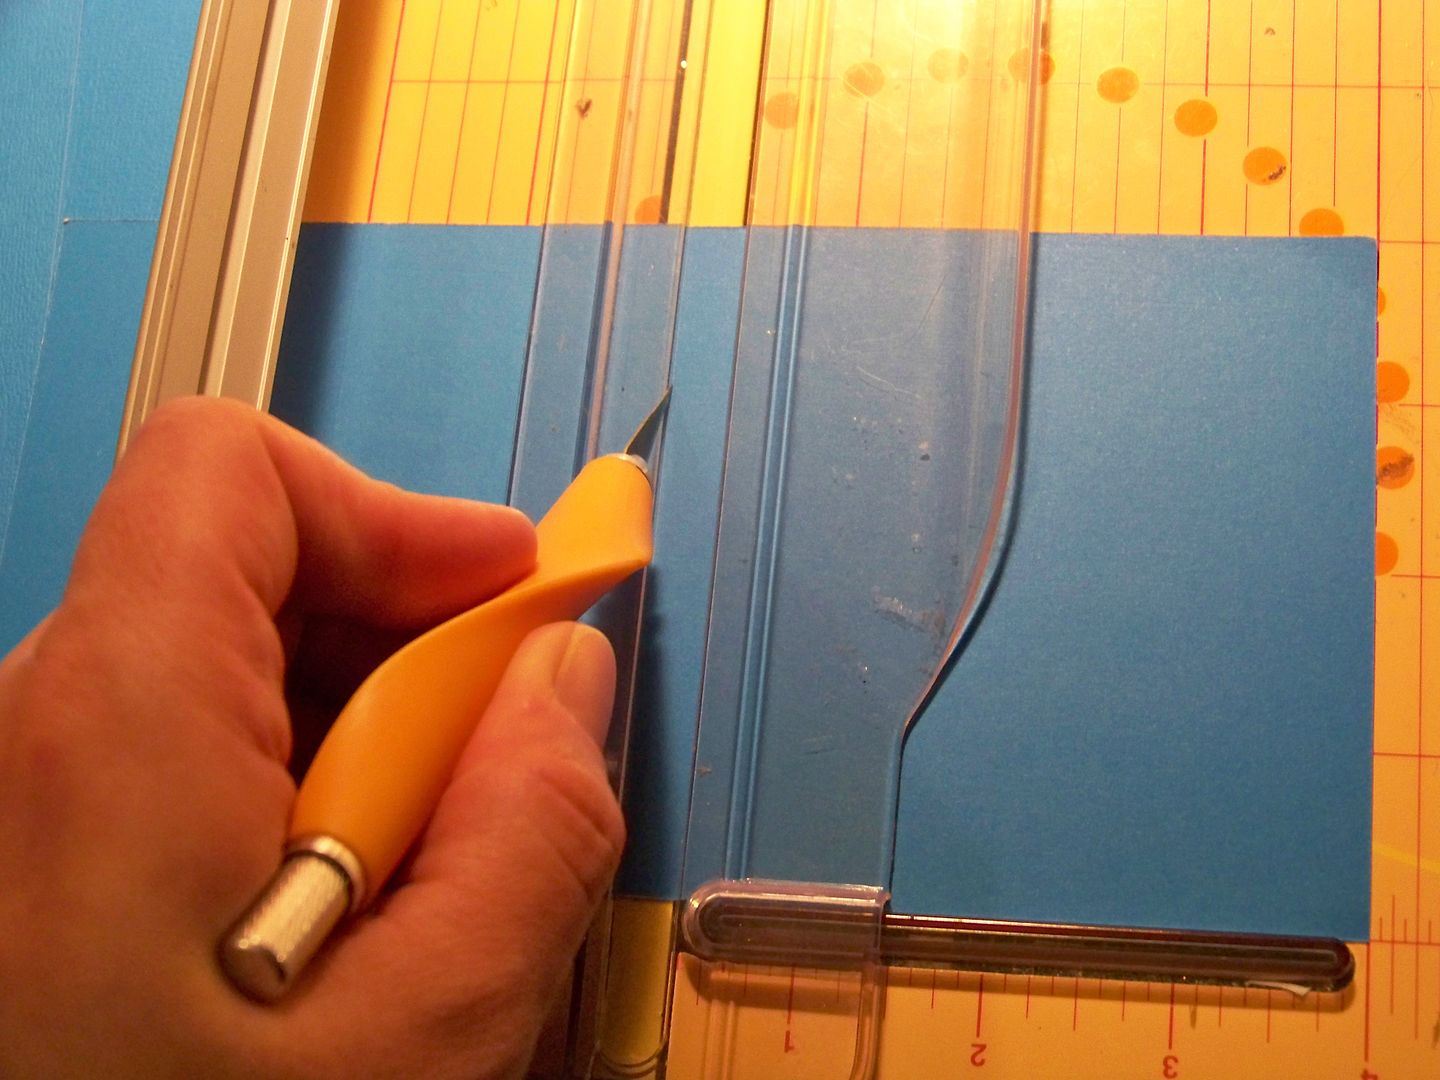
I like to score by lightly cutting into the cardstock with an Xacto knife. I use my trimmer's guide to keep it straight. For this book, I found that the Xacto knife way of scoring created much sharper folds, something very important as you add layered die cuts to embellish it with later!
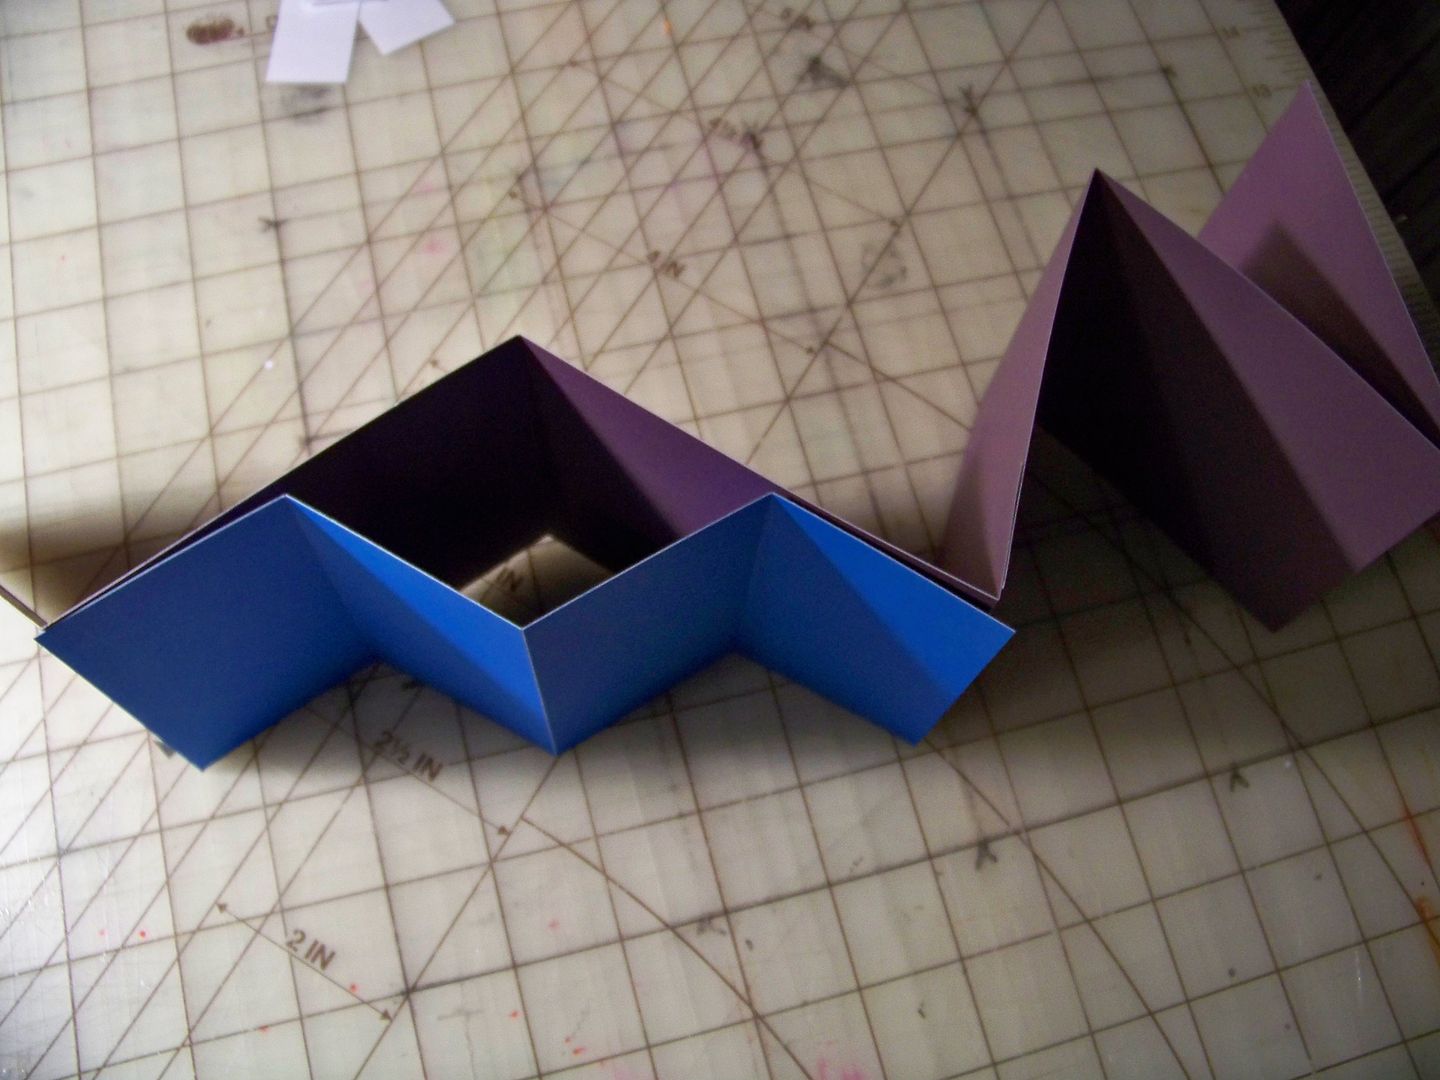
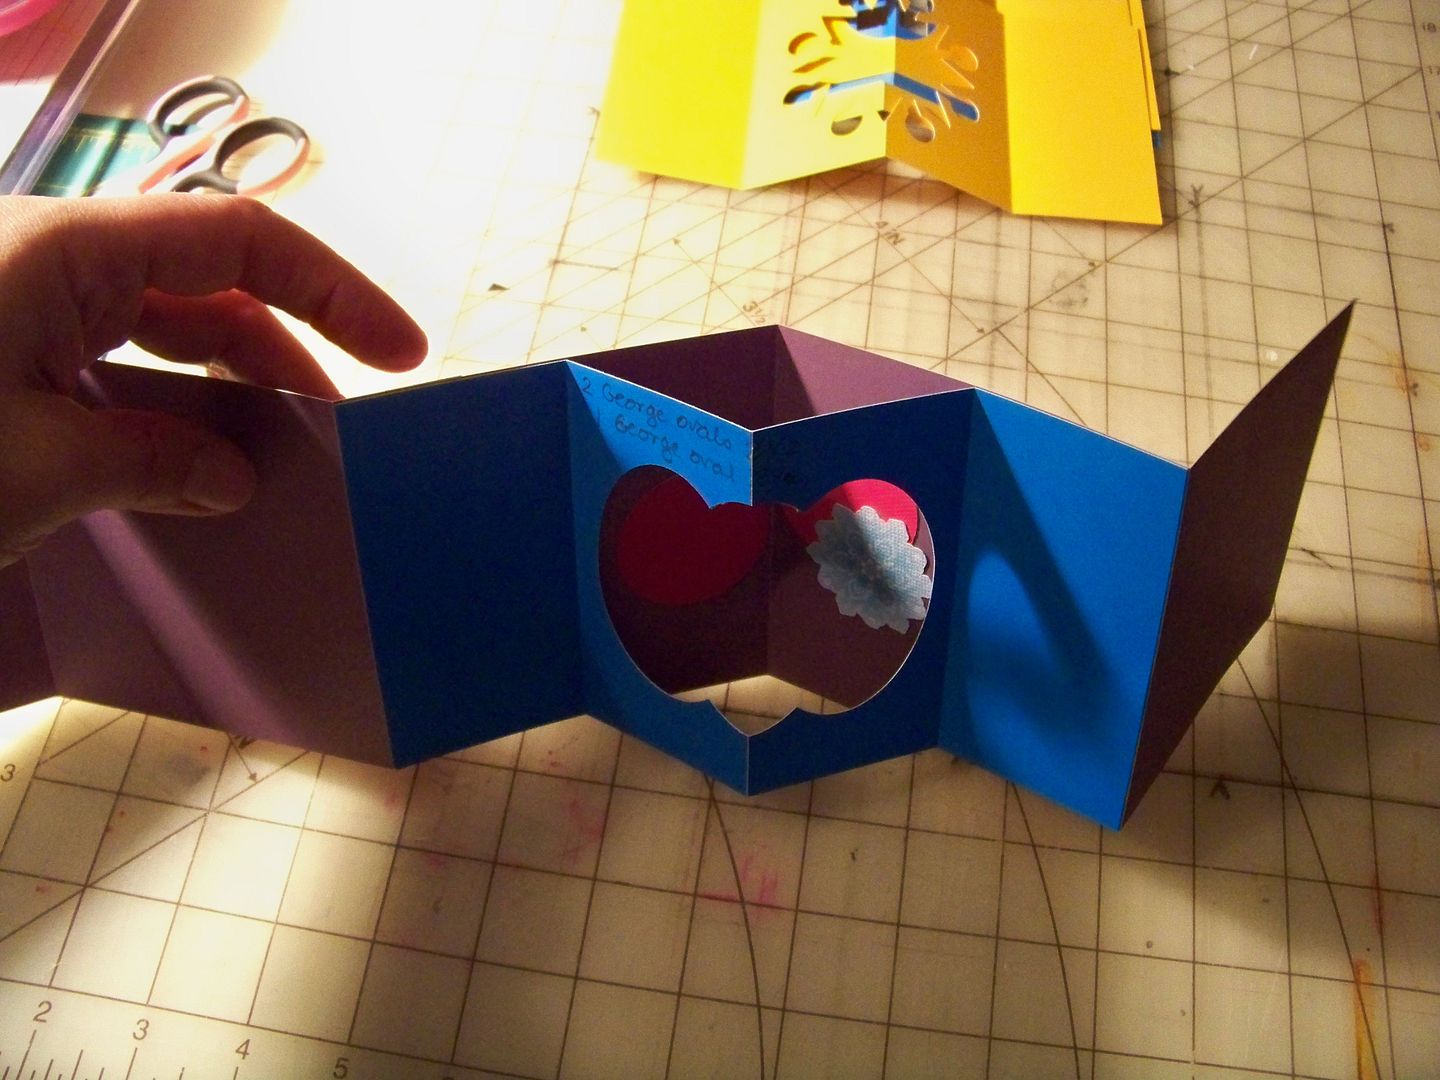
Here, you can see how it will fit to the base. Remember the purple base's valley fold is directly behind the blue page's mountain fold!
Step 3: Cut two 4" x 4" covers. The cover can be covered chipboard or just pieces of card stock. You could use almost anything for the covers-- even fabric-covered board, metal, or wood.
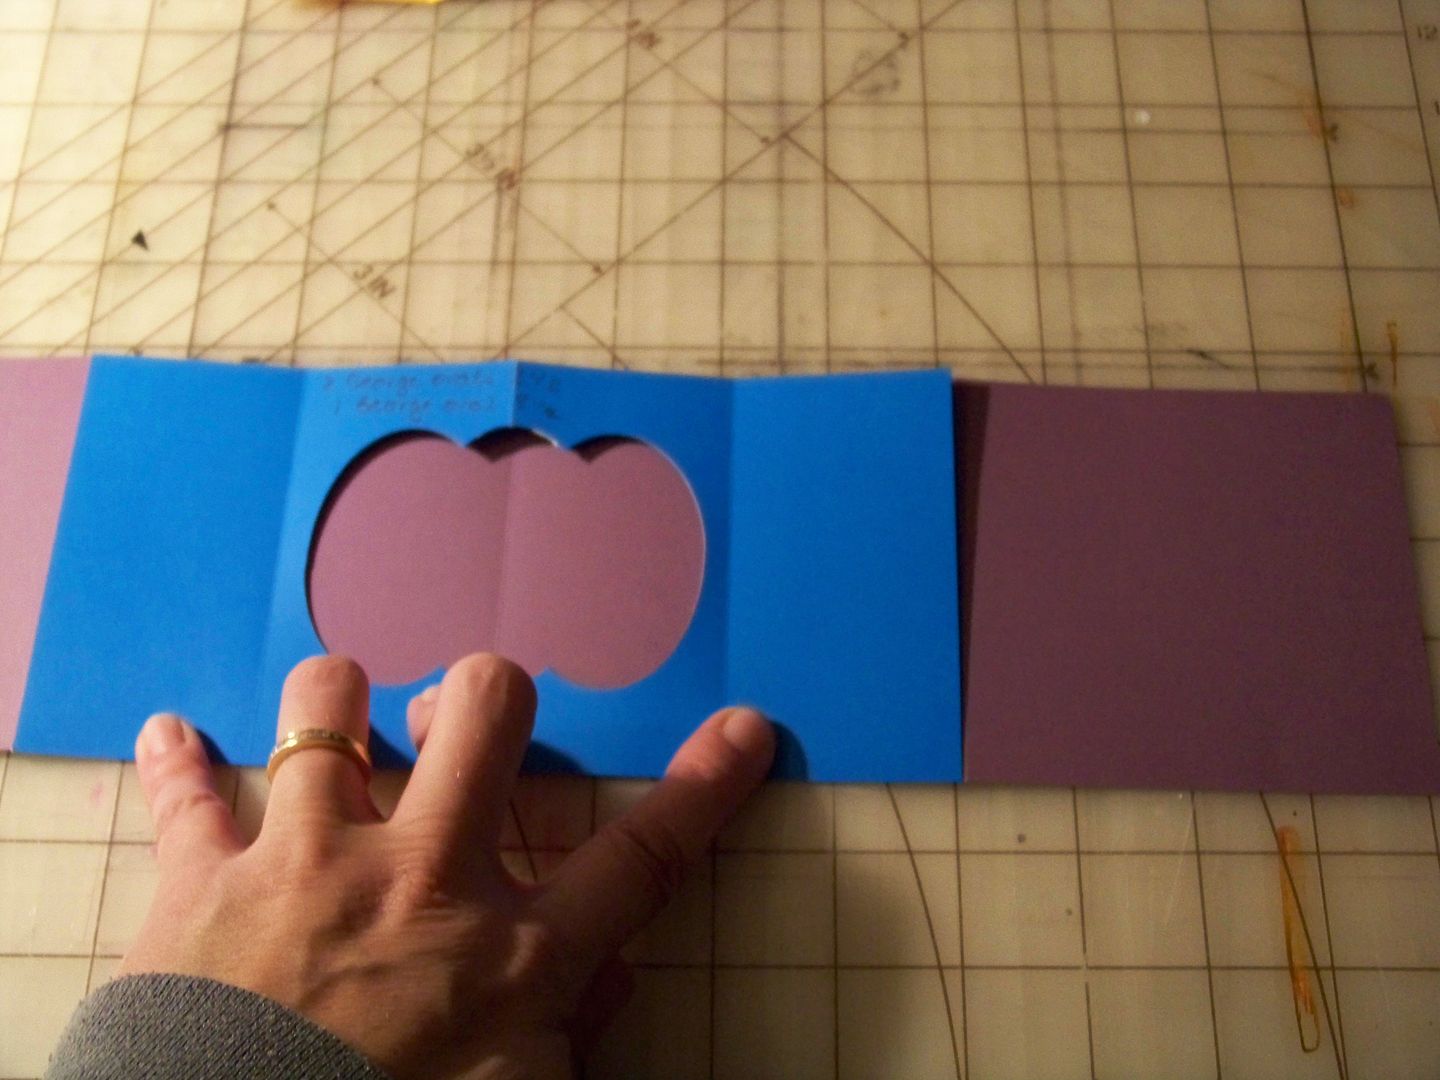
Step 4: Pick out a simple shape on a cartridge to create your window. (I tried lots of different ones on my mock-up as I was trying to figure out what I wanted for my final project's windows. There are endless options-- just keep the shapes simple and cut big enough to see through!) Use the Centerpoint feature on the Cricut to cut a window in the center of the mountain fold.
Step 5: Adhere the pages to the base by taping the 2" flaps on each side of the page with ATG tape. This will leave the center 4", that includes the cut-out, unglued and free to move! Notice that the center fold of the blue page is mountain fold; the fold under it on the purple base is a valley fold. This is key. You can add your embellishments here, before adhering the pages to the base or you can add them at step 7. The huge benefit to adding them here is that you can ensure that you get everything perfectly flat. Remember that anything you add here must be scored exactly like any fold it covers! For both my mock-up and for my final book, I chose to wait and add to each scene like decorating a room, after the pages were adhered.
After all the pages are adhered, it looks like this...

Step 6: On one end, adhere a 10" piece of ribbon on each side to make the tie. Adhere one cover on top, sandwiching the ribbon in between the end and cover on that end. On the other end, adhere a cover to the end, without ribbon. I used Terrifically Tacky Tape to adhere the covers to the ends of the book.

Step 7: Add embellishments to each page, remembering that anything that is placed over a score, must be scored. I found that multi-layered die cuts must be scored with an Xacto knife, not a bone folder! They are just too bulky and require the cutting to force the shape to fold as flat as possible. I learned that Scotch Quick Dry Glue creates brittle layered cuts. Scotch Scrapbookers Glue was much more flexible and less prone to "breaking" the paper at the score lines!!!

This is the back cover...
When you stretch it out, it looks like this...
Flipped over, the back looks like this-- the covers end up being part of the overall design on this side...
As I created my Christmas book, I realized that this project is a perfect one to pull out a paper stack and one cartridge and instantly have coordinating cuts and papers! I would love to do a book of nothing but cuts from the Art Deco cartridge for instance! It would also be a perfect project to use Imagine printed and cut shapes to avoid the layering! I learned so much doing this project-- and it was a REAL challenge for me to avoid adding texture and dimension to my die cuts!! This would be easy to mail and perfect for a little mantel decor or tablescape. And guess what? I used my stash for this entire project! (Thanks, MamaC!) OK... on to the tutorial...
Before I made my Christmas book, I made a mock-up book to figure it out. That is what I have used here to illustrate the process!
Note: For both the mock-up and for my finished book, I used my Cricut Expression. Measurements can be slightly different for the Imagine and the E2.
Step 1: Cut a strip that is 24" x 4". This is your base. Score this at every 4", flipping after each score so that you alternate which side you do the scoring on. I use an Xacto knife to score with to get a very clean, unbulky fold. Once scored, fold it accordion style. (The insides of your scenes will be this paper unless you choose to cut 4" x 4" squares -scored like the base- to adhere over the base. For my finished book, I decided to keep the base color behind my windows for continuity since my scenes were all so different.)
Step 2: Cut five 8" x 4" papers. These will be the pages that fold toward you and will create windows! Score these in the following manner: Create a valley fold at 2", a mountain fold at 4", a valley fold at 6". (For me, using my Xacto knife to score, I flip the book over and cut in my score line on the back at 2", then I flip it back over so the right side is up and score at 4". Then I turn it back over and score at 6".)
I like to score by lightly cutting into the cardstock with an Xacto knife. I use my trimmer's guide to keep it straight. For this book, I found that the Xacto knife way of scoring created much sharper folds, something very important as you add layered die cuts to embellish it with later!
Step 3: Cut two 4" x 4" covers. The cover can be covered chipboard or just pieces of card stock. You could use almost anything for the covers-- even fabric-covered board, metal, or wood.
Step 4: Pick out a simple shape on a cartridge to create your window. (I tried lots of different ones on my mock-up as I was trying to figure out what I wanted for my final project's windows. There are endless options-- just keep the shapes simple and cut big enough to see through!) Use the Centerpoint feature on the Cricut to cut a window in the center of the mountain fold.
 |
| This was cut from Accent Essentials, page 44, at 3". |
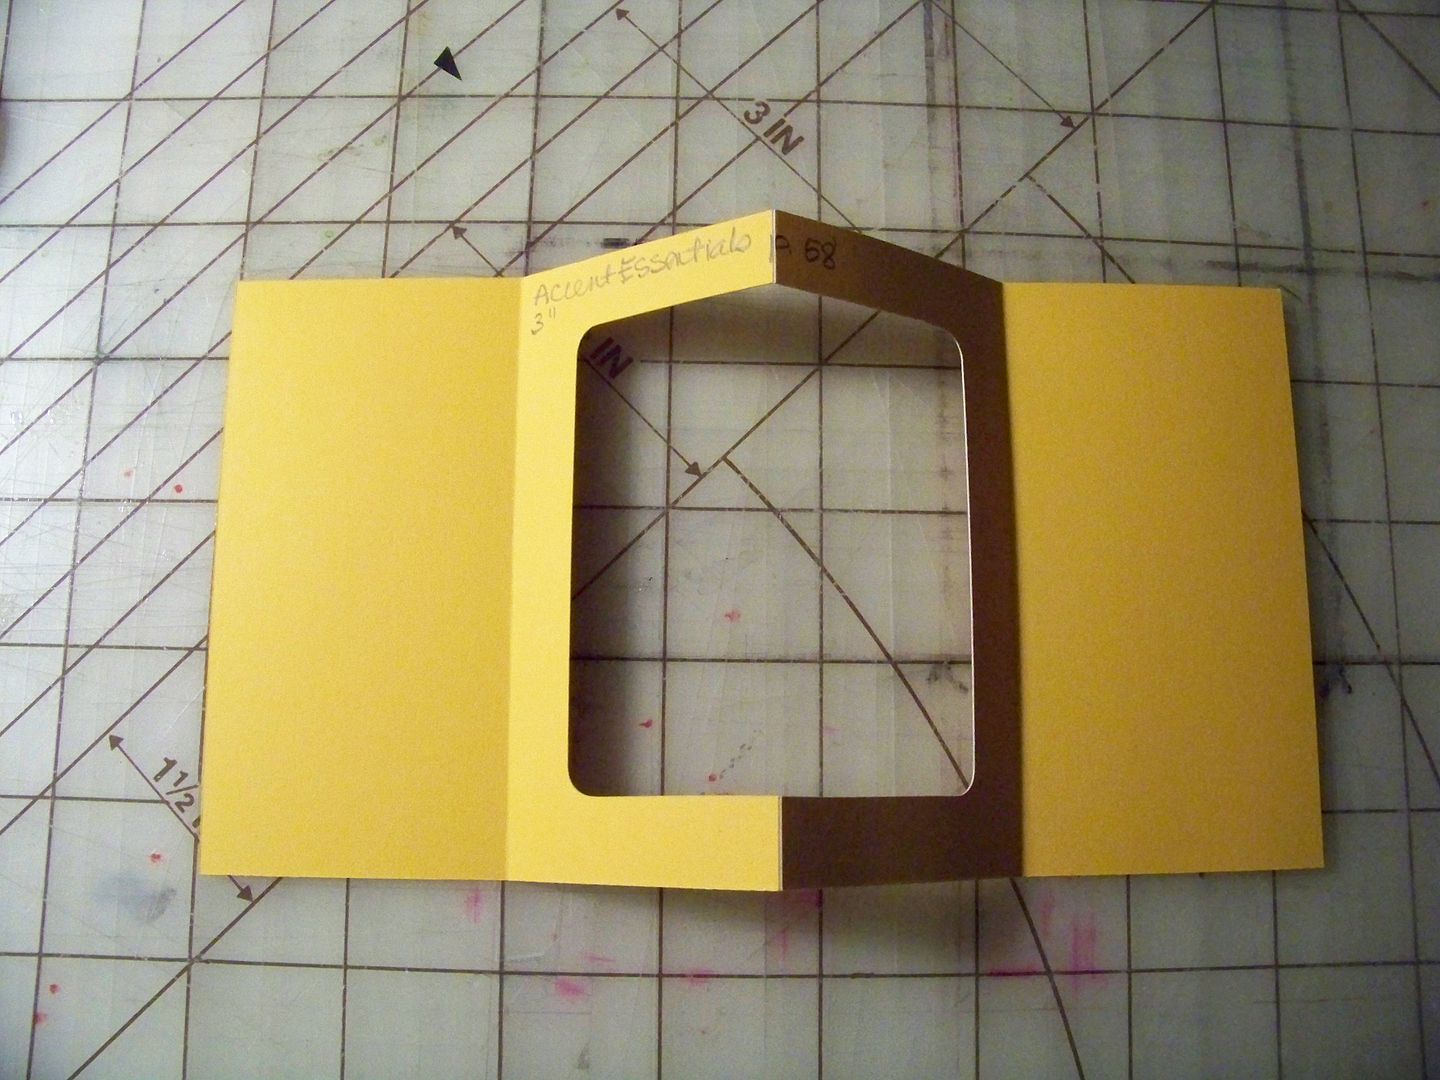 |
| This was cut from Accent Essentials, page 58, at 3". |
 |
| This was cut from George (the oval) at 2-1/2". |
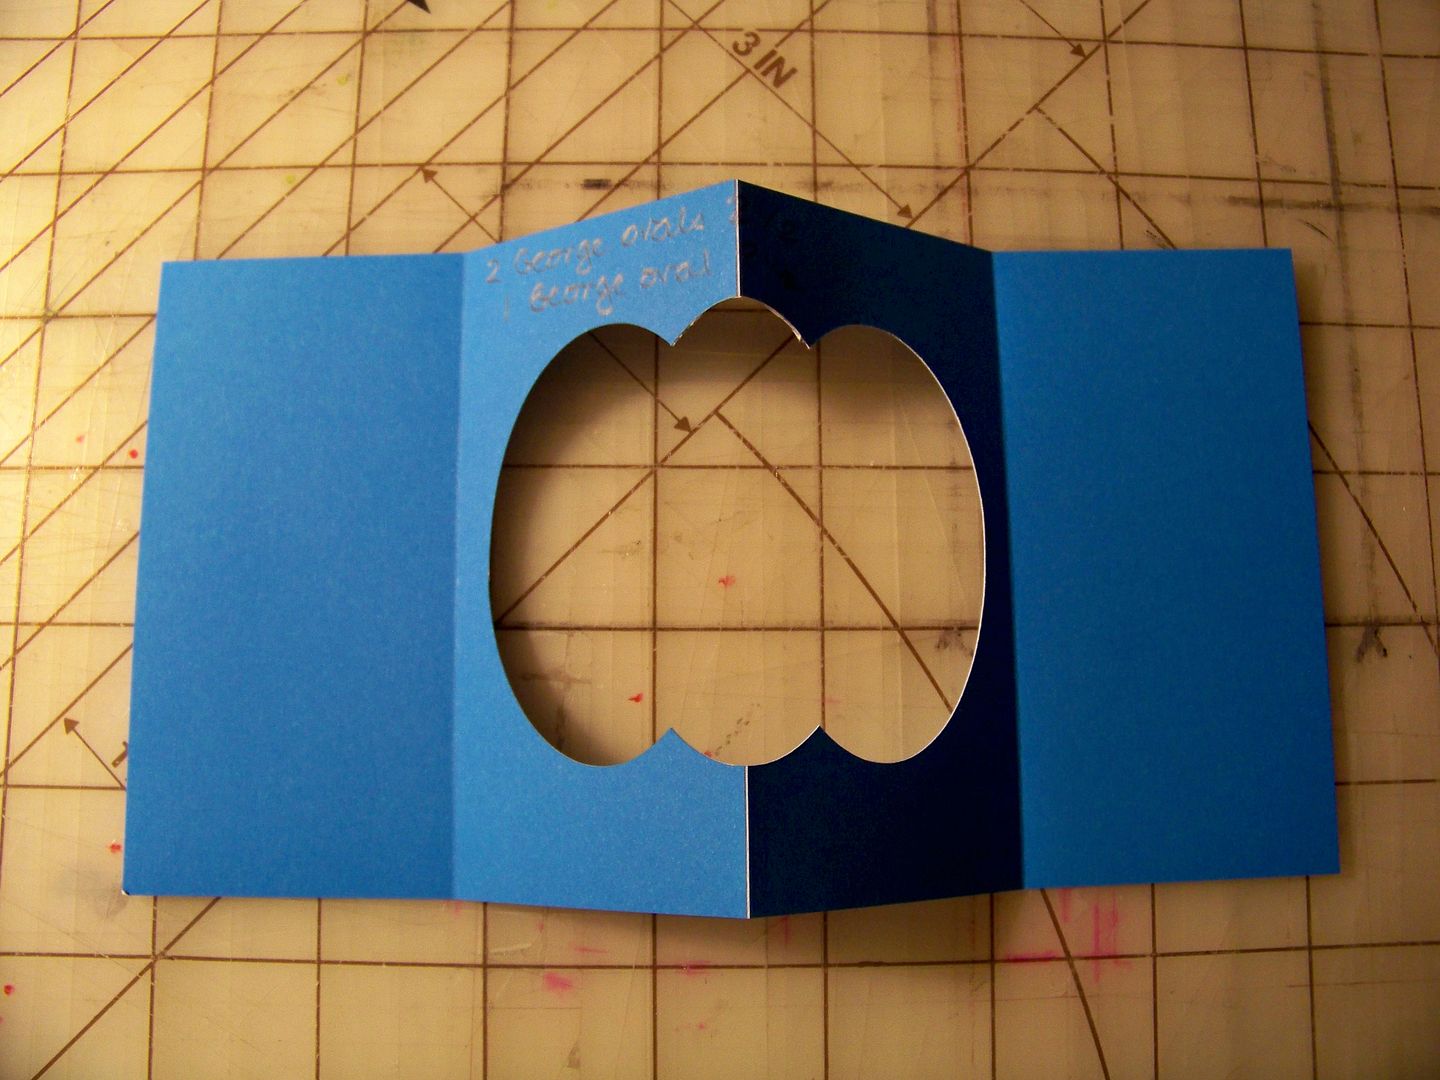 |
| For this cut, I entered two ovals (same as above at 2-1/2"). The blade went back to the center. Then I entered one oval at that size and re-cut. This is the result. |
 |
| This was cut from French Manor, page 36, at 3". This was the layer cut. I never used this one for my final project, but I definitely would enlarge it if it were used for the next one! |
Step 5: Adhere the pages to the base by taping the 2" flaps on each side of the page with ATG tape. This will leave the center 4", that includes the cut-out, unglued and free to move! Notice that the center fold of the blue page is mountain fold; the fold under it on the purple base is a valley fold. This is key. You can add your embellishments here, before adhering the pages to the base or you can add them at step 7. The huge benefit to adding them here is that you can ensure that you get everything perfectly flat. Remember that anything you add here must be scored exactly like any fold it covers! For both my mock-up and for my final book, I chose to wait and add to each scene like decorating a room, after the pages were adhered.
After all the pages are adhered, it looks like this...
Step 6: On one end, adhere a 10" piece of ribbon on each side to make the tie. Adhere one cover on top, sandwiching the ribbon in between the end and cover on that end. On the other end, adhere a cover to the end, without ribbon. I used Terrifically Tacky Tape to adhere the covers to the ends of the book.
Step 7: Add embellishments to each page, remembering that anything that is placed over a score, must be scored. I found that multi-layered die cuts must be scored with an Xacto knife, not a bone folder! They are just too bulky and require the cutting to force the shape to fold as flat as possible. I learned that Scotch Quick Dry Glue creates brittle layered cuts. Scotch Scrapbookers Glue was much more flexible and less prone to "breaking" the paper at the score lines!!!
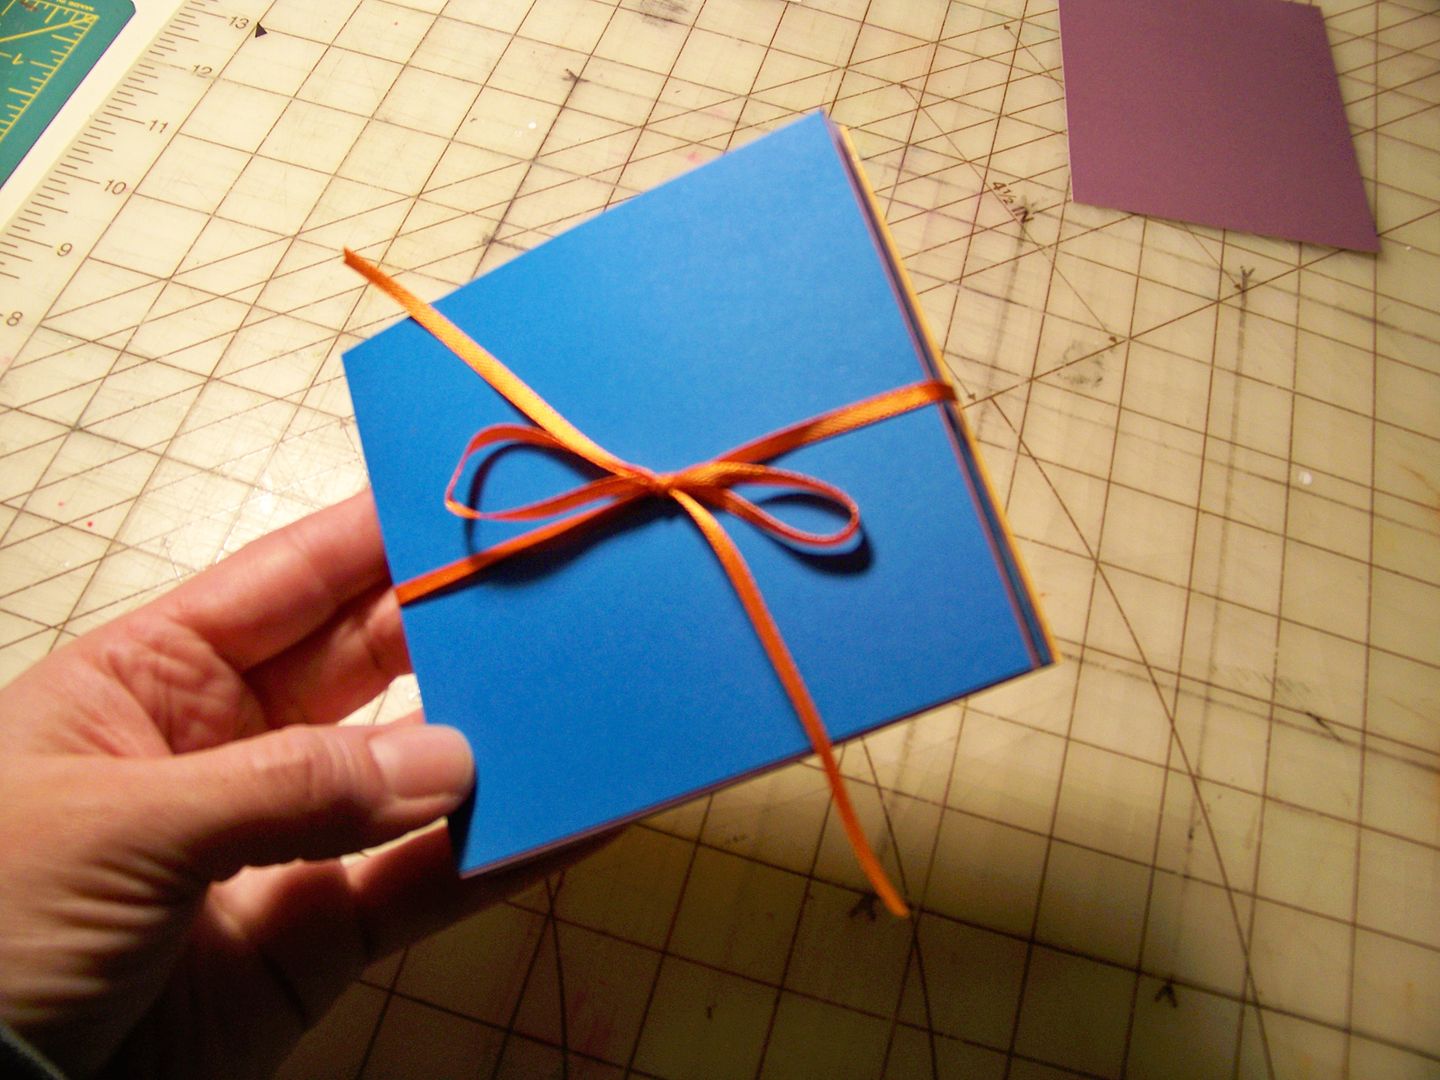
Step 8: Fold up. Hold the book so that the end with ribbons is on the bottom. Bring the ribbons up and tie the book closed.
Crafty Details for Christmas Pop-Up Accordian Book:
After I figured it out, I created my Christmas one! You know I don't believe in re-inventing the wheel, so these are my cut sizes for the final book:
My base was pale green. I used a 12x24 paper pad so that I wouldn't have any extra seams. Just like the tutorial, it was cut to 4" x 24". My pages were all different prints at 4" x 8". My cut outs were the rounded square on George (page 111) cut at 3" and the snowflake on Accent Essentials (page 44) cut at 3".
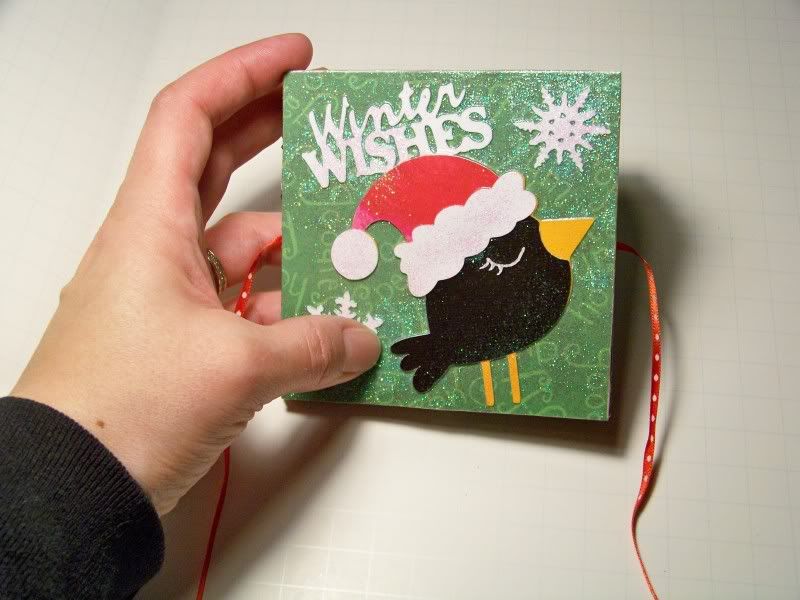
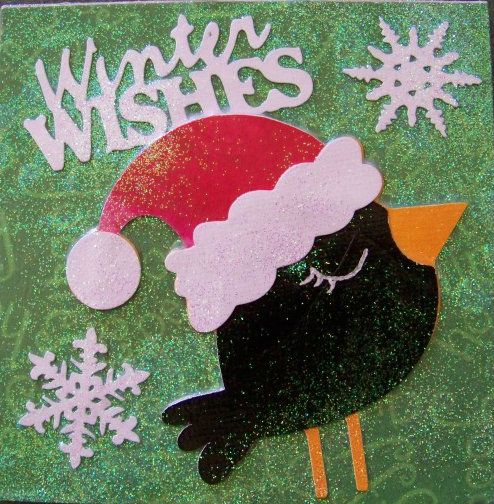 For the front cover, just like the tutorial, the base for the cover was cut at 4" x 4". The bird was cut from Jolly Holidays at 3". The text was cut from the same cartridge, at 1". The snowflakes were cut from December 25th at 1".
I adhered the base of the cover to chipboard with Mod Podge (glossy). I added the cuts and more layers of Mod Podge. I added glitter to the top coating of Mod Podge while it was still wet. For the back cover, I applied the glitter differently so see if there was a difference in the finished project. (The answer: no difference visually but the back cover, is smoother).
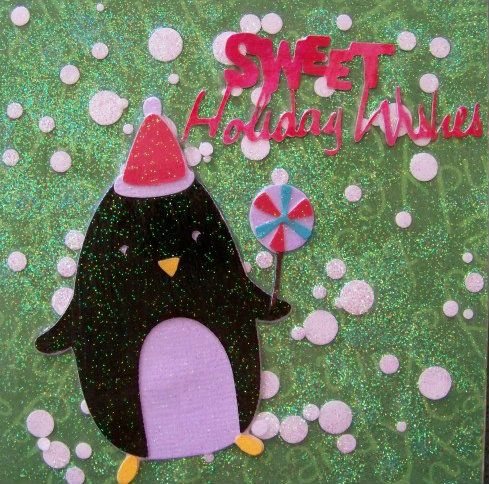
For the back cover, the penguin was cut from Winter Frolic (page 57) at 3". The Phrase was cut from the same cartridge and page at 1".
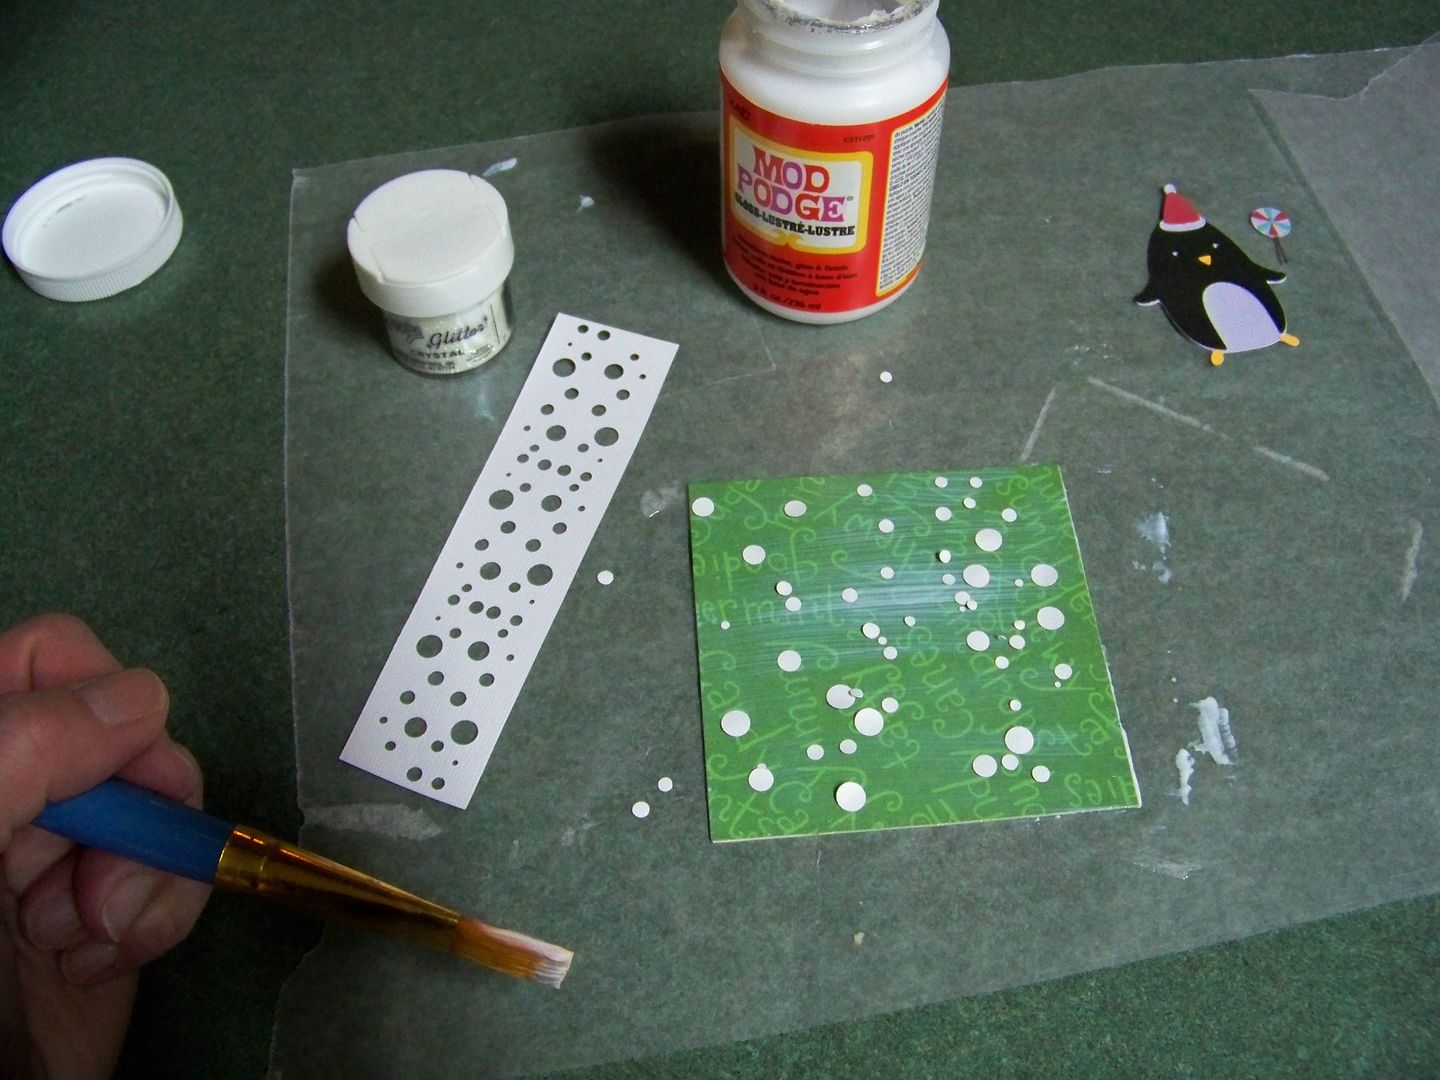
I cut the snow (circles) by using an edge punch. I applied the Mod Podge, then the base paper. Then I applied more Mod Podge and applied the snow circles. More Mod Podge, then glitter. More Mod Podge (be sure to scoop out Mod Podge from the jar when you get to this part so your brush won't infect the whole jar with glitter!), then the cuts. I topped it with a couple of layers of Mod Podge. (I allowed the Mod Podge to dry completely between layers of course-- in case you were wondering.) By using this technique, I had nice, sturdy covers with materials that I had on hand.

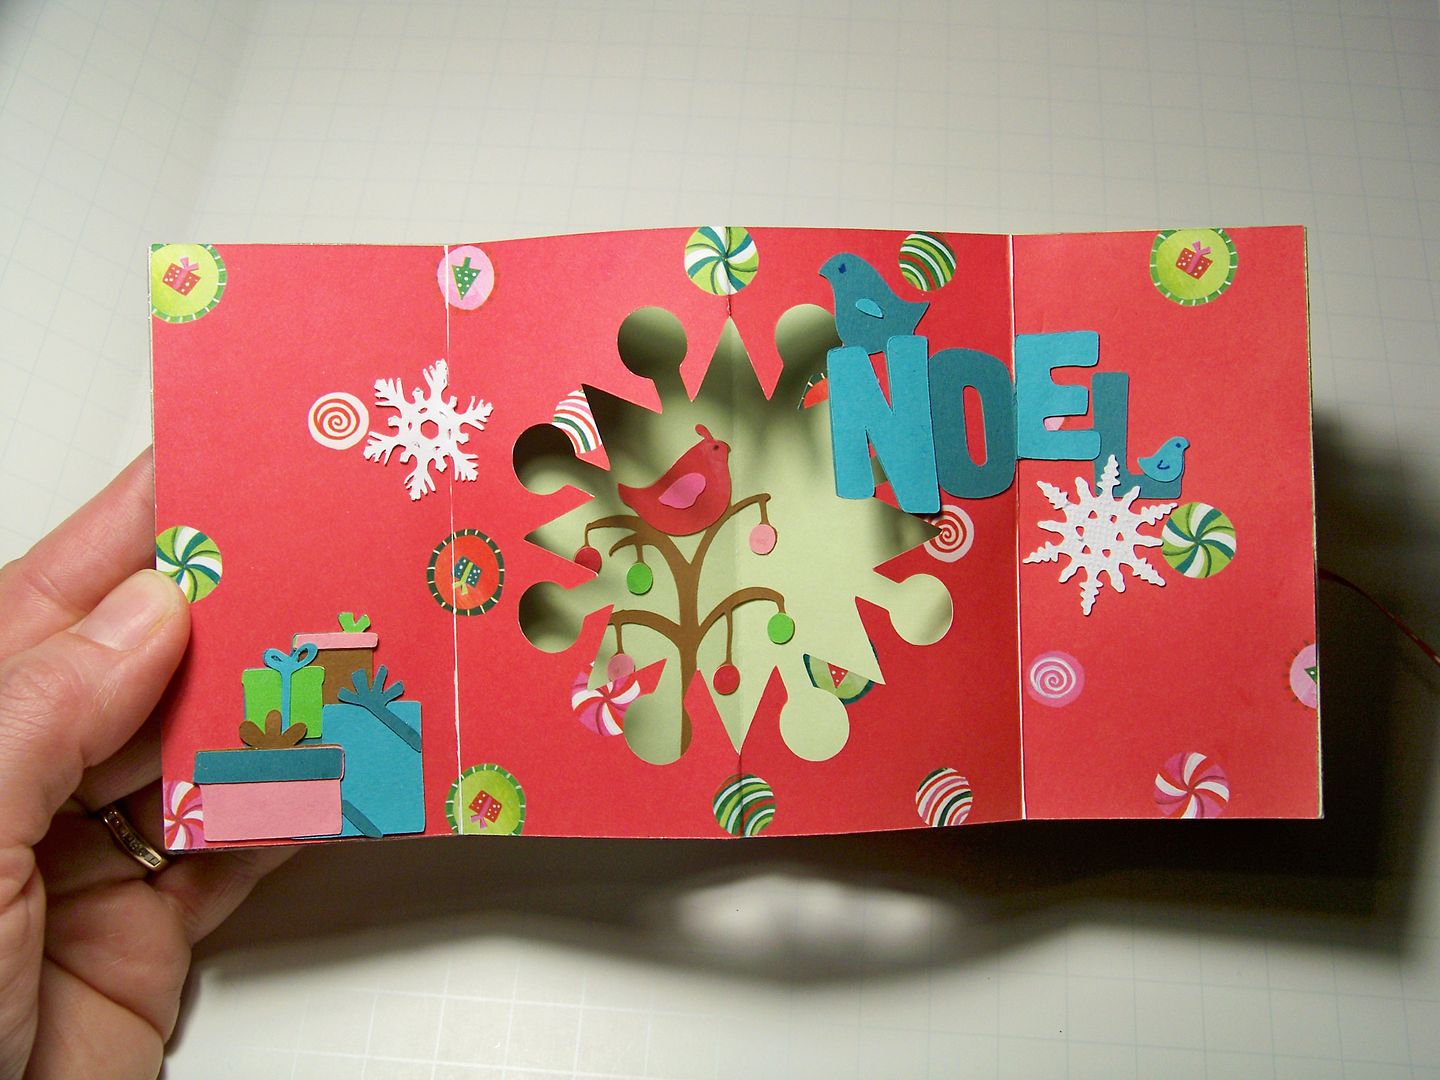
For the red page, the tree is from Winter Frolic (page 67), cut at 2-3/4". The gifts are from Winter Frolic (page 66), cut at 1-1/2". The text was cut from Winter Frolic (page 68) at 1-3/4". The snowflakes were cut from December 25th at 1". The tree was scored off-center to keep the bulk out of the fold.
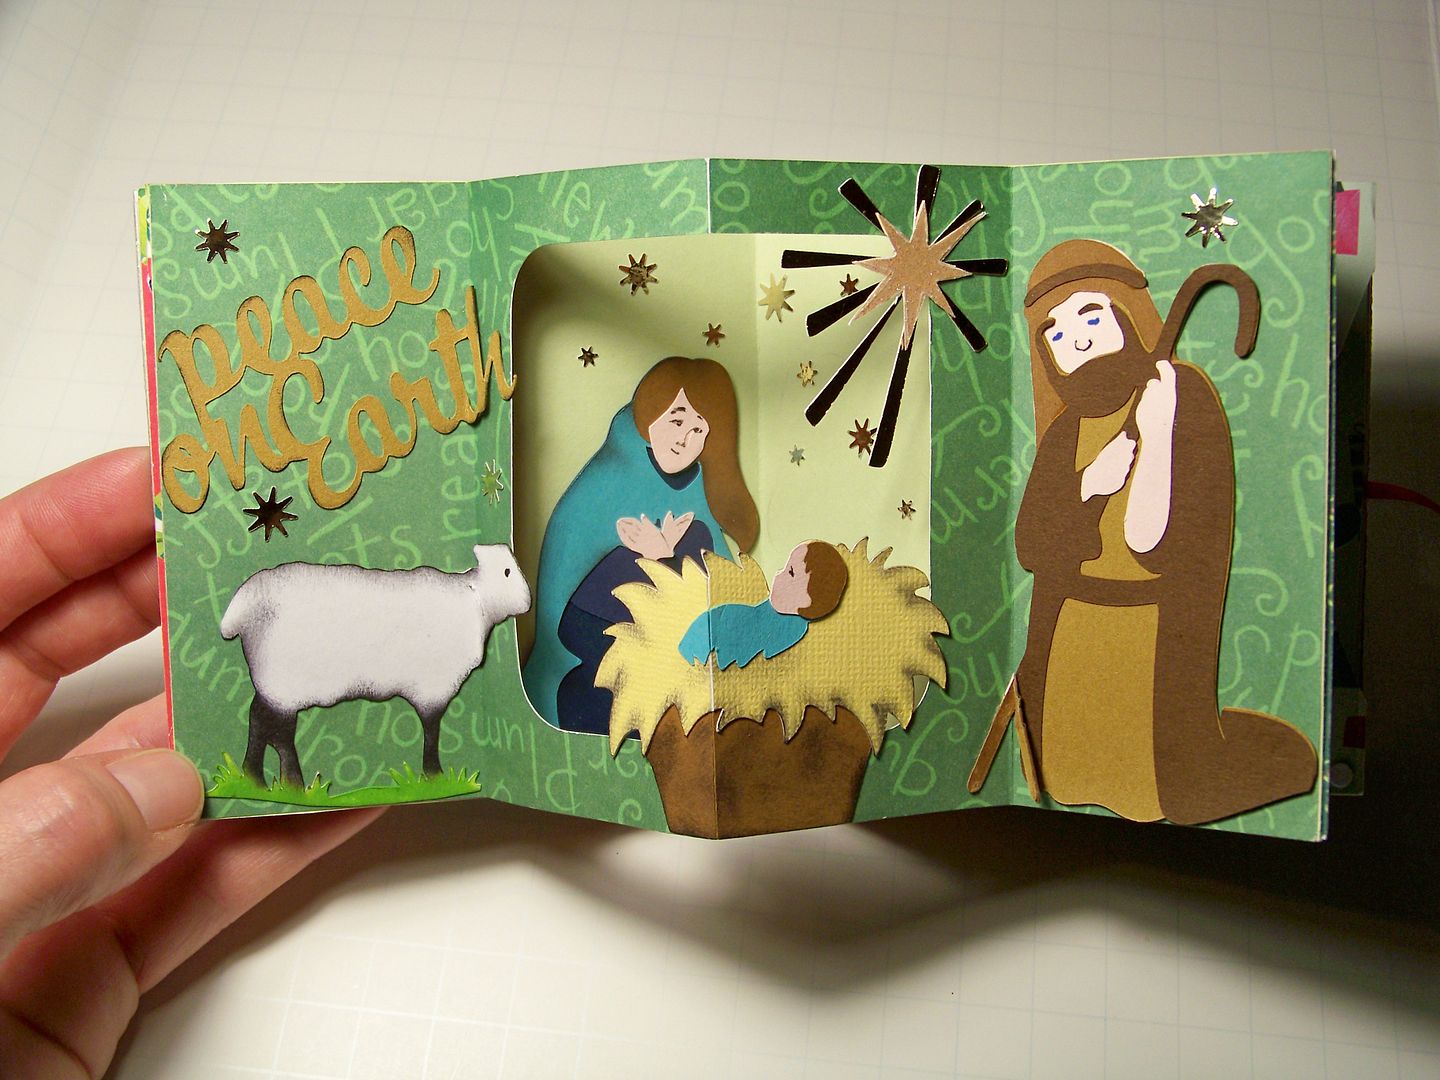
For the Nativity page, the manger with Jesus was cut from A Quilted Christmas (page 49) at 1-3/4". Mary was cut from A Quilted Christmas (page 50) at 2-1/2". The star was cut from Winter Frolic (page 71) at 2-3/4". Joseph was cut from A Quilted Christmas (page 51) at 3-1/2". The text was cut from Scandinavian Christmas Cards at 1-1/2". I manually cut away the star on the text. The lamb was cut from Nursery Rhymes (page 45) at 4". (I cut the the figure away from the lamb manually and inked). Note that both the manger and lamb cuts are scored to match what they were adhered to.
Crafty Details for Christmas Pop-Up Accordian Book:
After I figured it out, I created my Christmas one! You know I don't believe in re-inventing the wheel, so these are my cut sizes for the final book:
My base was pale green. I used a 12x24 paper pad so that I wouldn't have any extra seams. Just like the tutorial, it was cut to 4" x 24". My pages were all different prints at 4" x 8". My cut outs were the rounded square on George (page 111) cut at 3" and the snowflake on Accent Essentials (page 44) cut at 3".
I adhered the base of the cover to chipboard with Mod Podge (glossy). I added the cuts and more layers of Mod Podge. I added glitter to the top coating of Mod Podge while it was still wet. For the back cover, I applied the glitter differently so see if there was a difference in the finished project. (The answer: no difference visually but the back cover, is smoother).
For the back cover, the penguin was cut from Winter Frolic (page 57) at 3". The Phrase was cut from the same cartridge and page at 1".
I cut the snow (circles) by using an edge punch. I applied the Mod Podge, then the base paper. Then I applied more Mod Podge and applied the snow circles. More Mod Podge, then glitter. More Mod Podge (be sure to scoop out Mod Podge from the jar when you get to this part so your brush won't infect the whole jar with glitter!), then the cuts. I topped it with a couple of layers of Mod Podge. (I allowed the Mod Podge to dry completely between layers of course-- in case you were wondering.) By using this technique, I had nice, sturdy covers with materials that I had on hand.
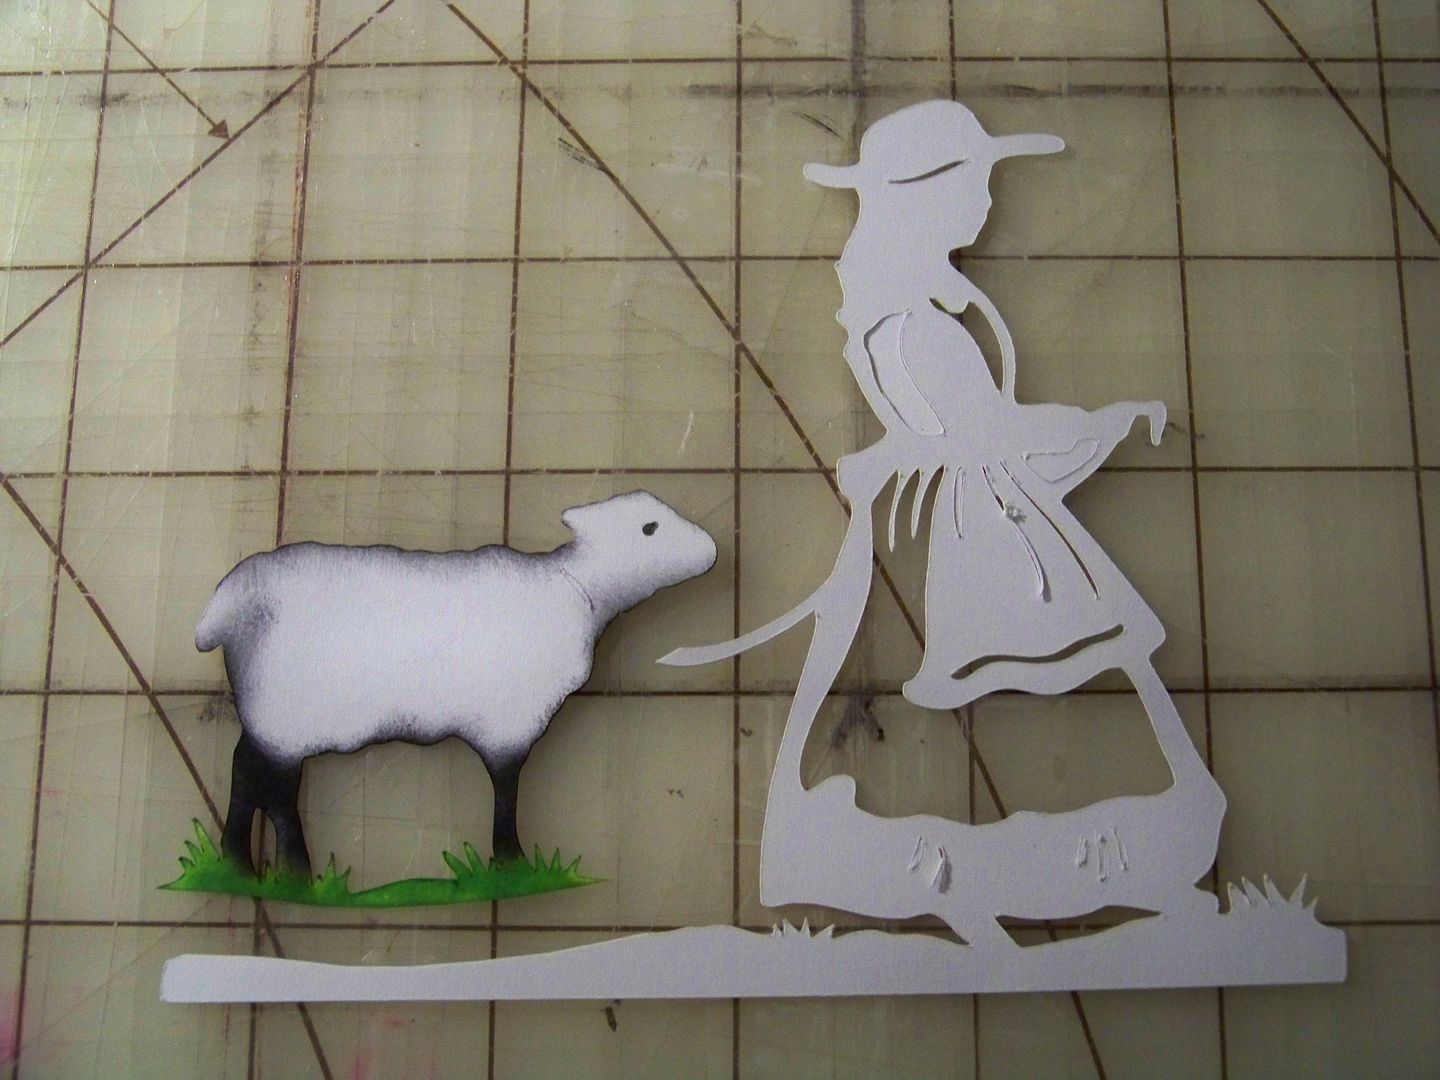 |
| There are tons of sheep and lambs on Cricut carts, but I didn't like any of them as much as this one! Super easy to ink up for color and detail without any bulk! I simply cut Mary's Little Lamb away from the silhouette. |
For the snowman scene, the tree is from Scandinavian Christmas, cut at 2". The snow is from the same edge punch used on the front cover. The snowmen are from Winter Frolic; page 28 at 3" and page 32 at 2-1/2". The tree was scored and applied off-center to reduce the bulk at the fold
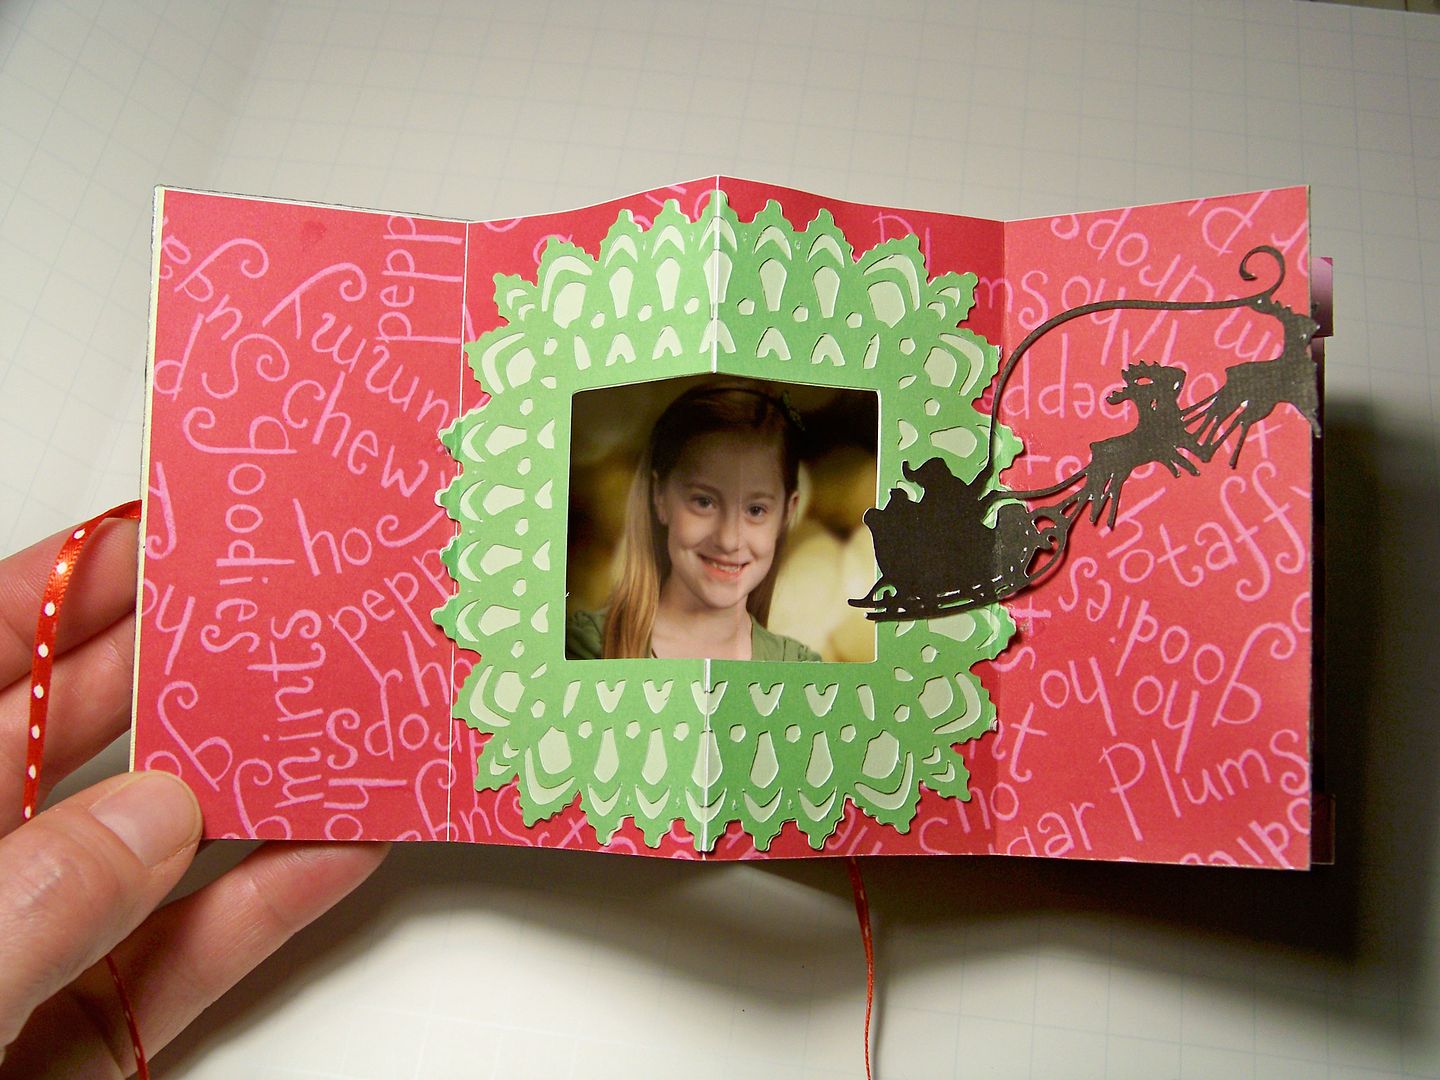
For the photo page, I cut the frame from Fancy Frames (#6) at 2-1/2" and turned it on its side. I will give you this bit I learned: next time I will cut a frame that either does not overlap the side score lines or one that overlaps them greatly! Small, thick pieces do not like to stay attached to the pages when they get folded and unfolded. The photo was scored just like any other embellishment that covers a score line! (Since the photo is inside the window, it is adhered to a valley fold so that means I scored it on the BACK side of the photo, avoiding a visible cut on the front! The sleigh silhouette was cut from Christmas (Solutions cartridge) at 2". I loved that this element moved from page to page-- more of that next time!
For the Santa page, I cut Mrs. Claus from A Quilted Christmas (page 33) at 3-3/4". I used an edge punch for the hem of her apron. The chimney with Santa was cut from A Quilted Christmas (page 29) at 2-1/2". These images had the most layers. I did learn for next time to cut away unneeded parts of layers and to NOT use Scotch Quick Dry glue for these, using a more flexible glue (like Scotch Scrapbookers Glue).
Thanks so much for joining in on the hop today! Please be sure to check out all of the participants' wonderful projects. I've posted the links below for everyone in this hop in case you've missed anyone.
Kreimers http://fantabulouslypink.blogspot.com/
Tiffysmom http://angiespaperpassion.blogspot.com/
BetsyBoo http://www.betsymcreates.blogspot.com/
October Beauty http://www.macybella.blogspot.com/
Marcjo http://stampcutcreate.blogspot.com/
Ken’s Kreations www.kreativeken.blogspot.com
DarcyBeeler http://dlmbscrapping-time2create.blogspot.com/
Scrapalette http://scrapalette.blogspot.com/
Momtotwocuties http://www.inlovewithpaper.blogspot.com/
Greengirl www.michelegreen.com
Scrappin-Nanapuddin http://scrappin-nanapuddin.blogspot.com
CraftyScentiments http://craftyscentiments.blogspot.com/
CricutAddicted http://scrappingformorefun.blogspot.com/
Sis O’Snap http://papercraftscissors.com/
TerriSki http://scrappinwiththebug.blogspot.com/
Phantom Rink Rat http://addictedtothecricut.blogspot.com
TheCraftyTouch www.thecraftytouch.blogspot.com
HappyScrapper64 http://happyscrapper64.blogspot.com/
CraftySanSan http://1craftysansan.blogspot.com
MamaC http://cccscraproom.blogspot.com/
NadiaH-McConnell http://www.withglitteringeyes.blogspot.com/ (That's me!!)


%20on%20post.%20%23WithGlitteringEyes%0A "Pin It")