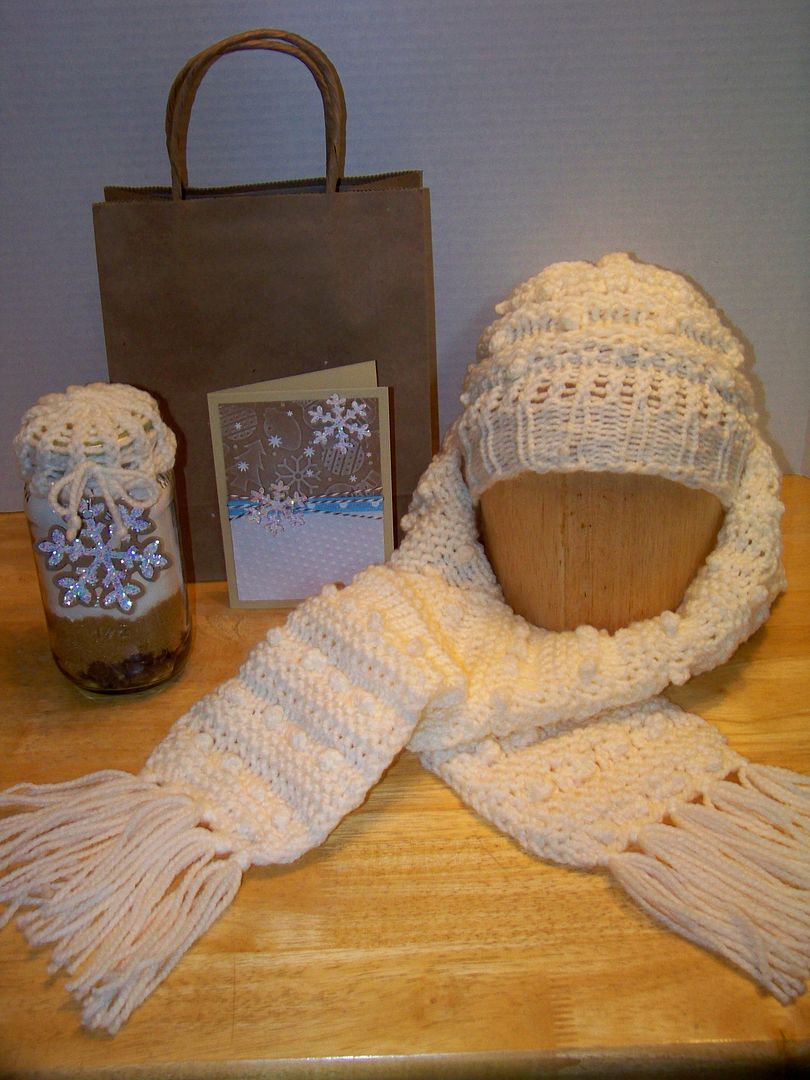
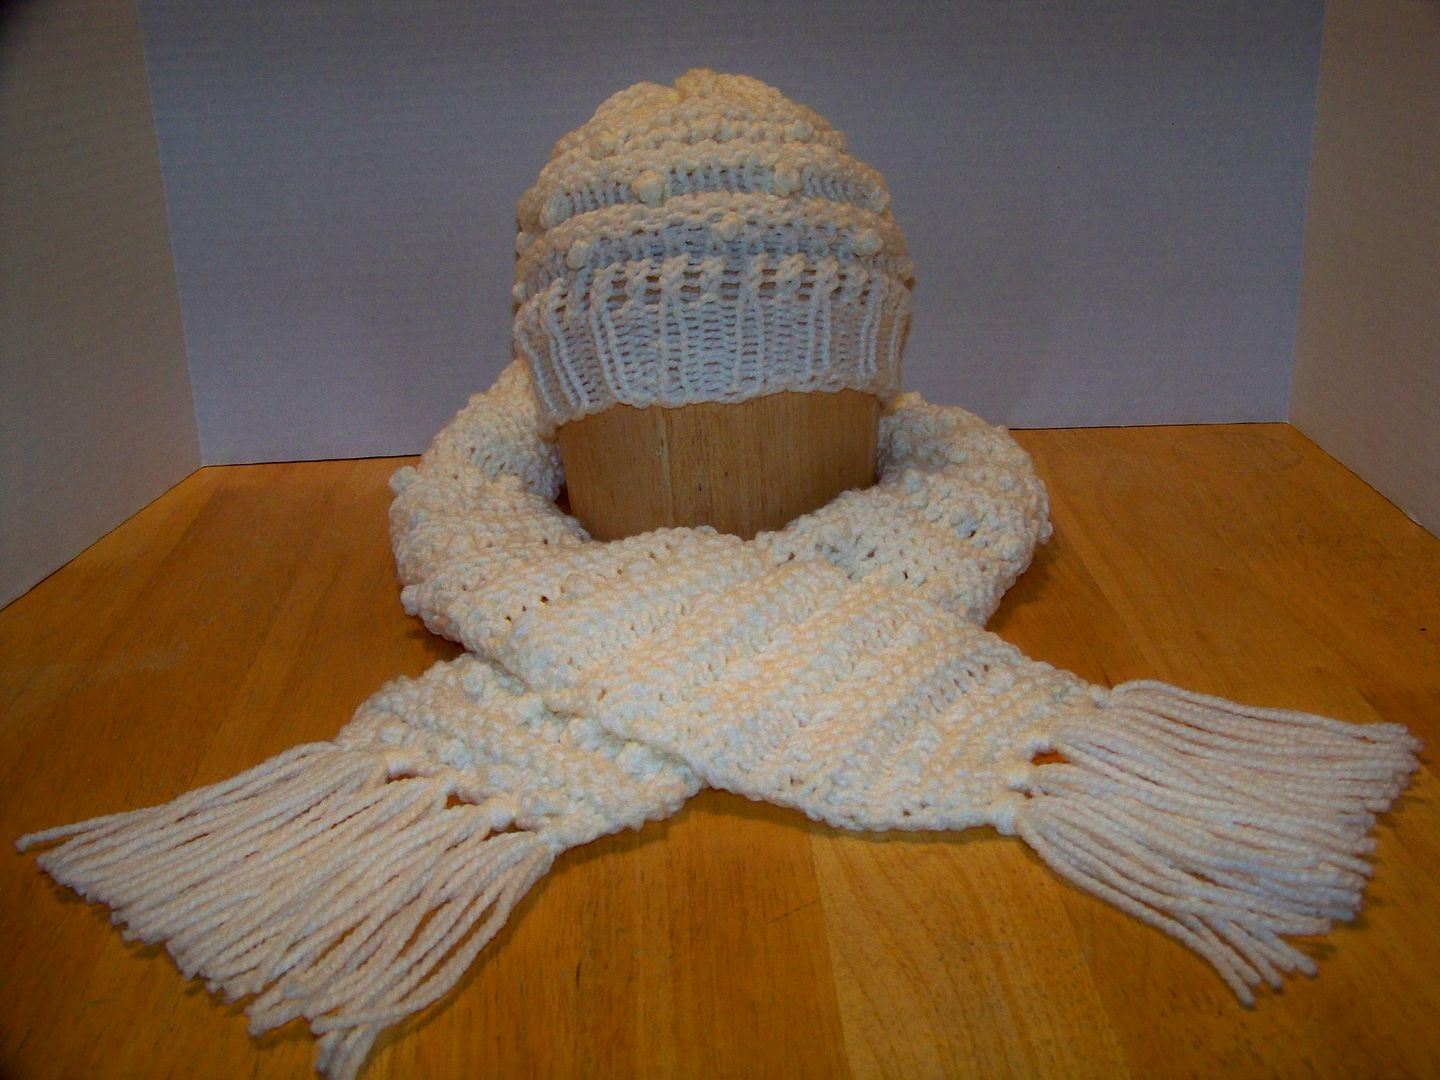
I have spent this past week behind my sewing machine, Cricut, and knitting looms making gifts and helping my daughter on a school project! Today, I wanted to share a Christmas gift project: a set that includes a scarf, a hat, a knitted jar lid with tag, and a card!
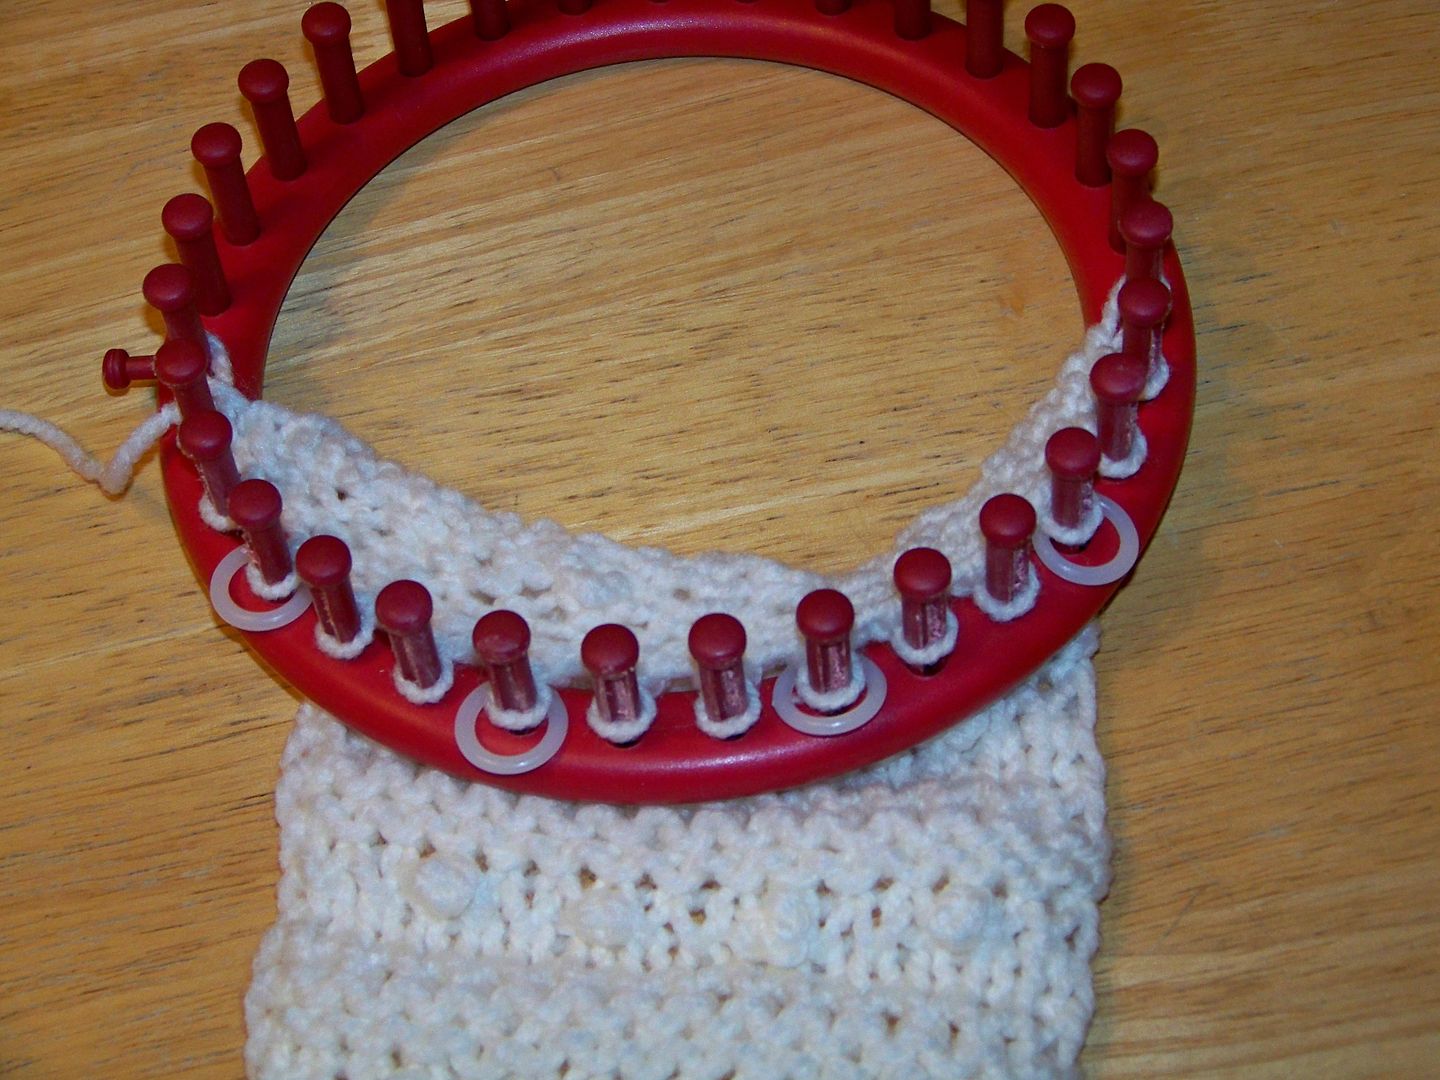
My new loom knitting obsession has had me trying to learn some new stitches, including my new favorite, the bobble stitch. The pattern for the hat and scarf here is one I created so that I could practice the new stitches I have learned. I created the scarf on the red Knifty Knitter loom using 1-1/2 skeins of a #5 yarn that I have had in my craft/sewing room for a while called Red Heart Chunky. I casted on 16 pegs using an e-wrap cast on method after placing markers (little rings) on pegs 4, 7, 10, and 13. I learned that I knit like I read, from left to right so I consider peg one to be the one to the right of the side peg, with peg #2 to the right of that, and so on. Because I am left-handed, this direction comes naturally, but I have found that many of the books I now have go in the other direction.
I knitted rows one through three. To see a video of a knit stitch, click here.
I e-wrapped row four. To see a video of an e-wrap stitch (also called a 'single stitch'), click here.
On row five, I used a knit stitch for all the pegs without a maker. For the ones with a marker, I did a bobble stitch wrapping 5 times. To see a video of a bobble stitch, click here.
Row 6: Knit stitch.
Row 7: Purl stitch. To see a video of a purl stitch, click here.
Row 8: Knit stitch.
Row 9: Purl stitch.
Row 10: e-wrap
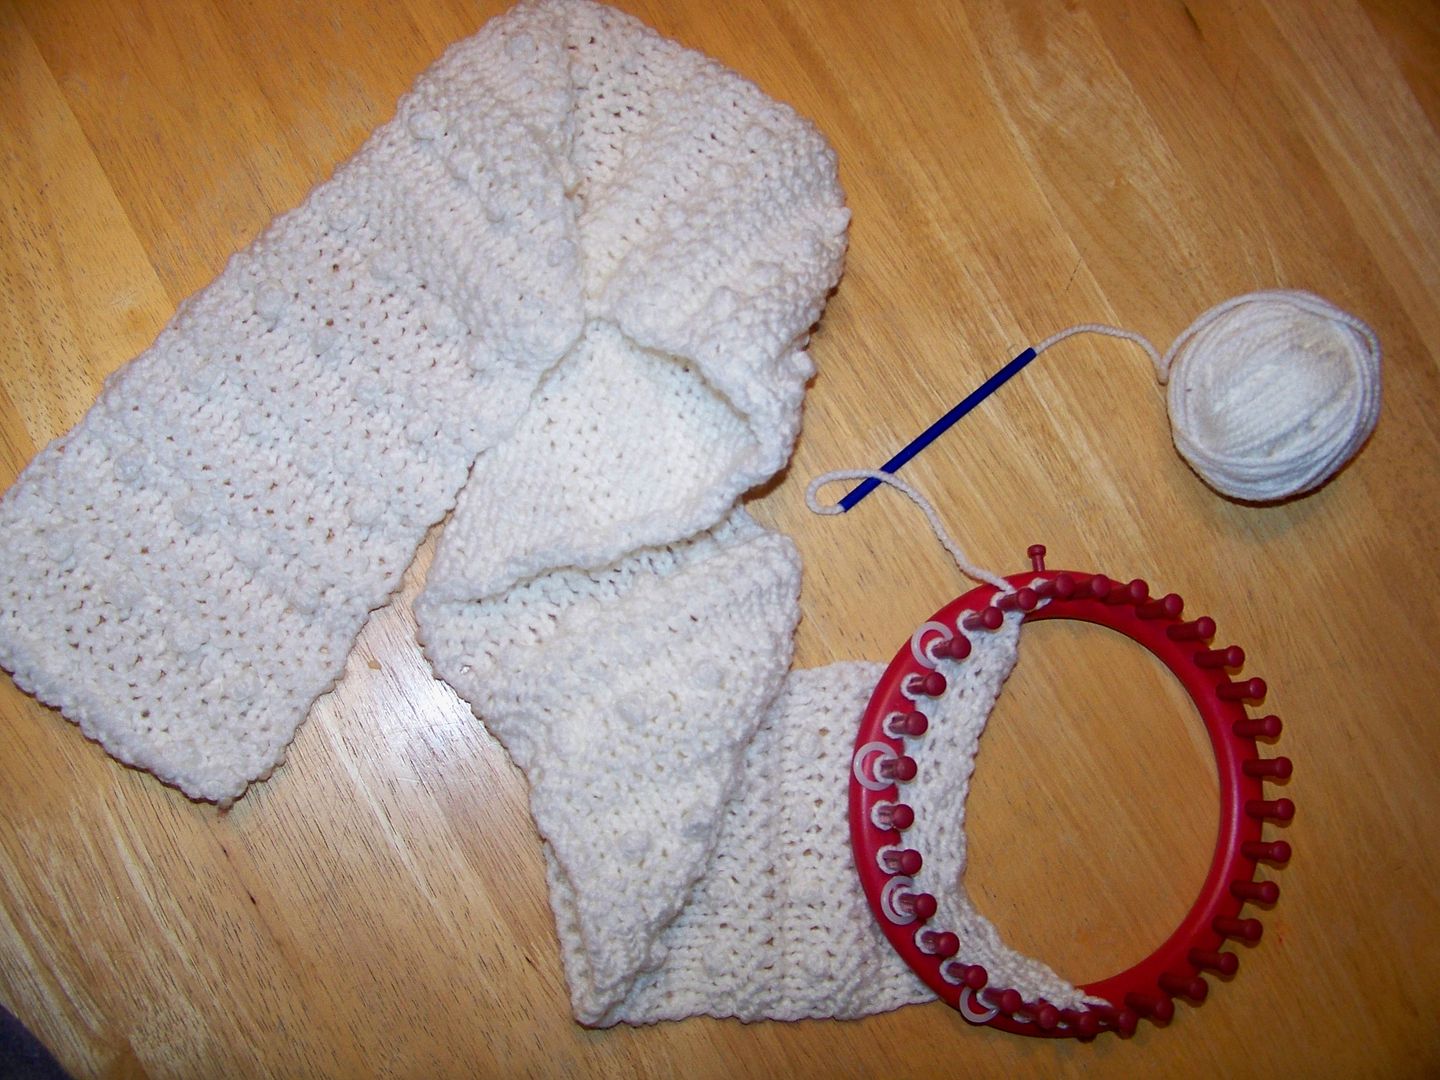
I loom knitted the above ten rows 26 times, creating a scarf that is 48" before the fringe was added. I used a flat panel bind off. For the fringe, I cut 5 pieces of yarn 11" for each fringe tassel, folding the bundle in half and completing a lanyard loop with the aid of a crochet hook. (There are five of these "fringe tassels" on each end.)
At this point, I wanted to quickly mention a couple of useful things that I figured out...
I take my knitting everywhere with me and find that I can often "lose my place" so I have notes in my notebook that remind me which direction I am going, for example "k ->, k <-, k ->, e <-". I don't know if anyone else has this problem, but some stitches are hard for me to just look at to know what they are, and if I had a little guide that reminds me which direction a particular row is going, it gives me just the clue I need to backtrack to figure out where I am. Of course, this only works on flat panel loom knitting!
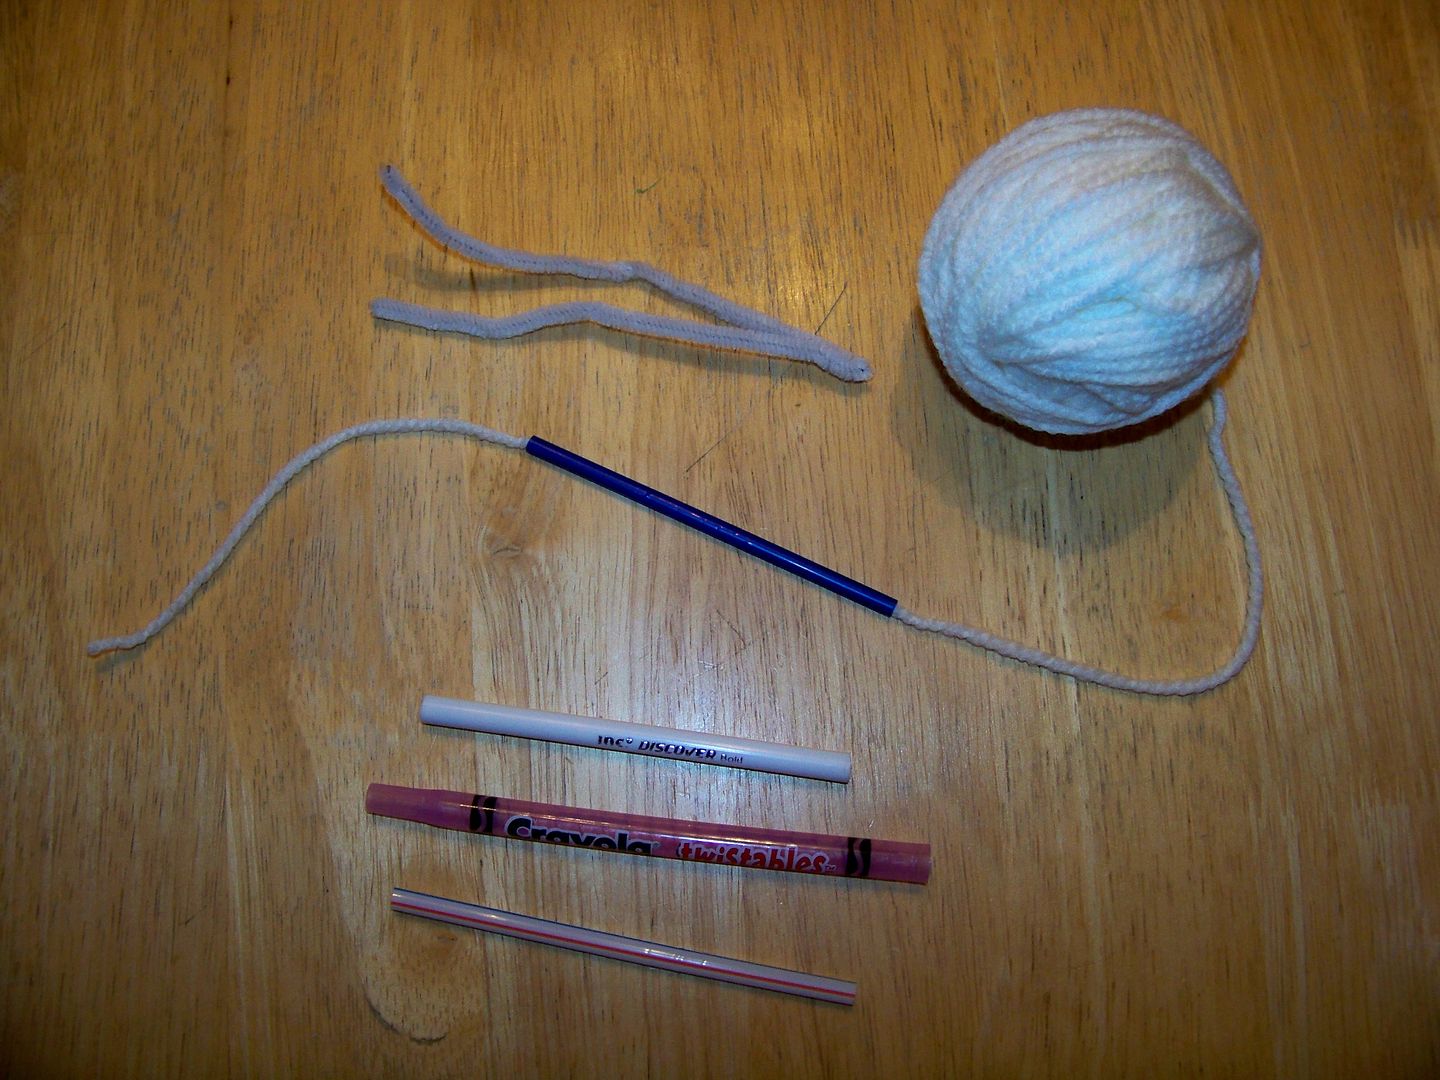
I also have started using a tool to e-wrap and loop around the pegs, which you can see on the photo above (the blue straw). I mentioned this on my last post, but wanted to share it again because it makes a HUGE time difference when e-wrapping and doing the stockinette stitches! To see a video on how to make what I call a stylus (and what the guy on the video calls a 'styler'), click here. (You will want to fast forward 1 minute 14 seconds to get to the part on how he makes his styler). I have used a cheap Bic pen casing, straws, and the outer plastic from a Crayola Twistable crayon as different looms have different amounts of space between the pegs. (When I do a knit, purl, bobble, etc., I just scoot the stylus down out of the way and use my hands to work with the yarn; so far, I only use the tool for e-wrap and double knit stockinette stitches.) I use a pipe cleaner just as in the video to thread the yarn through the straw.
OK, back to the projects! I wanted to make a hat to match the scarf.

To do the hat, I used round green Knifty Knitter loom (36 pegs) - even number of pegs required for this pattern with my directions. I did an e-wrap cast on going counter clockwise.
For the first row, I did a knit stitch, then a purl, repeating this combo to the end of the row and continuing on the following rows until I had 1-1/2" of rows completed on my loom. This creates the band around the head and doesn't roll.
Next, I did three rows of e-wraps.
Next, I used the 10-row combination listed above (from my scarf directions). I did this three times. For the bobble, I bobbled every 4th peg for the first bobble row. On the next repeat, when it was time to bobble, I bobbled every 2nd peg. Then back to the 4th peg on the third series. This created an alternating pattern of bobbles for the hat, unlike the scarf.
Last, I did four rows of e-wraps. My hat was 10" on the loom. I did a gathered bind off.
I thought it would be fun to play off the idea of knitting and do a knitted jar lid for a layered cookie mix that was part of this gift set. For tons of recipes for layered "in a jar" types of mixes, click here.
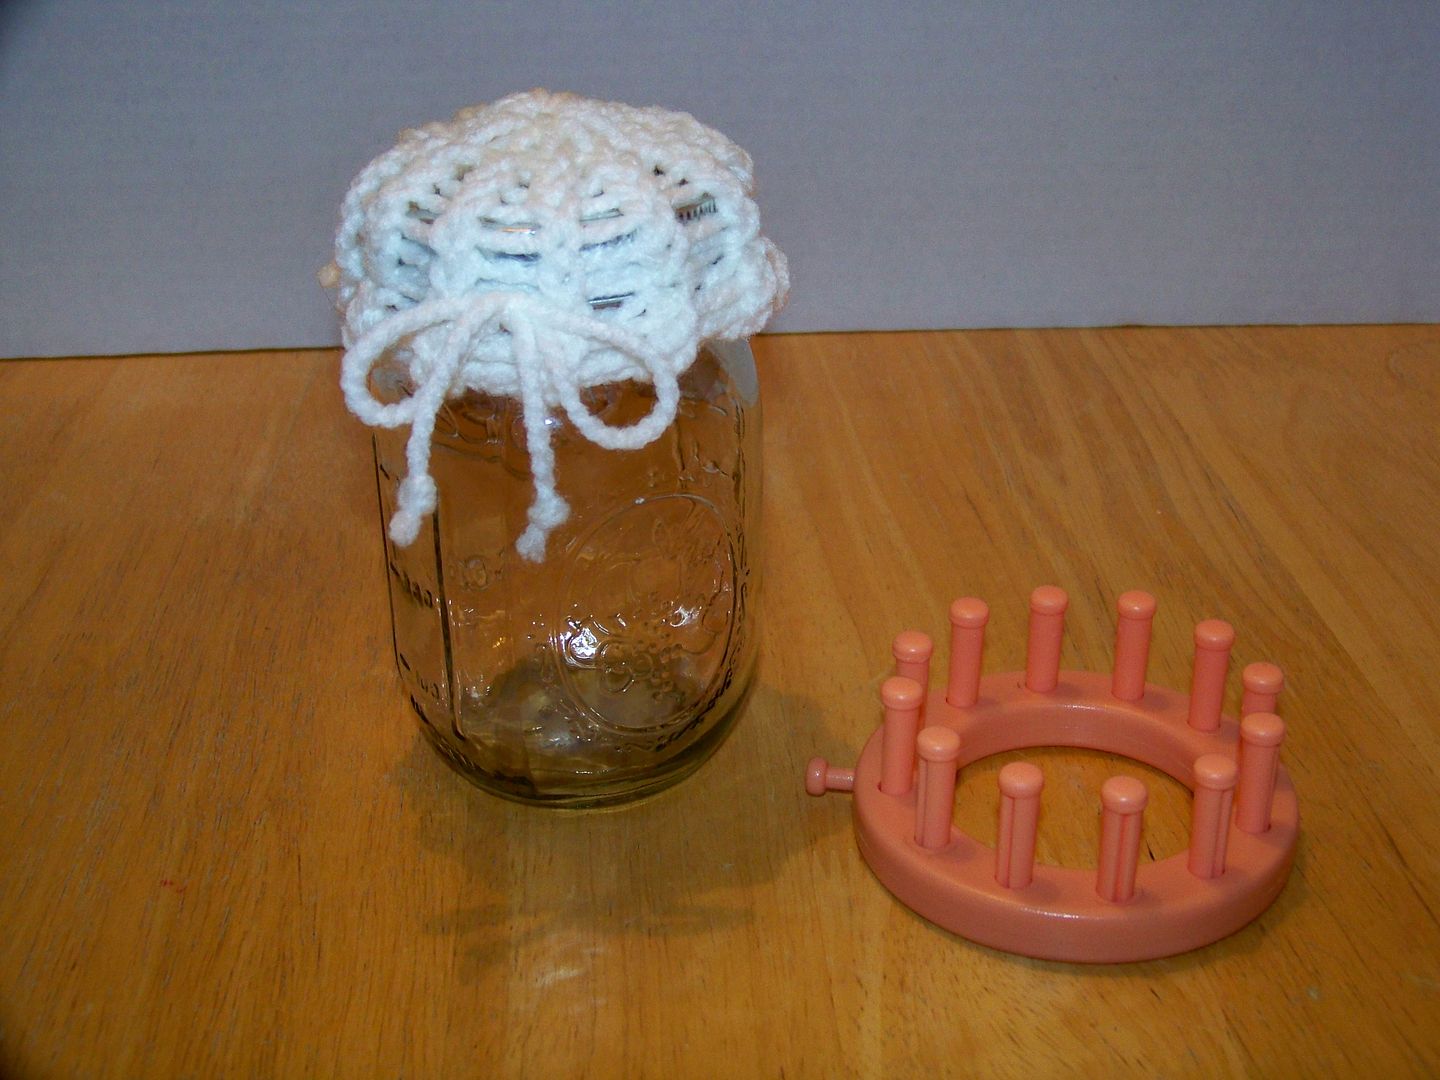
For this, I used the Knifty Knitter Flower Loom. I e-wrapped 2" then pulled the bottom loops up to make a hem (just like for hats-- in fact, this is a little hat). I continued e-wrapping for a total of 2". I did a gathered bind-off to close up the top. I used a crochet hook to help feed a piece of yarn around and tied it into a bow. The e-wrap stretches and is very forgiving so it worked well for this!

I created a tag for the jar using the Paper Trimmings cartridge (page 62). On my cartridge, for some reason the 'snowflke'
I created a card using the same Paper Trimmings snowflake (without shadow this time) at 1-3/4". The papers were embossed on the Cuttlebug. For the embossed kraft paper, I rubbed a white Studio G ink pad over it to emphasize the shapes. I embellished the card with tiny stars that I punched, ribbon, and twine.
Thank you for using your time to check out this post-- I know this is a super busy time of year and I appreciate your visit! This week, I am finishing up a costume for my daughter's school event that I have made with my sewing machine and my Cricut-- hope to share that soon. I am also sewing doll clothes like a mad elf and loom knitting wherever I have to wait. I hope your seasonal crafting is keeping you happy as you complete gifts, cards, and decor to make the holidays special at your house!
11 comments:
You are definitely rocking this new hobby of yours ;) - way to go! Thanks for sharing the instructions.
you are a-friggin-mazing. this is gorgeous. i love that chunky bobble knit stitch. thanks for the video links. i have a book (or ten), but i bet the video method is better. have you seen Jeannie Phillips blog? http://www.aplaceformycards.blogspot.com/ She has some amazing loom stuff. Beautiful work, Nadia.
Diane- Yes! I love Jeannie's projects! I love her baby cocoons and would LOVE to try those... just need to find someone with a baby first! Last year I became aquainted with her loom knitting projects and was AMAZED that the stuff she does is on a loom! I once told her she needed to teach loom knitting-- I really wanted to learn. I have had my looms since before that. I think was messed me up before tension --I didn't realize that the tension will change once some length gets knitted onto the loom. I also didn't realize how fast it was to do. I just kind of gave up, thinking it was going to be like traditional knitting. I didn't get them out again until Thanksgiving Week, but I have just loved Jeannie's projects all this time!
That's a great gift set! Thanks so much for sharing your directions and the links. The main reason I never use my looms is that I could only do the knit stitch and everything just looked the same. Now you have me wanting to learn more stitches. Oh, please check out my blog if you have a moment. I actually used my Yudu!
Maria
I see it that a trip to "knitting loom" store is on my horizon.
This is an exceptionally gorgeous set and thanks so much for all of the fabulous tips. As a fellow leftie, I appreciate that your "direction" will work for me too!!!
WOWZA - You are the Queen of Follow Through and Creativity!!!
Can't wait to see the sewing and crafting reveal for Piper's school event.
What a FANTASTIC gift set-- I am sure someone will be ecstatic to receive these!!!
Wow... You have been a busy little bee... Love all of your projects.. I can knit but have never used a knitting loom.. BEAUTIFUL projects..
That's what I thought it's a good thing they found the problem, hopefully they can fit it...sometimes I can hardly stand the pain-- but then I just put on my big girl pants and say I can handle this for just a while longer before I can sit down. Thank you for stopping by Nadia...
Ah...Nadia! I stand in amazement at your talent! More fabulous projects! Thank you for sharing your beautiful creations!
Carolyn
http://cccscraproom.blogspot.com
This set is just beautiful!!!....I am beyond excited that you love your looms! I love mine!
Hugs
Jeannie
Oh My Gosh, this set is amazing. I have had my looms for several years and have never tried anything this complicated. Thanks for inspiring me to try. Off I go to find out more info. Thanks Again. Your Circle Friend, Beth.
This is so cute! Maybe one day I will give this a shot too! But it looks so tedious and overwhelming!! It's quite intimidating.. the thought of.. \knitting..
Post a Comment